
Cracking Gel Coat: Causes, Warning Signs & Repair Options
Cracking gel coat can be a minor finish defect, evidence of movement beneath the surface, or the visible edge of damage extending into the fiberglass laminate.…
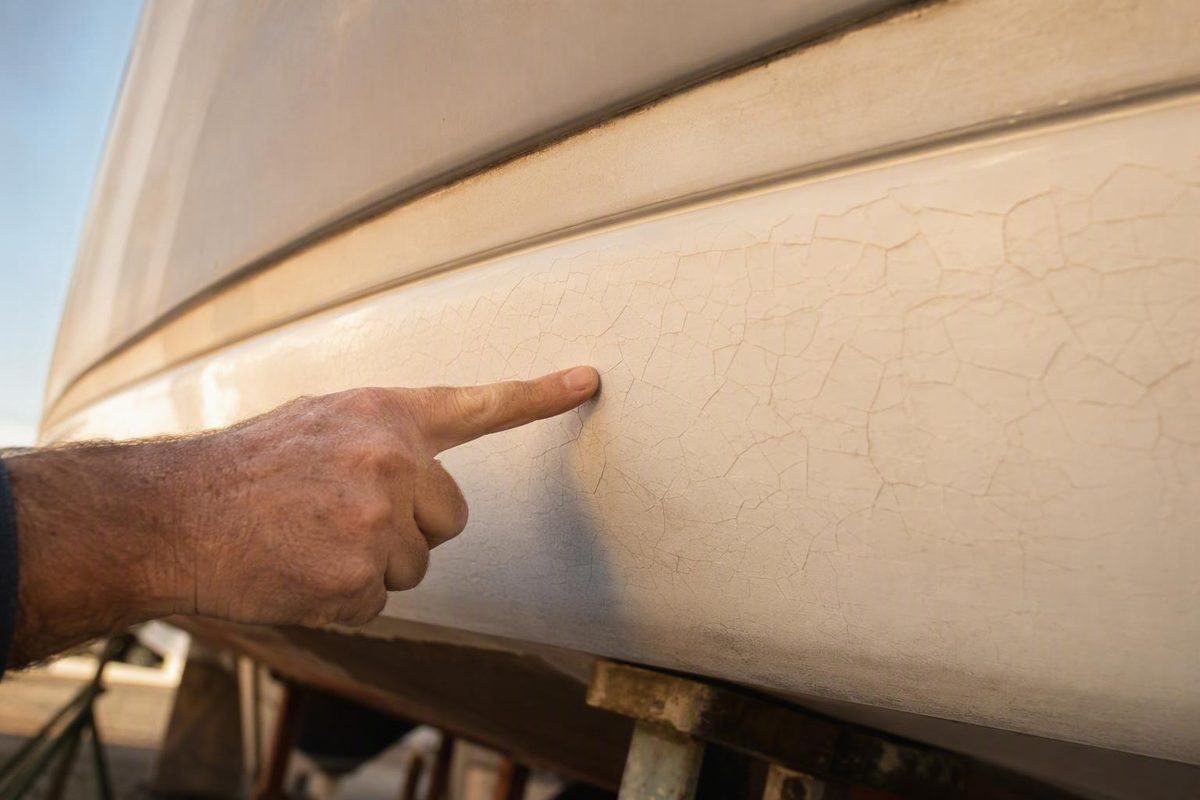
Cracking gel coat can be a minor finish defect, evidence of movement beneath the surface, or the visible edge of damage extending into the fiberglass laminate. Before the area is properly inspected, all three can look similar.
Do not assume a small crack is structural—but do not call it harmless based only on its shape, width, or length. A useful assessment considers the pattern, location, movement, moisture exposure, surrounding structure, and history of impact or loading.
That leads to three practical responses:
- Lower concern and monitor: Document a stable, isolated defect in a lightly loaded area and watch for change.
- Investigate before repair: Establish the depth and likely cause before filling or refinishing.
- Stop work or obtain professional evaluation: Escalate when there are signs of laminate, core, moisture, impact, or load-path involvement.
The repair must match the depth of the damage. Surface finishing can restore gel coat, but it cannot replace fractured fiberglass reinforcement.
What cracking gel coat means—and what it does not prove
Gel coat is the pigmented exterior finish applied over a molded fiberglass component. It supplies color, gloss, surface protection, and a fair outer skin. It is not the primary structure of a fiberglass boat.
Behind it may be:
- Fiberglass reinforcement saturated with resin
- A solid laminate or cored panel
- Stringers and bulkheads
- Structural tabbing
- Hull-to-deck connections
- Backing plates and washers
- Internal supports beneath decks, seats, towers, consoles, and fittings
These elements carry and distribute loads. A crack confined to the gel coat is therefore a surface defect. Fractured or separated laminate requires structural repair. Some damage involves both layers: the laminate must be rebuilt before the cosmetic finish is restored.
Not every hairline, spider crack, or area of crazing proves that the fiberglass is broken. Conversely, a line that is thin, short, or difficult to feel does not prove that the laminate is sound. Photographs, measurements, and crack patterns are useful screening information, but they cannot conclusively establish depth.
Gel coat is susceptible to cracking because it is comparatively brittle. It shrinks during cure and tolerates relatively little elongation; excessive thickness can make it more vulnerable when the substrate moves or stress becomes concentrated. A manufacturer-affiliated technical article reports cure shrinkage of 4% to 7%, elongation of less than 1%, and approximately 20 mils as a typical molded thickness, although those figures should not be treated as universal specifications for every product (Epoxyworks’ technical discussion of gel-coat stress cracking).
This mismatch can produce a crack limited to the finish. It can also allow the finish to reveal movement in the laminate, core, support, or hardware assembly. Similar-looking lines can therefore require very different repairs.
The central diagnostic question is not simply, “Is this a spider crack?” It is:
What happened here, does the substrate appear to be moving, and does the damage stop at the gel coat?
Until location, movement, surrounding condition, and history have been considered, “cosmetic” should remain a working possibility rather than a final diagnosis.
Read the pattern, location, and history together
Crack shape provides clues, not verdicts. Interpret the pattern together with its location and the events that preceded it.
| Pattern or finding | What it may suggest | Sensible initial action |
|---|---|---|
| Isolated, stable hairline in a lightly loaded area | Local surface defect, thick gel coat, ageing, or limited movement | Clean, photograph, inspect the reverse side if accessible, and monitor |
| Random network of fine, short cracks | Crazing associated with ageing, thermal cycling, UV or chemical exposure, or repeated movement | Map the extent and check for moisture exposure or abnormal panel movement |
| Radial or spider-shaped cracks | Impact, a dropped object, movement around a fitting, or concentrated stress | Inspect the center, nearby hardware, and the opposite side |
| Several similarly oriented cracks | Repeated flex, excessive loading, or stress over a bulkhead, support edge, or hard point | Investigate the load path before refinishing |
| Crack originating at a screw hole | Overtightening, thread pressure, fitting movement, poor backing, or failed sealing | Inspect the fastener, hole, bedding, backing, laminate, and surrounding core |
| Repaired crack returning in the same place | Unresolved movement, moisture, loading, support failure, or deeper damage | Stop repeating the surface repair and investigate the cause |
| Crack that changes width during ordinary loading | Movement beneath the finish and possible laminate or support involvement | Avoid deliberate flex testing and escalate the inspection |
Hairlines, crazing, and spider cracks
An isolated hairline that remains unchanged in a lightly loaded topside panel may be surface-limited. It still deserves cleaning, documentation, and inspection. Dirt can exaggerate a shallow defect, while oxidation or an old coating can obscure its edges.
Crazing describes a network of fine, short, irregular cracks. Appearance alone cannot reliably distinguish among them.
Spider or radial cracking can point toward a central event or stress concentration. A dropped object may create a star-shaped pattern. Similar cracking can appear around a fastener, tower foot, cleat, seat base, windshield, hatch, or other fitting. The center of the pattern and the structure around it may be more informative than the length of its branches.
Clusters running in similar directions deserve particular attention. They may reflect repeated panel bending or stress concentrated over a bulkhead edge or stiff support. A surface repair remains vulnerable if that movement continues.
Location can outweigh length
A long but stable surface line in an unloaded cosmetic panel may be less concerning than several short cracks around a highly loaded fitting. Higher-concern locations include:
- Cleats, winches, towers, rails, and lifting points
- Windshields, consoles, and seat mounts
- Hatches and sharp corners
- Screw holes and other penetrations
- Hull, deck, and panel transitions
- Bulkhead edges and internal supports
- Stiff-to-flexible transitions
- Below-waterline hull areas
- Cored panels where water could enter through a crack or fastener hole
A fitting transfers load through its fasteners, bedding, backing hardware, and local laminate. Cracking nearby may reflect only a brittle finish, but it can also be the first visible sign of movement, leakage, or concentrated loading.
Common causes to consider
| Possible cause | Typical context | What to investigate |
|---|---|---|
| Impact | Radial cracks, chips, bruising, or damage after a collision or dropped object | Center of impact, reverse side, laminate continuity, and softness |
| Repeated flexing | Aligned cracks or recurrence in one area | Panel support, core, bulkheads, stringers, and ordinary operating loads |
| Vibration | Cracks around machinery, fittings, consoles, or unsupported panels | Mounting, fasteners, supports, and repeated movement |
| Thermal cycling | Fine, widespread crazing | Exposure history, finish condition, and whether flex also contributes |
| Ageing and exposure | Oxidized or broadly deteriorated gel coat | Extent of finish deterioration and moisture exposure |
| Excessively thick gel coat | Local cracking despite apparently intact laminate | Finish depth and evidence of substrate movement |
| Overtightened fasteners | Cracks radiating from screw holes | Hole preparation, thread pressure, bedding, and backing |
| Poor support | Cracking over flexible decks or hull panels | Core condition, tabbing, trailer support, and reinforcement |
| Concentrated hardware loads | Cracks around cleats, towers, winches, and seat bases | Fastener holes, backing plates, local laminate, and load distribution |
Published examples show why pattern alone is inconclusive. In one winch-mount repair, apparently narrow cracks became deeper and wider as they were opened and were found to involve damaged laminate. In a separate owner-forum account, gel coat removed around a tower base reportedly revealed intact fiberglass. Neither anecdote establishes a general rule; together they show that similar surface patterns can have different depths (discussion containing the contrasting owner experiences).
History can help resolve that uncertainty. Ask whether the crack appeared after a collision, grounding, dropped object, unusually heavy loading, trailering problem, or hardware installation. Determine whether it was previously filled. Recurrence, impact history, and proximity to hardware can matter more than crack length alone.
A non-invasive inspection checklist before you grind anything
Start with observation rather than a grinder. The following steps are limited screening measures. They can identify warning signs, but they cannot certify a laminate, core, or fitting assembly as sound.
1. Clean enough to see the defect
Remove dirt, salt, wax residue, oxidation residue, and removable staining using methods compatible with the existing finish. The objective is to distinguish a crack from:
- A scratch
- A dirt line
- Oxidation
- A paint or coating defect
- A seam or mold mark
- Residue trapped in a superficial groove
Do not begin with aggressive solvents or abrasives when the finish or earlier repair materials are unknown.
2. Record the condition
Photograph the entire panel to preserve context, then take close photographs with a ruler or other scale. Record:
- Date
- Exact location
- Pattern and orientation
- Apparent length
- Whether it catches a fingernail
- Nearby fittings or structural transitions
- Known impact, loading, or trailering events
- Whether the area is normally above or below water
- Any previous repair
Use repeatable lighting and camera angles. A removable marker placed beside—not over—the crack can help identify its endpoints in later photographs.
3. Treat the fingernail check only as a clue
A defect that catches a fingernail is more substantial at the surface than one that cannot be felt. That observation does not establish how far it extends beneath the finish. A fine line may sit over damaged laminate, while a deeper groove may remain confined to unusually thick gel coat.
4. Look for exposed material and secondary symptoms
Inspect for:
- White or fibrous material beneath the finish
- Missing, lifting, or crumbling gel coat
- Darkening or discoloration
- Rust staining from hardware
- Dampness or leakage
- A depression, bulge, or distorted panel
- Changes on the reverse side
Where access is safe, inspect the back of the panel under good lighting. Look around fastener holes, tabbing, supports, backing hardware, and the corresponding interior location.
5. Screen gently for softness or unusual movement
Press gently around the area rather than forcefully on the crack. Compare its response with a nearby area of similar construction. Softness, sponginess, or visibly abnormal deflection is a reason to stop treating the defect as a straightforward finish problem.
This is not a calibrated test. Acceptable movement varies with the construction, location, panel span, core, and loading. Do not try to prove damage by deliberately forcing a hull or deck to flex.
If a crack changes width during ordinary, light loading that the component naturally experiences, movement beneath the finish may be involved. Exposed fibers, softness, crack movement, impact history, and reverse-side changes are recognized screening warnings, but a dockside inspection remains insufficient where those findings are present (Atlantic Boat Repair’s cosmetic-versus-structural screening guide).
6. Follow the load path
Do not inspect only the visible line. Examine:
- Nearby screws and bolts
- Sealant condition
- Washers and backing plates
- Corners and cutouts
- Bulkheads and supports
- Adjacent stiffeners
- Trailer bunks or rollers
- Hardware alignment
- Evidence of repeated contact or impact
The stress source may not sit directly beneath the crack.
7. Check progression and recurrence
Compare current measurements with older photographs. Growth, branching, widening, leakage, or recurrence after filling indicates an unresolved condition. These observations do not identify the cause by themselves, but they weaken the case for another simple surface repair.
For a new or warrantied product, documenting and reporting the condition before altering it is a conservative evidence-preservation practice. Warranty terms and reporting requirements vary, so request written guidance from the dealer or manufacturer before grinding, filling, or removing hardware.
Triage: monitor, investigate, or stop and call a professional
There is no universal crack-length threshold separating cosmetic from structural damage. Use a profile based on several findings.
Lower concern: document and monitor
A lower-concern profile may include all of the following:
- One isolated, stable surface line
- A lightly loaded location
- No known impact
- No exposed fibers
- No softness or unusual movement
- No leakage or moisture indication
- No visible reverse-side change
- No progression
- No failed previous repair
Monitoring is an assessment choice, not proof that the craft is safe or that the defect is permanently cosmetic. Record the area and recheck it after use, trailering, temperature changes, or significant loading.
Investigate before repair
Do not fill immediately when you find:
- Several concentrated or similarly oriented cracks
- A crack around a screw, fitting, corner, or transition
- Widespread crazing
- Uncertain depth
- A defect that returned after repair
- An area that moves differently from comparable surrounding construction
- Conflicting opinions about whether reinforcement is needed
- A new crack with no understood cause
Controlled removal of affected gel coat may be needed to expose sound edges and inspect the laminate. That step is both diagnostic and invasive. Near cored construction, loaded hardware, or a substantial impact site, a qualified composite repairer may be better placed to perform it.
Stop work or obtain professional evaluation
Stop treating the problem as a gel-coat-only repair when there is:
- Visible or exposed fiberglass reinforcement
- A moving, widening, or spreading crack
- A soft, spongy, bulging, or apparently separated area
- Significant impact, collision, or grounding history
- Water entry or suspected trapped moisture
- Suspected core involvement
- Broad or widespread damage
- Cracking around heavily loaded hardware
- Damage near a structural component or critical hull area
- Recurrence whose cause remains unresolved
These findings are associated with possible laminate, moisture, or support involvement and warrant closer evaluation; gel coat cannot restore the strength of fractured fiberglass (guidance on stress cracks versus structural fiberglass damage).
Give below-waterline cracks greater urgency because they can create a path for water intrusion. Cracks and osmotic blisters are not interchangeable terms: a crack is a fracture or separation in the finish, while a blister is a raised formation associated with moisture beneath the surface. Either may require more than filling when moisture or laminate damage is present.
Avoid invasive DIY diagnosis around heavily loaded hardware, wet or suspected-wet core, broad damage, or major impact sites unless you are prepared to control the opening and address deeper damage if it is exposed. One documented winch repair began with hairline cracks but uncovered wider laminate damage as the area was opened, illustrating why loaded fittings require caution (documented winch-mount investigation).
Gel-coat-only repair workflow for confirmed superficial cracks
This section is a high-level, non-engineered overview, not a universal repair specification. It applies only when the defect has been confirmed as confined to the gel coat, with no soft area, moving substrate, exposed fractured fibers, unresolved impact damage, water intrusion, delamination, or suspected core damage.
The selected coating and repair-material manufacturers must supply the actual mixing, curing, preparation, and overcoating requirements.
Why not simply paint over it?
Paint or new gel coat applied directly over an untreated hairline can leave dirt, moisture, wax, or other contamination inside the defect. The line may print through the new finish, and continuing movement can reopen it.
Opening a confirmed superficial crack is not about cutting an arbitrary trench. The purposes are to:
- Remove loose or compromised gel coat
- Expose clean, sound edges
- Remove trapped contamination
- Confirm that the visible damage stops at the finish
- Create usable bonding area for the chosen repair material
High-level sequence
- Identify the finish. Determine whether the surface is gel coat, paint, or a previous repair.
- Clean and decontaminate. Use methods compatible with that finish.
- Remove loose material. Do not trap lifting or crumbling edges beneath a new repair.
- Open the defect carefully. Remove damaged gel coat without intentionally cutting into sound laminate.
- Inspect the exposed substrate. Stop if fractured fibers, separation, moisture, softness, or unexpected depth appears.
- Prepare according to the selected system. Follow its instructions for cleaning and surface condition.
- Fill with a compatible material. Select it according to the finish, depth, exposure, and intended topcoat.
- Allow the specified cure. Follow the product’s stated mix ratio, temperature range, application limits, and cure window.
- Fair the surface. Restore contour without needlessly removing surrounding sound finish.
- Refinish and blend. Follow the coating system’s sanding and polishing requirements.
- Inspect and monitor. Watch for pinholes, edge lifting, shrinkage, movement, or renewed cracking.
There is no universal groove width. One short tutorial demonstrates channels approximately 1/16 to 1/8 inch wide, but that dimension belongs to the illustrated tools, filler, and paint workflow; it is not a standard for every crack or gel-coat thickness (Yachtorial’s product-specific spider-crack demonstration).
Choose materials by function and compatibility
A surface repair may involve gel coat, an epoxy fairing compound, another compatible filler, or a specified combination. These materials perform different functions:
- Gel coat restores a molded-type exterior finish.
- Fairing compound restores contour and fills prepared defects.
- Fiberglass reinforcement with compatible resin rebuilds damaged laminate.
- Paint or another coating provides the final appearance when part of a compatible system.
A filler does not become structural reinforcement merely because it contains resin. Gel coat does not replace missing glass fibers.
Confirm whether the final surface will be gel coated or painted. Check the compatibility of the substrate, filler, primer, and topcoat. When polyester gel coat is proposed over an epoxy repair, follow the selected manufacturers’ cure and surface-preparation requirements rather than assuming direct compatibility.
Published sanding procedures illustrate why one recipe cannot fit every system. One paint-oriented demonstration stops the fairing compound at 120 grit, while a gel-coat finishing process progresses through finer wet sanding before polishing. Norton, for example, describes preparation from 120 to 240 grit, followed after filling and curing by stages from 320 to 1,000 grit before polishing; those figures are examples from that process, not universal specifications (Norton’s system-specific gel-coat repair sequence).
Plan for color matching
A fresh batch made to an original code may not match the surrounding finish.
Prepare a small test batch or inconspicuous sample. Evaluate it after cure and finishing, not only while wet. Follow the selected product’s order of tinting, catalyzing, or adding hardener.
Keep the safety boundary narrow and explicit
Grinding gel coat or fiberglass and handling reactive repair materials require precautions specific to the tool and product. Norton expressly calls for gloves, eye protection, respiratory protection, and hearing protection during power-tool preparation. Product labels, tool instructions, and safety data supplied for the actual materials should govern any additional precautions; if those requirements are unavailable or cannot be followed, do not proceed.
A repair kit can assemble useful materials, but it does not establish that a crack is superficial or that the included resin and reinforcement suit the construction. Fiberglass Guide’s specific fiberglass patch-kit overview is related background on kit contents and resin choices, not evidence that a generic kit fits every gel-coat crack.
When the repair must extend into the fiberglass
Visible fractured fibers, laminate separation, softness, significant movement, or damage extending beneath the finish marks the boundary between cosmetic work and structural composite repair.
At a high level, structural work may involve:
- Determining the cause and extent of damage
- Correcting movement, support, moisture, or hardware-loading problems where possible
- Removing enough finish to expose the affected area
- Removing damaged or separated laminate
- Preparing sound surrounding material according to an appropriate repair design
- Rebuilding with suitable reinforcement and compatible resin
- Fairing and sealing the repaired structure
- Restoring the finish, color, texture, and gloss
This is not a laminate schedule. Reinforcement type, ply count, fiber orientation, taper geometry, resin choice, access, and cure conditions depend on the original construction and loads. Use construction-specific manufacturer instructions or a qualified composite repairer.
Packing gel coat or fairing compound over broken laminate restores neither the missing fibers nor reinforcement continuity.
The documented Genoa-winch case illustrates this boundary. Hairline cracks around two mounting screws appeared narrow initially, but progressive opening exposed deeper and wider laminate damage. The repair ultimately included three layers of epoxy and glass fibers, with curing and sanding between layers. That single repair does not establish a universal schedule, but it demonstrates how an apparently small surface defect near loaded hardware can expand in scope when opened (the reported winch-mount repair).
Assess the complete fitting assembly
Where cracking surrounds a cleat, winch, tower, rail, windshield, hatch, or seat mount, the repair may also need to address:
- Elongated or damaged fastener holes
- Crushed or wet core
- Failed bedding or sealant
- Inadequate or deteriorated washers
- Backing-plate condition
- Local laminate condition
- Unsupported spans
- Load distribution through the panel
- Nearby bulkheads, stringers, and tabbing
Restoring the finish while reinstalling the same leaking or poorly supported fitting invites recurrence.
Material selection should follow function rather than blanket rankings. Fillers restore shape. Gel coat restores a finish. Glass reinforcement with a compatible resin rebuilds laminate.
Professional assessment is prudent for suspected core damage, delamination, heavily loaded structures, broad repairs, major impact sites, and defects below the waterline. Commercial inspection guidance similarly treats exposed fibers, softness, movement, impact damage, and structural-area involvement as reasons not to proceed with a simple cosmetic repair (professional-inspection warning signs).
Prevent the crack from returning
The central rule is simple:
Correct the cause before perfecting the finish.
A visually successful repair can crack again if the panel continues to bend, hardware still concentrates load, or moisture continues entering the assembly.
Before refinishing, ask:
- Is the hull or deck moving unusually?
- Was there an impact whose deeper effects remain?
- Is vibration being transferred into the panel?
- Was hardware overtightened?
- Are backing washers or plates adequate and sound?
- Are supports, stringers, bulkheads, or tabbing damaged?
- Is the trailer supporting the hull appropriately?
- Can water enter through the crack or a fastener hole?
- Is the core wet, crushed, or separated?
- Does ordinary use repeatedly load the same area?
- Was the original crack merely covered instead of opened and inspected?
- Are the filler and finish compatible with the substrate and each other?
Fastener-related cracking
Self-tapping screws can place radial pressure on brittle gel coat when their threads bear directly against an unprepared finish. Appropriate preparation around the gel-coat portion of a hole can reduce thread pressure and provide room for sealant, but the exact method must follow the hardware, substrate, and repair-system guidance. Epoxyworks discusses this approach as part of preventing renewed cracking around screw holes (technical guidance on screw-hole stress cracking).
Do not focus only on the screw head. Inspect what the fastener enters, how the fitting is bedded, whether any core is sealed, and how load is distributed behind the panel.
Recurrence is evidence
When a crack reappears in the same location, treat that failure as diagnostic information. Possible explanations include:
- Continuing substrate movement
- Inadequate support
- Concentrated loading
- Moisture or core deterioration
- Compromised gel coat left behind
- Unrepaired laminate damage
- Incompatible materials
- Incorrect preparation or cure conditions
Another thin surface layer may delay the crack’s visibility without resolving its cause.
The same principle applies to widespread crazing. Rolling a coating over intact, cracked gel coat leaves the compromised layer in place. The depth, adhesion, movement, and cause must be assessed before deciding whether localized opening, broader removal, or another refinishing method is appropriate.
Non-slip texture complicates finishing
Molded non-slip requires texture restoration as well as color and gloss matching. One documented DIY repair used pigment tests and trial cure timing before recreating a diamond pattern at the material’s moldable stage. It is a useful account of planning and experimentation, not proof that the method suits every material or will provide universal durability (Practical Boat Owner’s molded non-slip repair account).
Test the material, color, cure stage, and pattern-reproduction technique away from the visible repair where practical. Prominent or extensive textured areas may justify specialist finishing.
After any repair, continue monitoring with dated photographs. Check for renewed movement, moisture, edge lifting, discoloration, shrinkage, or cracking. A close color and gloss match shows how the surface looks; it does not prove that the underlying load path is sound.
Special decisions for warranties, repair quotes, and used-boat purchases
Cracking gel coat becomes more complicated when another party may be responsible for inspection or repair, or when the condition affects a purchase.
New or warrantied products
For a new or warrantied boat, kayak, RV, or other gel-coated product:
- Clean only enough to reveal the defect.
- Photograph the complete component and detailed cracks.
- Include a scale and record the date.
- Note use, loading, storage, and known impacts.
- Report the condition to the dealer or manufacturer.
- Ask for written inspection or repair instructions before altering it.
- Preserve correspondence and take repeat photographs if it changes.
This is a conservative documentation practice, not a statement that every alteration voids a warranty. In one new-kayak discussion, contributors disagreed about the significance of the cracks but consistently emphasized documenting them and contacting the dealer or manufacturer before changing the surface (Paddling.com discussion of new-product gel-coat cracking).
Do not automatically transfer repair advice between products.
Comparing repair quotes
A gel-coat-only quote and a fiberglass-reinforcement quote may differ substantially because they assume different damage depths. When depth has not been confirmed, ask each repairer what evidence supports the proposed scope.
A useful comparison asks whether the quote includes:
- Diagnosis of the likely cause
- Controlled opening or inspection
- Hardware removal and reinstallation
- Fastener-hole and backing assessment
- Moisture or core evaluation
- Removal of damaged laminate
- Fiberglass reinforcement if required
- Fairing and sealing
- Finish identification
- Color and texture matching
- Written exclusions
- Repair-warranty terms
- A plan if deeper damage is discovered
Conflicting quotations do not necessarily mean one repairer is wrong. They may reflect different assumptions about what lies beneath the finish. An RV owner discussion illustrates the problem: one proposal called for broader fiberglass reinforcement, while another treated the cracks as cosmetic; participants suggested opening the defect or obtaining another opinion to resolve the uncertainty (discussion of conflicting gel-coat and fiberglass scopes).
Evaluating a used boat
Map every visible crack rather than judging only the most prominent one. Record:
- Location and pattern
- Above- or below-waterline position
- Proximity to loaded fittings
- Evidence of impact
- Softness or unusual movement
- Interior-side changes
- Previous cosmetic repairs
- Widespread versus localized cracking
- Moisture staining or leakage
- Recurrence reported by the seller
Pay particular attention to concentrations around cleats, towers, winches, windshields, hatches, seat mounts, bulkheads, and hull transitions. Ask for repair records where available.
Do not decide to buy, reject, or renegotiate solely from crack appearance. When diagnostic uncertainty could materially affect safety, repair scope, or purchase price, an independent marine survey or qualified fiberglass assessment can provide better evidence.
Frequently asked questions
Are spider cracks in gel coat always structural?
No. Spider cracks can be confined to the gel coat, particularly where a brittle or thick finish has experienced localized stress. They can also appear over moving or damaged laminate.
The pattern alone cannot establish depth. Inspect the center, location, impact history, nearby hardware, movement, softness, exposed fibers, leakage, and reverse side. A spider pattern around a loaded fitting or impact site deserves more concern than a stable pattern in a lightly loaded cosmetic area.
Can I paint or apply new gel coat directly over hairline cracks?
That is generally unreliable. Contamination can remain inside the defect, the crack may print through the new finish, and continuing movement may reopen it.
A confirmed superficial defect is normally cleaned, opened in a controlled way, inspected, filled with a compatible material, cured, faired, and refinished according to the selected system. If opening reveals fractured laminate, stop the cosmetic workflow.
When is cracking gel coat suitable for a DIY repair?
DIY work is most appropriate when the damage has been confirmed as limited to the gel coat and the repairer can safely follow the selected system’s preparation, mixing, curing, sanding, and finishing instructions.
It is a poor DIY candidate when the area is soft, wet, moving, below the waterline, associated with substantial impact, close to heavily loaded hardware, or suspected of involving laminate or core. Those warning signs are commonly identified as reasons for professional assessment rather than a cosmetic fill (structural-crack escalation guidance).
Why did the crack return after it was repaired?
The original cause may still be present. Possibilities include repeated panel flex, concentrated hardware loading, vibration, inadequate backing, damaged support, moisture, core deterioration, remaining compromised gel coat, or laminate damage that was never rebuilt.
Treat recurrence as evidence that the diagnosis or repair system needs reconsideration rather than simply covering the line again.
Should cracks around screws, cleats, towers, or winches receive professional inspection?
They deserve closer inspection because these fittings can concentrate loads into a small area. Professional assessment is prudent when the crack moves, has returned, follows an impact, surrounds heavily loaded hardware, or is accompanied by softness, leakage, exposed fibers, damaged fastener holes, poor backing, or suspected core involvement.
A stable superficial crack around lightly loaded hardware may ultimately need only a finish repair. That conclusion should follow inspection of the fitting, bedding, fasteners, backing, local laminate, and load path—not crack appearance alone.
The diagnosis-first rule
Do not assume that a small crack is structural, but do not hide it before understanding why it formed. A stable surface defect over intact laminate may be a manageable finishing repair. Movement, exposed fibers, softness, water entry, impact history, recurrence, or cracking near loaded structure calls for deeper inspection.
Correct the source of stress before refinishing. Follow the selected material system instead of a universal recipe, and document uncertain or warrantied damage before making irreversible changes.