
Boat Fiberglass Hull: Construction, Damage & Repair Guide
A boat fiberglass hull is not one uniform shell. It is a composite system made from glass reinforcement, cured resin, surface coatings and, on many boats,…
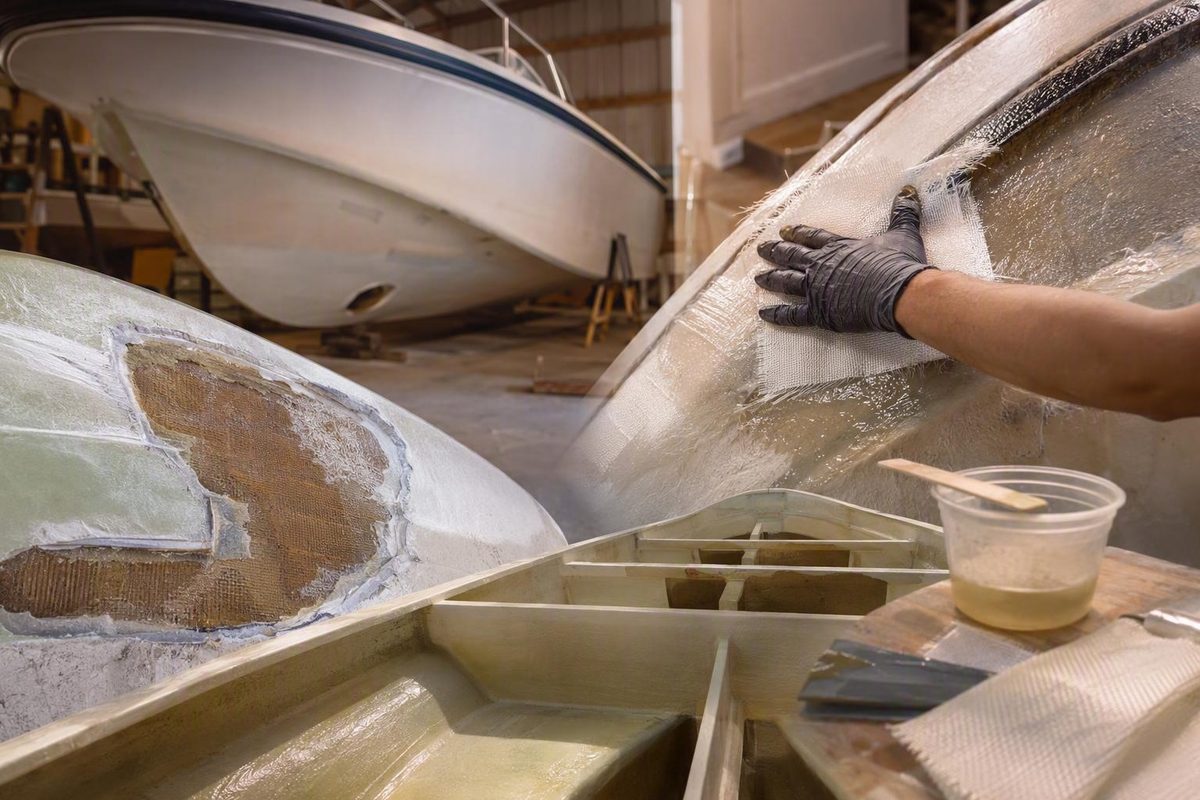
A boat fiberglass hull is not one uniform shell. It is a composite system made from glass reinforcement, cured resin, surface coatings and, on many boats, cores and internal structural members. A glossy gelcoat can hide damage below it, while an ugly surface scratch may be little more than cosmetic.
The practical rule is layer first, product second. Identify what has failed, investigate why it failed, and only then consider a repair system compatible with the original laminate, expected loads, water exposure and final coating. Small, clearly bounded cosmetic or above-waterline repairs may suit a careful DIYer. Wet core, deformation, extensive delamination or damage around highly loaded components calls for qualified marine help.
This article is an orientation and triage guide, not an engineering specification or approval standard. It cannot supply a laminate schedule, validate a structural repair or certify a boat as seaworthy. For consequential work, model-specific builder information and current technical data for the exact resin, reinforcement and coating system must take priority.
Related: Boat Hull Stress Cracks Need Triage Before Repair.
What a Fiberglass Boat Hull Is—and What Actually Carries the Load
Fiberglass, also called glass-reinforced plastic or GRP, is a composite, not a homogeneous material. The resulting structural skin is called the laminate.
Gelcoat is different. It is the smooth, pigmented outer surface commonly seen on a fiberglass boat. Its main jobs are appearance and surface protection. Although it contributes to the complete hull skin, it should not be mistaken for the principal load-carrying laminate beneath it.
A conceptual hull cross-section
From the water-facing surface inward, a fiberglass hull may contain some or all of these elements:
| Component | Typical role | Common concerns |
|---|---|---|
| Gelcoat | Smooth exterior finish; cosmetic and surface protection | Scratches, chips, crazing, fading, blisters |
| Optional barrier coating | Additional moisture protection within a specified coating system | Poor adhesion, cracking, trapped moisture beneath it |
| Optional laminate skin coat | Fine outer laminate intended to improve surface quality or reduce print-through | Voids, poor wet-out, cracking or weak bonding |
| Outer structural laminate | Distributes loads and provides impact and tensile strength | Fractured fibers, punctures, voids, delamination |
| Core, if used | Separates laminate skins to increase panel stiffness without making the panel solid throughout | Water intrusion, crushing, decay, debonding |
| Inner laminate skin | Completes a cored sandwich or adds thickness to a solid layup | Cracks, voids, separation from core |
| Stringers and floors | Stiffen the hull and distribute localized loads through the structure | Debonding, cracked tabbing, wet internal material |
| Transom reinforcement | Supports propulsion and other concentrated stern loads | Compression, cracking, moisture, core deterioration |
| Deck structure | Provides a walking and working surface while helping brace the boat | Soft spots, wet core, detached tabbing |
| Hull-to-deck joint | Connects the molded hull and deck assemblies | Leaks, loose fasteners, adhesive failure |
A skin coat and a barrier coating are not interchangeable terms. Their materials, positions and purposes vary among builders, so the actual construction must be verified from model-specific records where possible.
Not every boat contains every layer. Some hull regions are solid laminate; others are cored. A boat may have a cored deck but a largely solid hull bottom. Reinforcement may also change around the keel, chines, transom, engine beds, through-hulls, chainplates, lifting points and other concentrated loads.
A solid laminate can develop cracking, fiber fracture, voids and separation between plies. A cored laminate can suffer those failures plus wet, crushed, degraded or detached core.
The word fiberglass alone therefore tells you very little about structural capacity. It does not identify laminate thickness, fiber type or orientation, resin chemistry, core material, local reinforcement, workmanship, cure quality or design loads.
Manufacturer descriptions can help identify how a particular model was built, but they are not universal specifications. For example, Starcraft describes mold waxing, gelcoat and barrier coatings, stringer and deck reinforcement, hull inspection, and a bonded-and-screwed hull-to-deck assembly. Those are that builder’s stated practices, not specifications for every fiberglass hull. The same page uses unexplained “ml” measurements; without clarification from the manufacturer, those figures should not be interpreted as mils, milliliters or verified engineering dimensions.
How Fiberglass Hulls Are Built
Production methods vary by builder, model, hull area and era, but molded fiberglass construction commonly follows this broad sequence:
- Create and prepare the mold. A mold represents the finished exterior shape. It is cleaned and treated with a release system so the cured component can be removed.
- Apply the exterior surface system. Gelcoat is commonly applied first because construction proceeds from the outside inward. Depending on the design, a builder may add a laminate skin coat, barrier material or both.
- Place reinforcement and resin. Dry reinforcement may be wetted manually, applied mechanically or infused under vacuum. Pre-impregnated materials are another possibility.
- Consolidate the laminate. Workers or equipment remove trapped air and bring the reinforcement into contact with the mold and adjacent layers.
- Cure the part. The resin hardens into a rigid matrix. Temperature, material ratios, contamination and laminate thickness can affect the process.
- Release and trim the molding. The hull or deck is removed from the mold, cut to its final edges and prepared for assembly.
- Install structural reinforcement. Stringers, floors, transom components, bulkheads and local reinforcements are bonded or laminated into the molded shell.
- Join the hull and deck. The two major moldings may be bonded, fastened or both, according to the builder’s design.
- Inspect and finish the assembly. Inspection may cover dimensions, weight, surface quality, bonds, hardware, coatings and other production criteria.
A general GRP manufacturing overview describes the progression from model and mold through reinforcement, resin impregnation, curing, trimming and finishing. It is a useful high-level outline, but it is a commercial industry article rather than a boat-specific construction or repair manual.
Hand lay-up versus vacuum infusion
In hand lay-up, reinforcement is placed in the mold and resin is applied and worked through it. Consolidation commonly relies on rollers and manual technique.
Neither label automatically guarantees a superior hull. Final results also depend on design, fiber placement, resin content, air removal, cure conditions, worker execution and inspection.
Molds make complex curves and repeat production possible, but they do not ensure equal strength everywhere. Designers may specify different thicknesses, fiber orientations, cores or overlaps in different areas. A hull bottom encounters different loads from a topside panel, while a transom or engine bed must distribute loads that an open panel does not.
Local overlaps can add thickness or connect structural elements, but there is no single laminate schedule that applies to every boat.
Documented construction detail versus marketing
A statement that a named builder uses a particular resin, reinforcement, core, joining method or inspection step may help identify the construction of the relevant product. A phrase such as “unmatched strength,” however, is a comparative marketing claim unless supported by suitable testing. Treat builder specifications as model-specific unless their broader application has been independently established.
Advantages, Limitations, and What Determines Hull Life
Fiberglass became popular for production boats because it can be molded into complex shapes, does not rust like ferrous metal, supports favorable strength-to-weight designs and allows repeated production from molds. Routine care can also be manageable because the entire shell does not require the corrosion-control regime associated with steel.
Those advantages need boundaries. Fiberglass does not make a boat automatically light, fast, efficient, stable or seaworthy. Hull form, displacement, propulsion, ballast, loading, speed, sea state and operating practice all influence those outcomes.
Common advantages
- Moldability: Curves, chines, recesses and integrated details can be reproduced from a mold.
- Corrosion resistance: GRP does not rust like steel.
- Strength-to-weight potential: A suitable design can place reinforcement where loads need to be carried.
- Repeat production: A reusable mold supports efficient production of the same design.
- Surface finish: Gelcoat can provide a smooth, colored finish directly from the mold.
- Repairability: Many localized defects can be cut back and rebuilt with compatible composite materials.
Recurring limitations and failure modes
- Gelcoat cracking and crazing: Possible causes include impact, flexing, stress concentration, excessive coating thickness or aging.
- Blistering and osmosis-related damage: Water-related deterioration may produce localized blisters or broader coating and laminate concerns.
- UV degradation: Prolonged exposure can chalk, fade or degrade an inadequately protected surface.
- Water intrusion: Leaking fittings, fastener holes, cracks and exposed laminate can admit moisture into core or internal reinforcement.
- Delamination: Layers can separate after impact, poor bonding, fatigue, moisture exposure or manufacturing defects.
- Fatigue: Repeated flexing can produce cracking without one dramatic impact.
- Core damage: Core can become wet, crushed, detached or degraded while the outer skin remains largely intact.
Fiberglass is therefore corrosion-resistant, not maintenance-free. Durability depends on laminate design, reinforcement, core, workmanship, loading, storage, UV exposure, water exposure and maintenance. Those variables are too influential to support one meaningful “typical” fiberglass-hull lifespan.
Fiberglass versus steel
Fiberglass is highly moldable, does not rust and is efficient for repeated production. Steel is commonly selected for custom heavy construction and operating profiles in which substantial impact tolerance is a design priority. Steel, however, requires an effective corrosion-control system and brings different weight, construction and maintenance implications.
There is no universal winner. A lightly built fiberglass boat and a heavily built steel vessel are not meaningful equivalents merely because both float. The complete design and intended use must be compared. End-of-life considerations also differ: fiberglass composites are difficult to recycle, while steel is recyclable. A yacht builder’s fiberglass-versus-steel comparison discusses these tradeoffs, but its broad operating recommendations should be treated as manufacturer guidance rather than universal rules.
Damage Triage: Gelcoat Defect, Laminate Damage, or Structural Problem?
Begin with three questions:
- Which layer appears damaged?
- What caused the damage?
- Is the area structurally important, continuously immersed, cored or unable to hold its original shape?
Do not begin by choosing a filler. A material that hides a crack may also hide evidence needed to find its cause.
Symptom-based damage matrix
| Symptom | What it may mean | Initial response |
|---|---|---|
| Shallow scratch | Damage confined to gelcoat | Clean and inspect; controlled sanding and polishing may be sufficient if the laminate is untouched |
| Small gelcoat chip | Local loss of surface coating | Check for exposed or fractured fibers; use a compatible cosmetic repair only if the laminate is sound |
| Hairline crack | Gelcoat shrinkage, impact, flexing or stress beneath the surface | Investigate depth, pattern, movement and cause before refinishing |
| Exposed fibers | Gelcoat has been breached; laminate may be abraded or fractured | Keep the area dry and inspect closely; rebuild laminate if fibers are damaged |
| Deep gouge | Loss of gelcoat and possibly reinforcement | Remove loose material and determine whether structural fibers were cut |
| Puncture or through-hole | Structural laminate has been severed | Requires a designed reinforced-laminate repair, not resin or gelcoat alone |
| Blisters | Local coating failure, trapped fluid or wider moisture-related deterioration | Establish extent and moisture condition before selecting treatment |
| Discoloration | Staining, moisture, heat, a previous repair, resin change or contamination | Trace the source; appearance alone does not identify the mechanism |
| Change in tap response | Possible change in laminate, bond, core, thickness or backing | Mark the boundary and investigate further; sound alone is not proof |
| Soft spot | Possible wet, crushed, degraded or detached core; possibly thin or damaged laminate | Stop loading the area and investigate; do not simply cover it |
| Visible deformation | Loss of shape, failed support, extensive delamination or structural damage | Preserve the existing shape and obtain professional assessment |
| Cracking around hardware | Stress concentration, movement, water entry or inadequate backing | Inspect the attachment, backing, laminate and surrounding core |
Light scratches that have not penetrated deeply into gelcoat may be candidates for wet sanding, buffing and polishing. Small surface chips may accept a compatible cosmetic repair after the underlying laminate is confirmed sound. Holes, damaged laminate and soft spots require structural investigation before fairing or coating; this distinction is also made in a commercial fiberglass-boat repair guide.
Crack pattern matters. A short isolated crack after a minor scrape presents a different question from radiating cracks around an engine mount, recurring cracks beside a bulkhead or a line that grows under load. Carefully opening a crack during preparation may show whether it stops within gelcoat, but depth is only part of the diagnosis. Refinishing a crack without correcting the movement that caused it invites recurrence.
Use tap testing cautiously
Light tapping with a small, non-damaging tool may help identify a change in acoustic response across a panel, especially when the result is compared with known sound laminate nearby. A dull or hollow sound is not conclusive proof of moisture or delamination.
Tap testing is therefore a screening technique, not a stand-alone diagnosis. Findings should be mapped and interpreted alongside visual inspection, access from the opposite side, construction records and, where consequences are significant, professional assessment.
Location changes the risk
Use greater caution when damage is near a:
- keel or keel attachment;
- transom;
- stringer, floor, bulkhead or structural tabbing;
- engine mount or propulsion attachment;
- steering attachment;
- chainplate or other rigging load;
- through-hull, seacock, shaft opening or strut;
- lifting point, towing eye or other highly loaded fitting.
Surface appearance cannot establish internal condition, restored strength, watertightness or seaworthiness. If safe use of the boat depends on the affected area, uncertainty is itself a reason to consult an experienced marine repairer or surveyor.
A General Fiberglass Hull Repair Workflow
The following is a planning framework, not a structural specification. It does not establish a suitable bevel, laminate schedule, fabric weight, patch sequence, resin ratio, cure time or acceptable hole size for a particular hull. Those decisions require the actual construction details and current instructions for the selected repair system.
1. Identify the affected structure
Determine:
- whether the damage stops in gelcoat or enters the laminate;
- whether the panel is solid or cored;
- whether the core is dry, bonded and intact;
- whether stringers, tabbing, transom material or other reinforcement is involved;
- whether access is available from one side or both;
- whether the area is above or below the waterline;
- whether the hull still holds its designed contour.
2. Dry the area and remove unsound material
Before bonding, eliminate the moisture source and allow the repair zone to reach the condition required by the selected system. Remove loose gelcoat, fractured fibers, contamination and delaminated laminate until sound material is reached.
Do not laminate over wet core or bridge a flexible cavity with filler. If opening the area reveals more damage than expected, stop and reassess the scope rather than concealing it.
3. Taper and clean the sound laminate
Remove dust using suitable extraction and cleaning procedures. Solvent selection and timing must follow the chosen resin manufacturer’s instructions; an incompatible solvent, contaminated rag or retained residue can impair adhesion. A detailed Practical Boat Owner repair overview likewise emphasizes preparation, compatible resin use, air removal and manufacturer-specific instructions, but it should not be treated as a boat-specific engineering schedule.
4. Prepare the reinforcement
Cut reinforcement pieces before mixing resin. Their combined thickness, fiber type and orientation should restore the function of the surrounding laminate rather than merely fill the depression.
There is no reliable universal layer count. Two fabrics with different weights, weaves, fiber orientations or resin contents will not create equivalent laminates merely because the same number of pieces is used.
5. Wet out and consolidate
Apply compatible resin to the prepared substrate and fully wet the reinforcement. Place and consolidate the layers so they contact the repair surface and one another. Work out trapped air without starving the fibers or leaving an excessively resin-rich patch.
6. Control batch size and cure
Plan around ambient and substrate temperature, working time, batch mass and cure heat. Use only the mix or catalyst ratio, batch limits and application conditions stated in current technical data.
Do not change catalyst or hardener proportions according to an informal recipe. Incorrect measurement or mixing can lead to incomplete cure, brittleness, overheating or poor adhesion.
7. Fair and protect the repair
After the specified cure state is reached, inspect and sand as permitted by the system. Fairing compound can fill weave, pinholes and low areas or restore contour. It is not a substitute for reinforcement where structural fibers were lost.
Finish with a compatible gelcoat, paint, barrier coating or other protective system suitable for the underlying resin and anticipated water exposure.
Two bounded repair configurations
Inside repair against an exterior backer: For certain small above-waterline holes with good interior access, a smooth release-coated backer may be secured against the exterior to support the original contour while laminate is rebuilt from inside. A marine dealership’s example specifically limits this configuration to smaller above-waterline holes. It is a commercial how-to example, not a validated method for cored, highly loaded, large or submerged damage.
Outside patch with backing support: If a through-hole must be approached from outside and has no laminating surface behind it, suitable backing can create a temporary base. The area is then dried, prepared, reinforced, cured and finished. A commercial exterior-patching overview illustrates the concept but does not provide an engineered laminate schedule, acceptance criteria or universal maximum hole size.
These are configurations, not recipes. Published examples disagree about whether nested layers should progress from large to small or small to large. Patch geometry must be selected as part of one coherent repair design, not assembled from unrelated instructions.
Epoxy, Polyester, or Vinylester: Choosing a Compatible Repair System
Resin selection is a system decision. Consider the existing substrate, secondary-bond demands, reinforcement, water exposure, final finish, working conditions and current manufacturer compatibility guidance.
| Decision factor | Epoxy | Polyester | Vinylester |
|---|---|---|---|
| Bonding to prepared cured fiberglass | Commonly selected where strong secondary adhesion is important | Generally bonds less reliably than epoxy to old cured laminate | May be suitable, subject to formulation and substrate guidance |
| Structural demand | Frequent candidate for structural secondary bonds | May be appropriate within a validated polyester repair system | Possible where the complete repair system supports it |
| Water exposure | Good moisture resistance; commonly considered for immersed repairs | Requires careful system selection and protection | Often considered where greater moisture resistance than standard polyester is desired |
| Traditional polyester gelcoat finish | May require product-specific preparation or a validated tie-coat | Usually integrates more directly | Compatibility depends on the particular resin and gelcoat |
| Relative material cost | Generally higher | Generally lower | Often positioned between polyester and epoxy |
| Process sensitivity | Exact resin-to-hardener ratio and thorough mixing are critical | Specified catalyst range and cure conditions are critical | Specified catalyst and product conditions are critical |
| Principal reason to consider it | Secondary adhesion, moisture resistance and structural bonding | Economy and integration with conventional polyester systems | A middle-ground option for some moisture-prone, blister or underwater systems |
These relative cost and compatibility distinctions are general rather than current price guarantees; a commercial resin-selection guide similarly places epoxy above polyester in typical cost and vinylester between them while stressing product-specific selection.
Epoxy can commonly bond to properly prepared, fully cured polyester fiberglass. The reverse is not symmetrical: polyester generally does not bond reliably over cured epoxy. That difference matters when planning the finish. Polyester gelcoat over a cured epoxy repair may require product-specific preparation or a validated tie-coat; there is no universal process that applies to every formulation.
Polyester remains useful. It is comparatively economical and fits naturally into many conventional polyester-and-gelcoat systems. Vinylester may provide a middle ground where greater moisture resistance than standard polyester is desired. None of these resin labels, by itself, determines whether a repair will succeed.
What limited comparative testing can—and cannot—tell us
A manufacturer-authored report from 2004 compared repairs to one DCPD polyester-and-fiberglass laminate. In that coupon test, a WEST SYSTEM epoxy repair retained 81.7% of the control laminate’s tensile strength, while a repair made with the DCPD polyester retained 70.5% under the stated preparation and cure conditions. The test used small specimens, one laminate system and products sold by the publisher, so it does not establish universal superiority, long-term durability or full-scale hull performance. The methods and commercial context are described in the WEST SYSTEM epoxy-versus-polyester report.
Other controlled-panel reporting supports a broader lesson: resin is only one variable. Reinforcement type and laminate skin thickness can substantially affect damage resistance, while fiber reinforcement changes how the resin performs within the composite. A Practical Sailor summary of composite panel tests reports that skin thickness, reinforcement and resin choice all affected the tested panels; those controlled results do not establish performance for every hull or collision.
For any repair, obtain current technical data for the exact resin, hardener or catalyst, reinforcement, filler, primer, gelcoat, paint and barrier coating. Verify:
- approved substrates;
- required surface preparation;
- mix or catalyst ratio;
- application-temperature range;
- working, overcoating and recoat windows;
- batch-size or laminate-thickness limits;
- cure requirements;
- compatibility with the next coating.
Structural cracks and holes generally need appropriate fabric reinforcement. Pouring resin into a crack, smearing putty over a puncture or replacing severed fibers with gelcoat does not restore the original reinforcement path.
Below-Waterline, Cored, and Highly Loaded Repairs
Some damage should never be treated as an ordinary surface patch.
Below-waterline damage
Continuous or repeated immersion increases the importance of:
- confirming that the substrate and any core are suitably dry;
- removing unsound laminate rather than sealing over it;
- selecting a moisture-resistant and compatible repair system;
- restoring coating continuity;
- sealing fibers, edges, fasteners and penetrations;
- obtaining appropriate inspection before relaunch.
An epoxy barrier coat may form part of some below-waterline systems, but it cannot compensate for trapped moisture, wet core, poor adhesion or fractured laminate. A smooth barrier-coated surface can still conceal an unsound repair. Commercial repair guidance likewise stresses dryness, structural restoration and continuous water-resistant protection for submerged repairs rather than relying on coating appearance alone.
Cored construction
If the core is wet, crushed, degraded or detached, laminating only over the outside skin does not necessarily restore that sandwich structure.
A cored repair requires answers that a cosmetic patch does not address:
- How far has moisture migrated?
- Is the core still bonded to both skins?
- Has it been crushed or lost thickness?
- What core material and density were used?
- How should replacement material be shaped and bonded?
- How will the skins and local load paths be restored?
If those questions cannot be answered reliably, stop rather than improvise a core replacement.
Highly loaded areas
Damage near concentrated loads deserves a larger safety margin. A modest crack beside a steering attachment may be more consequential than a larger cosmetic chip in an unloaded topside. The same principle applies near keels, transoms, stringers, engine mounts, chainplates, through-hulls, shaft supports and lifting or towing fittings.
Explicit stop-work triggers
Obtain assessment from an experienced marine repair professional or surveyor when you find:
- wet, crushed, detached or otherwise damaged core;
- cracks that spread, recur or move under load;
- broad or severe delamination;
- distorted hull shape;
- a large opening or missing structure;
- failed stringers, tabbing, floors, bulkheads or transom material;
- damage near a keel, engine mount, steering attachment, chainplate, through-hull or other highly loaded component;
- below-waterline structural damage whose extent or moisture condition is uncertain.
Commercial repair guidance identifies large holes, soft spots, core concerns and structural damage as conditions that may exceed safe DIY scope. It does not establish a universal threshold, and neither does the wider evidence available here. Accessibility, location, laminate type, remaining shape, loading and core condition matter more than one crack length or hole diameter.
A careful DIYer may be able to handle a small, fully understood, above-waterline laminate repair with sound surrounding structure and good access. Structural, cored, extensive, deformed or safety-critical damage warrants professional involvement.
Before launch, remember that smooth fairing and glossy paint prove only that the surface was made smooth and glossy. They do not prove watertightness, structural capacity or seaworthiness.
Safety, Inspection, and Return-to-Service Checklist
Fiberglass repair combines airborne glass dust, power tools, reactive chemicals, solvents, potentially flammable materials and heat-producing cures. Treat safety planning as part of the repair system rather than an optional workshop precaution.
Grinding and sanding release hazardous dust and fine fibers. Use suitable respiratory protection, sealed eye protection, gloves, skin-covering clothing and tool-connected dust extraction. Isolate the work area so dust does not spread through the boat or into the surrounding environment. Practical Boat Owner’s repair guidance specifically calls for a respirator and goggles during grinding and recommends extraction to reduce airborne dust.
Provide ventilation appropriate to the exact resin, solvent and coating. Keep ignition sources away where flammable vapors or materials may be present, and follow the product Safety Data Sheet for ventilation, PPE, storage, spill response and disposal. Repeated epoxy exposure can cause sensitization or allergic reactions, so skin contact should be avoided even if previous use caused no symptoms; the health warning and need to follow each product’s Safety Data Sheet are also noted in the Practical Sailor testing summary cited above.
Plan for exothermic heat. Do not leave an unnecessarily large mixed batch in a container or exceed the manufacturer’s limits for batch mass or laminate thickness. Never alter catalyst or hardener proportions to compensate for temperature unless the manufacturer expressly allows it. Incorrect ratios can produce incomplete cure, brittleness, overheating or poor bonding.
If working conditions fall outside the specified range, use only a manufacturer-approved temperature-specific product, condition the workspace appropriately or postpone the job.
Pre-work checklist
- [ ] Identify the likely original substrate and resin system.
- [ ] Determine whether the panel is solid or cored.
- [ ] Map the full damage boundary, not only the visible mark.
- [ ] Confirm the laminate and any core are suitably dry.
- [ ] Check stringers, tabbing, transom material and nearby attachments.
- [ ] Confirm the hull retains its designed shape.
- [ ] Determine whether access from one or both sides is required.
- [ ] Check whether the area is above or below the waterline.
- [ ] Record ambient and substrate conditions required by the repair system.
- [ ] Arrange suitable ventilation and remove relevant ignition hazards.
- [ ] Set up dust extraction and containment.
- [ ] Select respiratory, eye, hand and skin protection.
- [ ] Obtain current technical data and Safety Data Sheets.
- [ ] Verify resin, reinforcement, filler, primer and finish compatibility.
- [ ] Prepare reinforcement, tools, backers and consumables before mixing.
- [ ] Establish a stop point if newly exposed damage exceeds the plan.
Post-cure visual checklist
- [ ] The laminate has reached the cure state specified by the manufacturer.
- [ ] No sticky, rubbery, soft or abnormal areas suggest incomplete cure.
- [ ] There are no obvious voids, bubbles, lifted fabric or dry fibers.
- [ ] No reinforcement remains exposed.
- [ ] Cracks have not reopened or spread.
- [ ] The repair follows the intended hull contour without visible distortion.
- [ ] Edges blend into sound laminate without visible separation.
- [ ] Fairing and coatings form a continuous, compatible system.
- [ ] Below-waterline surfaces and penetrations have continuous protection.
- [ ] Nearby fittings and structures show no unexplained movement.
This is only a visual screening list. It cannot validate an engineered structural repair, establish original strength or certify seaworthiness. Where the consequences of failure are significant, use a qualified professional to determine what inspection and return-to-service decision are appropriate for the actual structure.
Used-boat inspection sidebar
When inspecting a used fiberglass boat, look for blisters, soft spots, changes in tap response, cracks around fittings, discoloration, exposed fibers and previous repairs that are wavy, poorly faired or different in texture. Inspect the transom, stringer areas, engine beds, chainplates, through-hulls, deck hardware and hull-to-deck joint where accessible.
Ask about moisture concerns, blister history, collision or grounding damage and previous structural repairs. Request invoices, photographs, survey reports and builder records. Ask how the hull was built, what core material was used and what warranty terms apply. Model-specific records are more useful than broad assurances that all fiberglass lasts for decades.
Frequently Asked Questions
Can epoxy be used to repair a polyester fiberglass hull?
Yes. Epoxy is commonly used over properly prepared, fully cured polyester laminate because it generally provides strong secondary adhesion and good moisture resistance. The existing surface must still be sound, dry, clean and prepared according to the exact epoxy manufacturer’s instructions.
Plan the finish before selecting epoxy. Polyester resin does not reliably bond over cured epoxy, and polyester gelcoat may require product-specific preparation or a validated tie-coat. Do not assume that any gelcoat can be applied directly over any cured epoxy.
How can I tell whether a hull crack is only in the gelcoat?
Clean the area and inspect it under good light. Look for exposed fibers, movement, softness, deformation, impact marks and related cracks on the opposite side. During repair, a crack may need to be carefully opened to determine whether it stops in gelcoat or enters the laminate.
Location and pattern matter as much as apparent depth. Recurring cracks, radiating cracks or cracks around structural attachments can indicate movement below the surface. If the crack enters fibers, moves under load or sits near a highly loaded component, treat it as more than cosmetic until assessed.
Can a fiberglass hull be repaired below the waterline?
Yes, many below-waterline fiberglass repairs are possible. The damaged area must be suitably dry, the structural laminate must be restored with compatible materials, and the final system must provide continuous water-resistant protection. Epoxy or vinylester may be considered depending on the substrate, repair design and intended finish.
A barrier coating may form part of that system, but it cannot correct wet core, trapped moisture, delamination or an inadequate laminate repair. Do not relaunch based on surface appearance alone.
Does a fiberglass repair always need cloth or mat?
No. A shallow scratch confined to gelcoat may require only controlled sanding, polishing or a cosmetic gelcoat repair. A small chip may be filled and refinished if inspection confirms that the reinforcement beneath it remains intact.
Cloth, mat, tape or another suitable reinforcement is generally required when structural fibers or laminate have been cracked, cut, punctured, ground away or delaminated. Resin and fairing compound can bind, fill or shape, but they do not replace missing structural reinforcement.
Is a fiberglass hull better than a steel hull?
Not universally. Fiberglass is moldable, corrosion-resistant and efficient for repeat production, with favorable strength-to-weight potential. Steel is commonly used for heavy custom construction and designs in which substantial impact tolerance is a priority, but it requires ongoing corrosion control.
The better choice depends on the complete vessel: hull form, displacement, structural dimensions, workmanship, operating area, expected impacts, propulsion, loading and maintenance capacity. Hull material alone does not determine speed, fuel economy, stability, seaworthiness or service life.
The safest approach remains layer first, product second. Identify what is damaged, determine whether the problem is cosmetic, laminate-related, cored or structural, and verify that the reinforcement, resin and finish form a compatible system. Avoid universal layer counts, cure times, bevels and resin recipes.
Reserve DIY work for bounded repairs you can fully assess, prepare, laminate and inspect safely. Wet core, deformation, extensive delamination, below-waterline structural damage and failures near highly loaded components are reasons to stop and obtain qualified marine assistance.