
Boat Hull Stress Cracks Need Triage Before Repair
Keep a gelcoat-finished fiberglass boat out of service when integrity is uncertain, especially if a crack is below the waterline, leaking, moving or growing.
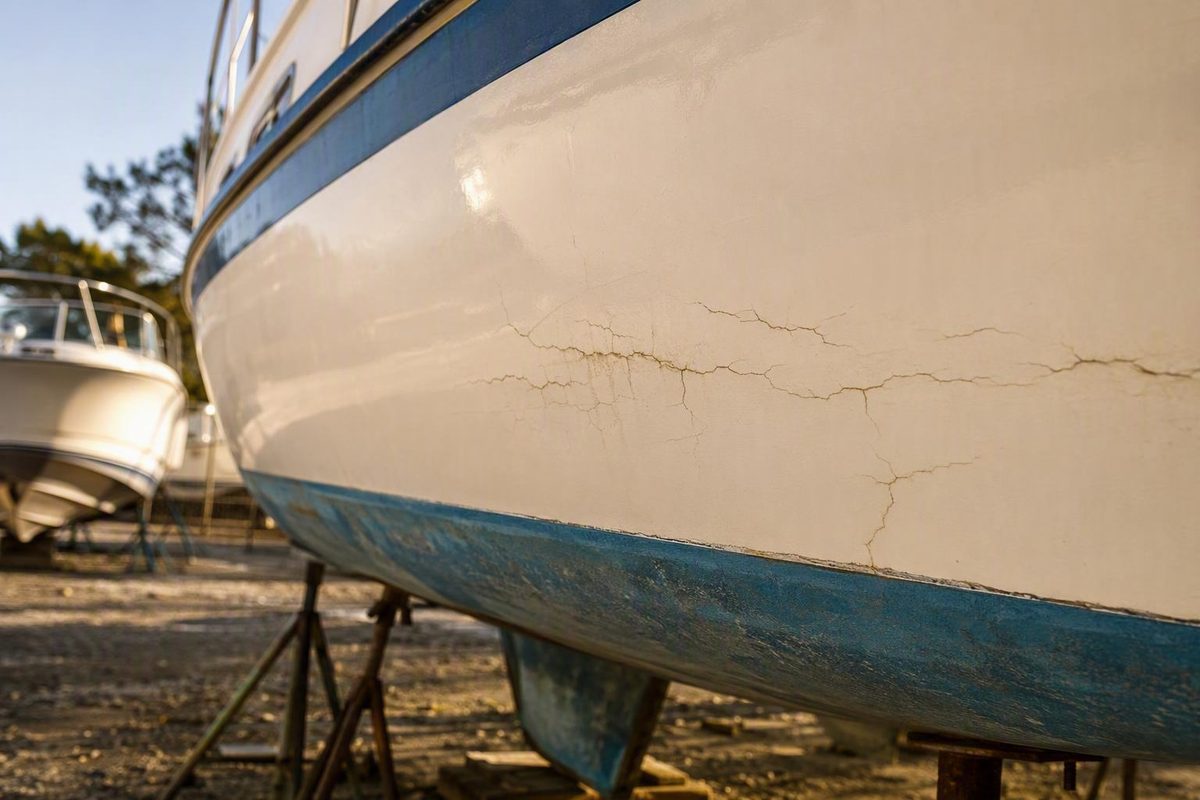
Stress cracks on a boat hull may be superficial fractures in the gelcoat, or they may be the visible edge of damage involving fiberglass laminate, core material, or internal supports. A crack cannot be classified reliably simply because it looks small.
Before filling or refinishing anything, determine as far as reasonably possible whether the damage is confined to the finish—and whether an underlying source of flex, impact, or concentrated loading remains.
This is a triage and repair-planning overview for fiberglass hulls with gelcoat finishes. It is not a vessel-specific inspection, structural repair design, or authorization to return a damaged boat to service. The guidance should not be transferred unchanged to wooden, aluminum, or steel hulls.
Start here: decide whether the boat should stay out of service
Immediate triage
Avoid operating the boat when hull integrity is uncertain, particularly when a crack is below the waterline, leaking, moving, growing, recurring, or associated with a collision, grounding, or other impact. Preserve the visible evidence and arrange direct assessment instead of filling the crack to see what happens. Commercial fiberglass-repair guidance likewise treats widening, flexing, leakage, exposed fiberglass, recurrence, and collision history as warning signs of possible structural damage (stress cracks versus structural cracks).
This is a cautious screening rule, not project-specific permission to launch, trailer, or continue using a particular damaged boat.
Treat these as higher-concern signs:
- Exposed fiberglass strands or an opening through the finish
- Water entering through or around the crack
- Unexplained water collecting in the bilge
- A surface that moves or flexes abnormally under light pressure
- Softness in the surrounding hull, core, transom, or support structure
- Suspected separation between laminate layers or between a skin and core
- Bulging, bubbling, staining, or discoloration around the defect
- A crack that is visibly widening, lengthening, or opening
- Unusual vibration, noise, or a recent change in how the boat feels underway
- Damage centered on a dent, abrasion, puncture, or other impact mark
- Cracking that returns after an earlier cosmetic repair
Location also changes the level of concern. Give extra weight to cracks:
- On the hull bottom or below the waterline
- At or near the keel
- Around the transom or motor mounts
- Beside bulkheads, stringers, ribs, or bonded supports
- Around through-hull fittings, strakes, chines, lifting points, or heavily loaded hardware
- Where trailer bunks or rollers contact the hull
- In an area exposed to concentrated engine, rigging, impact, or wave loads
A hairline crack high on a lightly loaded topside may be less concerning than a similar-looking line beside a motor mount or keel. That does not make the topside crack diagnosed or safe. Depth, location, movement, leakage, and surrounding damage matter more than an unsupported crack-length threshold.
Photographs can document the pattern and help prioritize next steps. They cannot reveal every hidden fracture, wet core section, delaminated bond, or failed backside support. A direct examination may still be necessary even when the visible line appears minor.
Understand what may be cracked: gelcoat, laminate, core, or supports
A gelcoat-finished fiberglass hull can be viewed as a stack of functional layers:
Outside of hull / water side
┌──────────────────────────────────────────────┐
│ Gelcoat: colored exterior finish             │
├──────────────────────────────────────────────┤
│ Fiberglass laminate: load-carrying structure │
├──────────────────────────────────────────────┤
│ Optional core: increases panel stiffness     │
├──────────────────────────────────────────────┤
│ Inner skin, bonds, stringers, bulkheads,      │
│ ribs, transom structure, or other supports   │
└──────────────────────────────────────────────┘
Inside of hull
Liners and interior finishes may obscure the reverse side.
Gelcoat is the smooth, pigmented exterior finish over the fiberglass structure. It provides appearance and surface protection, but it is not a replacement for sound load-carrying laminate. Some hairline cracks, spiderweb patterns, and widespread crazing remain entirely within this outer finish.
Laminate is the resin-and-fiberglass structure beneath the gelcoat. If the reinforcement or resin matrix is fractured, repairing the finish alone cannot rebuild the damaged load-carrying structure.
Core material, where present, separates laminate skins and increases panel stiffness. Wet, crushed, deteriorated, or poorly bonded core changes both the diagnosis and repair scope.
Supports include stringers, bulkheads, ribs, transom components, backing structures, and bonded joints.
Boating-maintenance guidance distinguishes cracks confined to gelcoat from those reaching laminate or core and emphasizes stabilizing the source of flex or weakness before filling the visible opening (gelcoat, laminate, and core distinctions).
Crack shape is a screening clue, not a depth gauge:
- Isolated hairline: May be a shallow finish fracture, but location and history still matter.
- Spiderweb pattern: Can follow a minor impact or localized flexing; a central impact point deserves closer inspection.
- Single linear crack: May follow a corner, seam, hard spot, or concentrated stress line.
- Concentrated parallel cracks: Can indicate repeated flexing across a larger stressed zone.
- Fastener-centered cracks: May point to excessive screw pressure, poor backing, movement, or inadequate hole preparation.
- Widespread crazing: May reflect broad gelcoat deterioration or repeated cycling rather than one isolated defect.
- Recurring crack: Suggests that movement, damaged material, loading, or inadequate reinforcement remains unresolved.
No pattern proves that damage is cosmetic or structural. A conspicuous spider crack may remain in the finish, while a nearly invisible line may extend into a highly loaded laminate.
Read the pattern and location for clues about the cause
The visible crack is often a symptom. A durable repair depends on identifying and correcting the condition that made the surface fail.
Isolated hairlines and spider cracks
An isolated hairline or small spider pattern may result from minor impact, localized flexing, or stress within the gelcoat. If the center contains a chip, dent, scuff, or abrasion, inspect beyond the visible branches. The gelcoat may have cracked while the laminate remained sound, or the pattern may outline deeper impact damage.
A web without an obvious center may be associated with repeated local movement. Look for nearby hardware, an internal support, a loose component, or a trailer contact point aligned with the affected area.
Concentrated or similarly oriented cracks
A group of cracks running in similar directions broadens the investigation. It may indicate that the panel repeatedly bends along a common stress line or that damage extends below the finish.
Manufacturer-published technical guidance distinguishes minor isolated cracks from concentrated, similarly oriented cracking that can justify removing gelcoat and inspecting the laminate rather than repeatedly filling the surface (pattern-based gelcoat-crack assessment).
That does not mean every parallel cluster is structurally damaged. It means the appropriate question changes from “How do I hide these lines?” to “Why is this area moving?”
Cracks around fasteners and hardware
Cracking around a screw, cleat, fitting, rail base, or mounted component may result from:
- Overtightening
- Concentrated clamping or thread pressure
- Insufficient, compressed, or damaged backing
- An undersized pilot hole
- Poor countersinking or edge preparation
- Movement between the fitting and hull
- An unsealed penetration admitting moisture into a core
- Loads the local structure does not distribute adequately
The correction may require removing the hardware so the hole, backing, seal, surrounding core, and load distribution can be examined. Replacing the gelcoat without correcting the pressure or movement invites recurrence.
Cracks near hard spots
Stringers, ribs, bulkheads, fittings, and bonded supports make one part of a hull stiffer than the adjoining panel.
A crack aligned with a support does not prove that the support has failed. It may instead reflect a stiffness transition, a poor bond, inadequate reinforcement, impact damage, or excessive movement in the surrounding laminate. Access to the reverse side can be important in distinguishing among those possibilities.
Other plausible contributors
Depending on the boat and crack location, possible contributors include:
- Collision, grounding, dock, debris, or internal impact
- Repeated hull flexing
- Engine or machinery vibration
- Excessive or poorly distributed loads
- Inadequate local reinforcement
- Wet, crushed, weak, or deteriorated core
- Damaged stringers, bulkheads, ribs, or bonded joints
- Poorly positioned or damaged trailer bunks and rollers
- Pressure or movement around hardware
- Thick, brittle, aged, or poorly bonded finish material
- Repeated temperature cycling
These are investigation points, not diagnoses. More than one may be operating at the same time.
Cause-to-correction framework
| Observation or suspected cause | What the repair plan must address |
|---|---|
| Impact-centered cracking | Establish how far damage extends before refinishing; inspect accessible laminate, core, and reverse surfaces |
| Repeated hull flex | Evaluate laminate condition, panel stiffness, bonds, and supporting structure |
| Cracking around hardware | Correct fastener pressure, hole preparation, sealing, backing, and load distribution |
| Cracks aligned with trailer bunks or rollers | Examine support position, shape, condition, and contact before repairing the finish |
| Soft or spongy surrounding area | Investigate core condition, skin-to-core bonding, and possible water entry |
| Cracks beside a stringer, rib, or bulkhead | Examine the bond, support condition, stiffness transition, and local reinforcement |
| Recurrent cracking after filling | Remove enough finish to determine whether movement or deeper damage was missed |
| Widespread crazing | Determine whether unstable gelcoat must be removed rather than coated over |
Correcting movement, weakness, impact damage, or concentrated loading is part of the repair—not an optional prevention measure. If the hull continues bending at the same point, a cosmetically perfect fill may crack again.
Perform a cautious initial inspection without hiding the evidence
An owner can document and screen a crack before grinding, filling, or painting. The purpose is to gather evidence and identify reasons for escalation, not to issue a structural diagnosis at home.
Clean only enough to see clearly
Remove dirt, wax, salt, and loose contamination using a method compatible with the existing finish. Do not aggressively route, grind, or sand a crack of uncertain depth merely to make it more visible.
Allow the area to dry sufficiently for inspection. View it in oblique light from several angles because glare can hide fine lines.
Photograph the crack in context
Take:
- A wide image showing the crack’s position on the hull
- A medium image showing nearby fittings, chines, supports, trailer contact, or impact evidence
- A close image with a ruler or another scale beside the crack
- Images of the accessible reverse side, where available
Record the date and relevant history, including a grounding, collision, rough-water event, trailer adjustment, hardware installation, heavy loading, previous repair, unexplained bilge water, or new vibration.
Mark the ends and monitor change
Place removable reference marks just beyond the visible ends without covering the crack. Record their positions and the date. This provides a better basis for detecting growth than memory or photographs taken from different angles.
Monitoring is appropriate only when no urgent condition already calls for direct assessment. It should not be used to postpone evaluation of a leaking, flexing, impact-related, below-waterline, or structurally located crack.
Inspect adjacent and reverse surfaces
Where access permits, look for:
- Cracking beyond the obvious line
- Staining, water tracks, or damp material
- White or fractured-looking lines in exposed laminate
- Visible or loose fibers
- Broken tabbing or separated bonds
- Damage to a stringer, rib, bulkhead, liner, or transom component
- A dent, abrasion, puncture, or impact point
- Loose hardware or compressed backing
- Core exposed by an unsealed penetration
Check gently for abnormal softness or movement. Do not hammer, jack, bend, or deliberately load an uncertain area to force the crack open.
If the crack changes or leaks during ordinary handling, document that observation and stop treating the defect as an uncomplicated cosmetic repair. Repair-shop guidance identifies pooled bilge water, softness, discoloration, bubbling, and unusual vibration or noise as reasons to investigate hull damage more closely (indicators associated with hull damage).
Cleaning, photographs, light touch, and visual inspection cannot rule out hidden delamination, wet core, or damage behind an inaccessible liner. Preserve suspected structural evidence for direct examination rather than routing or covering it first.
Arrange direct professional assessment when depth remains uncertain or any of the opening red flags is present. A remote photo review may help prioritize next steps, but it cannot establish the full depth or extent of damage.
Choose the right path: monitor, repair the finish, or rebuild the structure
Use depth, location, movement, leakage, surrounding condition, growth, recurrence, and history—not crack length alone—to select a path.
Is there leakage, visible fiberglass, abnormal flex, softness,
suspected delamination, growth, recurrence, impact history,
or a highly loaded or below-waterline location?
                         │
              ┌──────────┴──────────┐
             Yes                    No
              │                      │
Direct assessment before            Can the defect reasonably be
cosmetic work                        confirmed as gelcoat-only?
                                     │
                           ┌─────────┴─────────┐
                          No                  Yes
                           │                   │
                Preserve and assess       Is the cause corrected,
                rather than filling       with sound laminate and
                                          no water entry?
                                              │
                                    ┌─────────┴─────────┐
                                   No                  Yes
                                    │                   │
                              Investigate or        Cosmetic repair
                              correct cause first   may be reasonable
Path 1: document and monitor
Limited monitoring may be reasonable when the crack has been inspected, no urgent signs are present, and the owner is documenting whether it changes before deciding on cosmetic work.
This path is not a declaration that the crack is harmless or that the boat is safe for a particular use. Any new movement, moisture, discoloration, recurrence, or growth changes the decision.
Path 2: cosmetic gelcoat repair
A narrow DIY candidate is an isolated defect reasonably confirmed to be confined to gelcoat, with:
- Sound surrounding laminate
- No abnormal movement or softness
- No leakage or unexplained moisture
- No unresolved impact damage
- No evidence of core or support failure
- No active growth
- No recurrence suggesting continuing flex
- An identified and corrected cause where one is apparent
- A location and scope suited to the owner’s skills and working conditions
Cosmetic repair restores the finish. It does not rebuild damaged laminate.
Path 3: direct professional assessment
Choose direct assessment when the defect has uncertain depth, concentrated or extensive cracking, impact history, exposed fibers, movement, leakage, softness, suspected delamination, recurrence, or a highly loaded or below-waterline location.
Structural repair differs fundamentally from surface refinishing: damaged material is exposed and removed as necessary, then the load-carrying laminate is rebuilt. Wet core and damaged supports must be corrected before fairing and finishing. Gelcoat, patch paste, and filler cannot restore fractured reinforcement or a failed structural bond (cosmetic versus structural repair).
A qualified fiberglass repair professional can examine the construction and develop the repair scope. Where condition, responsibility, purchase implications, or repair adequacy is disputed, consider obtaining separate condition documentation from an appropriate marine surveyor rather than relying solely on the party performing the repair.
General repair sequence for confirmed gelcoat-only cracks
The following is a general workflow, not a universal product recipe. Use it only after deeper damage has been reasonably ruled out and the source of movement or loading has been corrected.
1. Correct the cause
Address loose hardware, excessive fastener pressure, inadequate backing, poor trailer contact, or another identified source of stress. If correction requires laminate, core, bond, or support work, the project is no longer gelcoat-only.
2. Remove loose or unsound edges
Remove gelcoat that is visibly loose, poorly bonded, or crumbling. The objective is to reach stable edges without needlessly cutting into sound laminate.
A tight, contaminated slit may not provide adequate access for preparation and filling. Controlled opening or channeling creates room to remove damaged gelcoat and place compatible repair material.
3. Open the crack with controlled passes
Several shallow tool passes generally provide more control than one deep cut. Follow the affected path while avoiding unnecessary penetration into the fiberglass. If fibers, moisture, a void, unexpected depth, or moving material appears, stop and reassess the classification.
Maintenance guidance likewise recommends shallow controlled passes and selecting fill material according to the prepared channel’s actual depth and width (general crack-opening and filling workflow).
A hairline, spiderweb, gouge, and broad channel do not necessarily receive the same preparation or material.
4. Abrade and clean
Abrade the channel and immediate bonding area as required by the selected repair system. Remove sanding debris and contamination without spreading residue into the repair.
Use only cleaning methods approved for the substrate and repair chemistry.
5. Mask the repair area
Masking protects nearby finish and limits unnecessary sanding. Leave enough working area to apply, level, and blend the repair without creating a sharp ridge at the tape line.
6. Fill with a compatible material
Match the material to the prepared defect’s depth and width, the existing construction, and the intended finish. A shallow gelcoat channel may call for matched gelcoat; a deeper but nonstructural surface defect may require a different compatible filling system.
Do not assume that gelcoat, one-part paste, polyester filler, thickened resin, and structural laminating resin are interchangeable. Follow the selected product’s current technical instructions for approved substrates, mixing, catalyst or hardener proportion, application thickness, and working time.
7. Cure as directed
Some gelcoat products require an air-excluding film, waxed formulation, or another specified cure method. Other systems cure differently. Do not transfer one product’s instructions to another.
The product documentation—not a generic article—must determine when the repair can be sanded, loaded, immersed, or returned to service.
8. Level and progressively refine the finish
After the specified cure, level the repair without aggressively thinning the surrounding gelcoat. Move through progressively finer abrasive stages suited to the product, then compound and polish or apply the specified primer, paint, or gelcoat finishing system.
Each abrasive stage should remove the scratches left by the previous stage while preserving the hull contour. Do not jump from coarse leveling directly to polishing.
Do not apply this workflow to a crack suspected of reaching laminate, core, or supports. Finding fibers, moisture, a void, or unexpected movement is a reason to stop—not an invitation to pack the opening with more paste.
What structural fiberglass repair involves
When a crack extends into the laminate—or when the finish failed because the underlying structure is moving—the work changes from surface refinishing to structural reconstruction.
At a planning level, structural work generally involves:
- Exposing enough of the area to inspect the damage
- Removing fractured, delaminated, contaminated, or otherwise unsound material
- Continuing until sound construction is reached
- Preparing the repair zone to transfer load into the surrounding laminate
- Correcting damaged core, bonds, backing, or supports
- Rebuilding the laminate with suitable resin and fiberglass reinforcement
- Consolidating and curing the new laminate according to the repair system
- Fairing without removing required structural thickness
- Sealing and preparing the repair for its intended finish
- Restoring paint or gelcoat as a separate finishing stage
Concentrated or recurring cracks may require removal of surrounding gelcoat so the laminate can be inspected. Repeatedly filling visible lines can hide progression while leaving the cause untouched.
The repair design is project-specific.
- Original hull construction
- Resin system
- Damage depth and area
- Direction and concentration of loads
- Solid versus cored construction
- Condition of adjacent laminate
- Access to one or both sides
- Nearby supports and hard spots
- Intended paint or gelcoat finish
- Applicable builder instructions
Chopped strand mat and biaxial fabrics such as 1708 are examples used in some fiberglass repairs, not universal prescriptions. Practitioner guidance notes that material selection changes with crack pattern, reinforcement needs, and the intended finish (repair variables and reinforcement examples). Naming a fabric does not establish an appropriate laminate schedule for a hull bottom, transom, keel, or motor-mount area.
Core damage changes the scope substantially. Wet, soft, crushed, or poorly bonded core may need to be removed and replaced, and the route by which water entered must be corrected.
Likewise, a cracked finish over a detached stringer, failed bulkhead bond, weak transom, or damaged rib cannot be corrected with gelcoat. The support and its connection to the hull must be addressed before the exterior is faired and refinished.
Uncertain or significant hull damage calls for a fiberglass repair professional with relevant structural-repair experience. Project-specific laminate design, compatibility decisions, cure limits, inspection methods, and return-to-service determinations fall outside a general article.
Select materials by substrate, depth, reinforcement need, and finish
Material names are not repair designs. “Use epoxy” or “use gelcoat paste” is incomplete advice unless it accounts for the substrate, damage depth, structural loading, access, cure conditions, and final coating.
Bounded material-planning matrix
| Planning factor | Confirmed shallow gelcoat damage | Medium-depth surface defect | Fractured laminate | Core or support damage |
|---|---|---|---|---|
| Primary objective | Restore the exterior finish | Rebuild a stable surface profile | Restore load-carrying laminate | Restore the structural system beneath the skins |
| Possible material category | Matched, compatible gelcoat repair material | Compatible filler, thickened resin, or specified repair compound | Compatible resin with designed fiberglass reinforcement | Core, bonding, tabbing, reinforcement, or support materials selected for the construction |
| Fiberglass reinforcement | Normally unnecessary for a truly finish-only channel | Depends on whether the defect reaches laminate | Required as dictated by the repair design | Usually project-specific and integrated with skin or support reconstruction |
| Critical checks | Color, cure method, preparation, immersion limits | Depth, shrinkage, adhesion, finishing compatibility | Original laminate, fiber orientation, loading, access, cure, consolidation | Moisture source, core type, bond area, load path, support geometry |
| Finish consideration | Blend into existing gelcoat | Must accept the selected finish system | Structural resin must be prepared for paint or gelcoat | Rebuilt structure must be sealed, faired, and finished as a complete system |
| DIY suitability | Potentially, after inspection | Conditional and skill-dependent | Requires structural-repair competence | Usually a major structural project |
Matched gelcoat is commonly used for shallow prepared channels. Some medium-depth nonstructural defects may use a compatible filler or specified repair compound. Fractured laminate requires resin and fiberglass reinforcement selected for the repair; filler alone is not structural reconstruction.
The original laminate chemistry may also be uncertain. A product that bonds to one prepared substrate may require additional steps before accepting the next coating.
Paint and gelcoat finishes can impose different preparation and compatibility requirements. A repair intended for paint does not necessarily use the same sequence as one intended to receive gelcoat.
Avoid both categorical extremes:
- It is too broad to say gelcoat can never be applied over cured epoxy.
- It is also unsafe to assume gelcoat can always be applied directly over any cured epoxy.
Technical guidance for epoxy-based gelcoat-crack repair specifies preparation steps rather than treating cured epoxy as automatically ready for every finish (epoxy repair and finish preparation).
For every material system, consult current product technical documentation for:
- Approved substrates
- Resin-to-gelcoat or resin-to-paint compatibility
- Mixing and catalyst requirements
- Surface preparation
- Application thickness
- Environmental limits
- Working and cure times
- Sanding or recoating windows
- Washing or post-cure requirements
- Time before loading, launching, or prolonged immersion
There is no universal fabric, fabric weight, patch count, resin ratio, or reinforcement schedule suitable for every hull crack.
Work safely, prevent recurrence, and monitor the repair
The technical sources supporting this overview do not provide a comprehensive occupational-safety program. Therefore, “work in a ventilated area” must not be treated as complete protection from solvents, reactive resins, catalysts, sanding dust, fire, or other product-specific hazards.
Use a sheltered workplace with suitable ventilation as a minimum working condition, and follow the current label, safety data sheet, and manufacturer instructions for every solvent, resin, hardener, catalyst, gelcoat, filler, primer, paint, and cleaner. Basic commercial spider-crack guidance likewise calls for a ventilated, sheltered work area and following the gelcoat manufacturer’s directions (minimum workplace guidance).
Those product-specific documents—not this article—should determine the required:
- Gloves, protective clothing, and eye protection
- Respiratory protection
- Vapor and sanding-dust controls
- Ventilation method
- Fire, spark, flame, and ignition precautions
- Mixing limits and management of heat-generating reactions
- Storage and separation of reactive components
- First-aid and spill procedures
- Disposal method for liquids, dust, contaminated materials, and cured waste
Do not assume that one glove material, respirator cartridge, ventilation setup, or cleanup method is suitable for every repair product.
Prevent the same stress from returning
Before considering the job complete, revisit the likely cause:
- Trailer support: Check bunks and rollers for alignment, damage, adequate contact, and concentrated pressure.
- Load distribution: Avoid repeatedly concentrating heavy equipment or stored objects against one hull area.
- Hardware pressure: Inspect backing, clamping force, hole preparation, sealing, and movement around fittings.
- Penetration sealing: Correct failed or unsealed holes that can admit water into core or backing.
- Support condition: Examine accessible stringers, bulkheads, ribs, transom structure, and bonded connections.
- Impact exposure: Address repeated contact with docks, gear, loose internal objects, or other impact sources.
- Protective finish: Repair deteriorated coatings that leave prepared or exposed material vulnerable to water and contamination.
Recurrence can indicate unresolved flex, hidden impact damage, weak support, deteriorated core, inadequate reinforcement, incompatible materials, poor cure, or an earlier repair confined to the surface. It does not identify the cause by itself. The correct response is reassessment, not another cosmetic layer.
Document and monitor the completed repair
Photograph the completed repair, including a wider view that records its location. Note the products used, batch information where available, preparation, cure conditions, and completion date.
Inspect the area periodically and after relevant events such as an impact, grounding, trailer adjustment, or unusual loading. Look for:
- Renewed hairline cracking
- A halo or parallel cracks around the repair
- Movement or softness
- Bulging or discoloration
- Water entry
- Separation at the repair edge
- Changes on the accessible reverse side
The appropriate frequency depends on the location, use, repair type, and consequences of failure. Renewed cracking is a reason to reconsider the load path and underlying structure.
Frequently asked questions
Are spider cracks on a fiberglass boat hull only cosmetic?
Not necessarily. Spider cracks can remain within the gelcoat, particularly when associated with minor surface impact or localized finish stress. They can also appear over moving laminate or radiate from an impact that damaged deeper layers.
Treat the web as a clue. Consider its location, center point, surrounding stiffness, moisture signs, accessible reverse side, growth, and impact history. It becomes a reasonable cosmetic-repair candidate only after the surrounding laminate appears sound and the defect is reasonably confirmed to be limited to gelcoat.
Can I use a boat with a stress crack below the waterline?
Do not assume a below-waterline crack is safe because it is short, narrow, or not leaking while the boat is ashore. If its depth or the hull’s integrity is uncertain, keep the boat out of service until the area is directly evaluated.
Leakage, visible fibers, movement, softness, growth, impact history, or proximity to the keel or another major structure strengthens the case for prompt assessment. General repair-shop guidance likewise advises against operating a boat with a compromised hull and recommends professional evaluation for significant or uncertain damage (cracked-hull assessment guidance).
Why did a repaired stress crack come back?
The earlier repair may have restored the surface while leaving the cause in place. Possible contributors include continuing panel flex, concentrated hardware pressure, poor trailer support, a hard spot, hidden laminate damage, deteriorated core, damaged supports, or inadequate reinforcement.
Do not simply widen and refill the line. Reassess the surrounding laminate and load path first.
Can gelcoat patch paste repair a structural fiberglass crack?
No. Patch paste may restore the appearance of a properly prepared shallow finish defect when the underlying laminate is sound. It cannot reconnect fractured fiberglass, replace missing reinforcement, restore a failed skin-to-core bond, or repair a damaged stringer or transom.
Structural damage requires the compromised area to be exposed and rebuilt as necessary with a suitable resin-and-reinforcement system. Gelcoat is applied later as part of finishing; it is not the source of restored structural strength.
Can gelcoat be applied over an epoxy repair?
Sometimes, but not automatically. Compatibility depends on the particular epoxy and gelcoat products, complete cure, surface cleaning, abrasion, environmental conditions, and any manufacturer-required intermediate process.
Use current written instructions from the manufacturers of both systems. If those instructions are unclear or conflict, obtain product-specific technical advice or choose a documented compatible system rather than relying on a general claim that gelcoat always—or never—works over epoxy.
The simple rule is: do not repair the appearance until the cause and depth have been assessed. A stable, inspected gelcoat-only crack may be a manageable cosmetic project. Leakage, movement, softness, visible fibers, growth, recurrence, impact history, or a critical hull location should shift the job from patching to direct professional evaluation. If repair proceeds, use a system compatible with the hull and intended finish, follow its technical and safety instructions, correct the underlying stress, and monitor the area for renewed cracking.