
Gelcoat Blisters: Spot Repair or Full Hull Treatment?
Learn how blister depth, distribution and recurrence determine whether a fiberglass boat needs spot repair, hull treatment or laminate rebuilding.
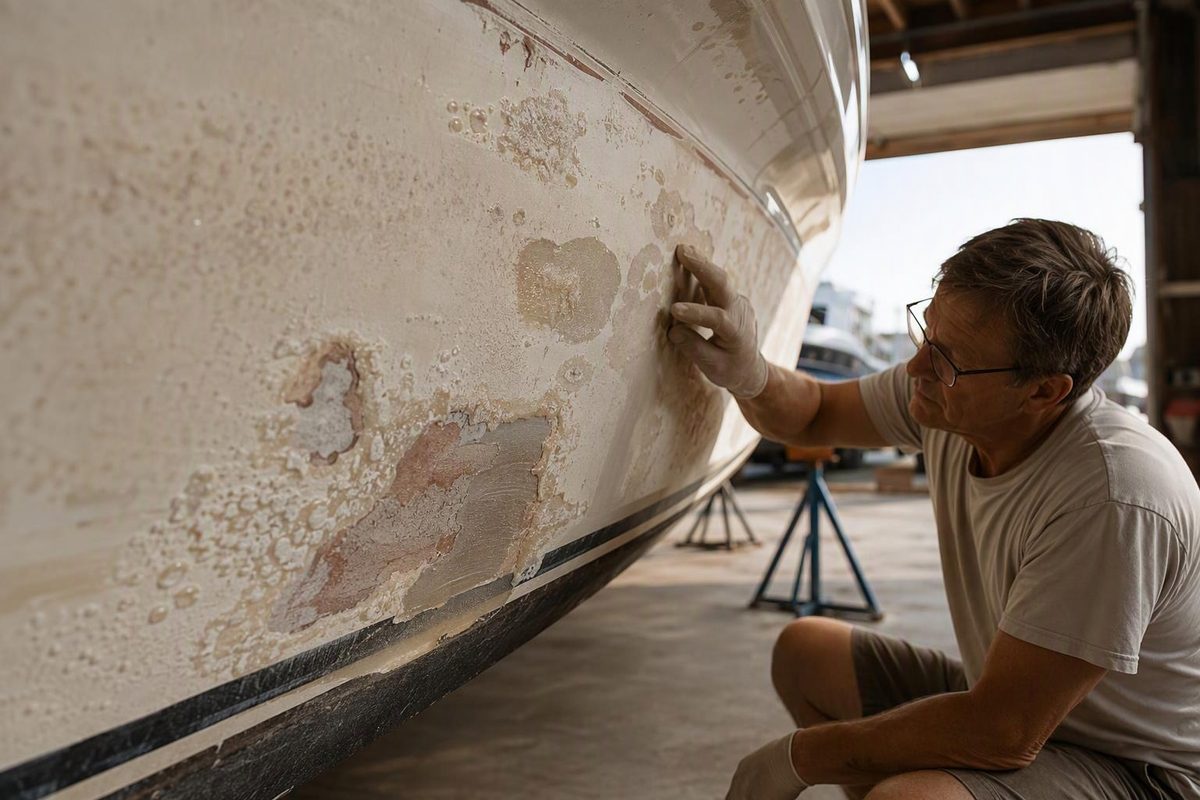
A manageable number of isolated gelcoat blisters can usually be opened and repaired individually when the surrounding laminate is sound. Dense or recurring blistering across the underwater hull may justify gelcoat removal, controlled drying and an epoxy barrier system. If damage reaches reinforcing fibers, it requires laminate repair rather than surface filling.
Select what you found on the hull; the tool shows the appropriate repair path.
Gelcoat Blister Repair Path
Base the decision on the affected layer, distribution and whether blistering is progressing.
Open each complete cavity, clean and dry it by one repair system’s method, fill with the specified moisture-resistant epoxy system, restore compatible coatings and map the locations for later haul-outs.
Source basis: WEST SYSTEM, Epoxyworks, International Paint and BoatUS guidance cited in the article.
Do not choose a repair from blister diameter alone. Distribution, depth, recurrence and the condition of the exposed laminate matter more.
Inspect Blisters Immediately After Haul-Out
Inspect the bottom as soon as the boat leaves the water. Blisters can deflate within an hour or two and become harder to locate. Photograph the hull, mark affected areas and record their approximate number and distribution before opening representative blisters (Epoxyworks).
First establish which layer is raised:
- Paint blister: The bubble is confined to antifouling paint, primer or another coating, with intact gelcoat below. Diagnose the coating system rather than cutting into the hull.
- Gelcoat blister: The dome remains after paint removal, and opening it exposes a cavity beneath the gelcoat.
- Laminate blister or delamination: The cavity extends between fiberglass layers or exposes loose fibers, degraded resin or separated reinforcement.
- Localized void or impact damage: A lone raised area beside hardware, above the waterline or near prior damage may have a local cause rather than hull-wide osmotic blistering.
In osmotic blistering, water entering a polyester system encounters soluble material and collects in voids. The resulting solution attracts more water, and increasing pressure enlarges the cavity. Hydrolysis can also degrade polyester resin and resin-to-fiber bonds, so visible blisters may indicate damage below the finish (WEST SYSTEM).
For the relationship between gelcoat and reinforcement, see Boat Fiberglass Hull: Construction, Damage & Repair Guide.
Match the Repair to Extent and Depth
| Finding | Appropriate Next Step |
|---|---|
| A manageable number of isolated cavities with sound, firmly bonded laminate | Open and spot-repair each cavity; inspect again at later haul-outs |
| A few new blisters with no history of recurrence | Spot-repair, map their locations and monitor |
| Numerous or closely spaced blisters across much of the underwater hull | Obtain a survey and assess removal, drying, fairing and barrier-coat options |
| Increasing numbers after earlier spot repairs | Reassess the complete underwater hull instead of repeatedly filling symptoms |
| Loose fibers, degraded resin or a cavity extending through reinforcement | Remove damage to sound material and specify a reinforced laminate repair |
| Wet core, widespread delamination, uncertain hull thickness or damage beside a keel, rudder or through-hull | Stop removal and use a marine surveyor or qualified composite repair yard |
A few blisters do not automatically justify peeling an otherwise sound bottom. Epoxyworks recommends individual repair and monitoring when the number is manageable; it may take several haul-outs to establish whether the condition is stable or progressing. At the other extreme, filling hundreds of cavities does not correct a hull-wide moisture problem.
International Paint describes a similar dividing line: gelcoat blistering may call for gelcoat removal, cleaning, drying and recoating, while extensive craters in the underlying laminate require removal and replacement of laminate layers (International Paint).
Spot-Repair Isolated Gelcoat Blisters
Use this route only where the surrounding laminate is sound. Follow one repair-system manufacturer’s current instructions throughout. Do not combine one company’s resin with another company’s filler, cleaning solvent or overcoat schedule without confirmed compatibility.
- Open the complete cavity. Wear eye protection, chemical-resistant gloves and suitable dust protection. Fluid may discharge when a blister is opened. Remove the loose dome and its unsupported edge rather than drilling only a drain hole.
- Dish back to firmly bonded material. Remove damaged material, but do not grind deeper merely to make every cavity identical. Tap around the opening. A dull response extending beyond it may indicate a larger debonded area.
- Clean and dry it by the selected system’s method. Water-soluble residues cannot be removed by drying alone. Published methods differ: BoatUS specifies washing and extended drying, while WEST SYSTEM’s isolated-blister method uses repeated isopropyl-alcohol wipes. Use the complete method approved for the epoxy system rather than mixing steps (BoatUS; WEST SYSTEM).
- Abrade as specified and wet out the sound substrate. Apply the approved unthickened repair epoxy, observing its temperature, mix ratio, working time and recoat limits.
- Fill a shallow cavity with the specified moisture-resistant filler. Both BoatUS and WEST SYSTEM describe colloidal-silica-thickened epoxy for isolated cavities that will not receive a complete barrier coat. Avoid an absorbent or low-density fairing compound as the only underwater fill unless the manufacturer’s full barrier schedule covers it.
- Replace reinforcement if fibers were removed. Fairing putty does not restore structural glass. Taper the opening to sound laminate and rebuild it with compatible cloth and laminating resin. Stop for a repair specification if the required thickness and layup are unknown.
- Cure, prepare and recoat. Follow the epoxy instructions for cure time, blush removal and sanding. Restore a compatible underwater primer, a barrier layer where specified, and antifouling coating.
Mapping each repair matters because later haul-outs reveal whether new blisters are isolated exceptions or part of a progressing pattern. Repeatedly filling new cavities without comparing their number and distribution can conceal the point at which a hull-wide assessment becomes appropriate.
Full Hull Treatment Requires Drying and Recoating
A full treatment is a staged hull project, not simply a larger filling job. Depending on the survey and coating system, it generally involves:
- Removing antifouling paint and incompatible coatings.
- Peeling or abrading affected gelcoat without unnecessarily cutting sound structural glass.
- Opening deeper cavities and mapping delaminated areas.
- Repeatedly washing exposed laminate to remove contaminants brought to the surface.
- Drying the exterior and interior while keeping the bilge dry and ventilated.
- Repairing damaged laminate, then filling and fairing.
- Applying the complete epoxy barrier system to its specified dry-film thickness.
- Applying compatible primer or antifouling within the manufacturer’s preparation and overcoat window.
There is no universal drying time. Hull construction, temperature, humidity, ventilation and damage depth all affect it. A schedule copied from another boat does not establish that a particular hull is ready to coat.
Handheld moisture meters provide relative readings, not direct measurements of true laminate moisture. Mark repeatable locations above and below the waterline and monitor the trend under stable conditions. A leveling trend is more informative than treating one displayed percentage as a universal pass-or-fail threshold (WEST SYSTEM).
A barrier coat limits future moisture entry. It does not replace degraded reinforcement, remove soluble contamination or make a wet surface ready for coating. Coating over an inadequately cleaned or insufficiently dried substrate can seal the finish without correcting the condition underneath.
Stop When Reinforcement or Core Is Involved
Pause and obtain a survey or repair specification if representative openings reveal broad delamination, soft or resin-starved glass, wet core, multiple damaged laminate layers or a dull-sounding area that grows as material is removed. These findings make the required repair depth and laminate schedule difficult to determine from the surface alone.
Damage around a keel, rudder, through-hull, engine support or another load-carrying feature also deserves structural assessment. Do not continue grinding when hull thickness, reinforcement orientation or the extent of a debonded area is uncertain.
Finish cracks and impact damage can coexist with blistering but require a different diagnosis. If the surface also has moving or branching cracks, use the checks in Cracking Gel Coat: Causes, Warning Signs & Repair Options before treating the bottom as an osmosis-only project.