
Are Spider Cracks in Fiberglass Cosmetic or Structural?
A long crack that opens, grows, follows a joint, or appeared after an impact deserves more concern. See when monitoring or cosmetic repair fits.
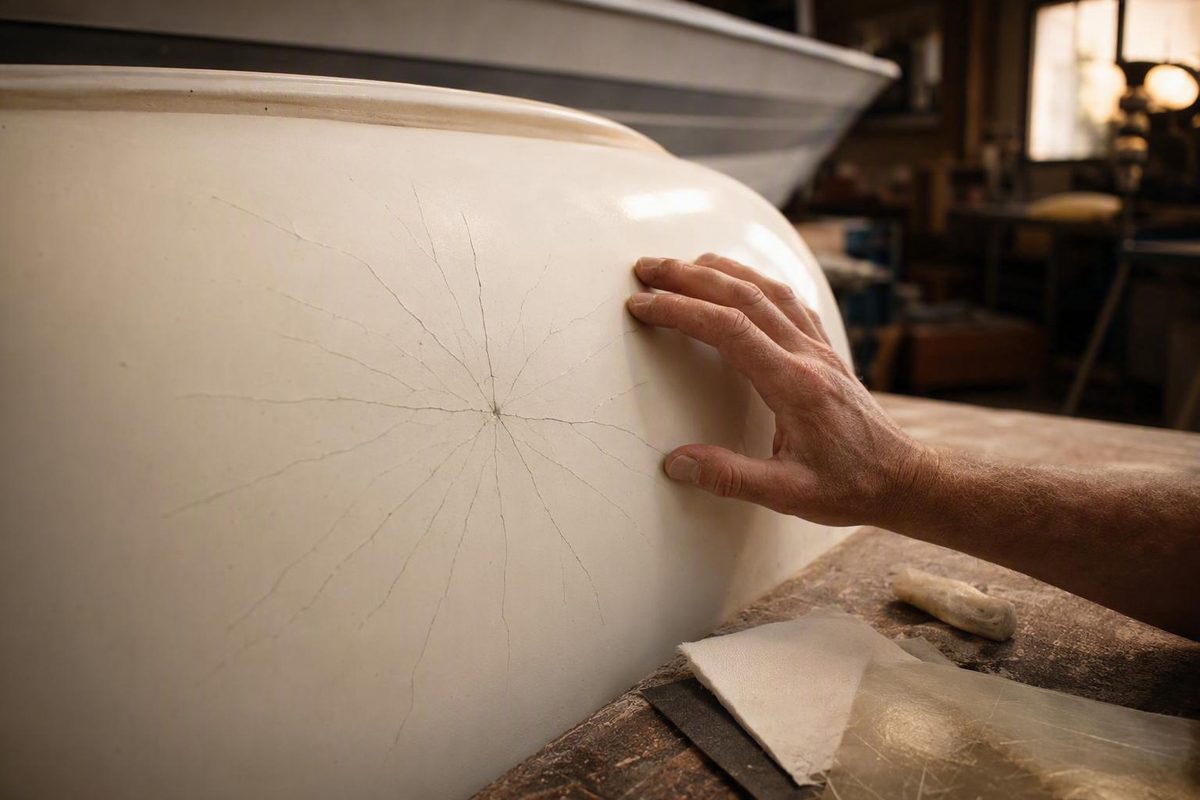
Spider cracks in fiberglass often look like a finish problem: fine lines radiating through an otherwise smooth surface. Sometimes the damage is confined to gelcoat. But the web pattern alone cannot establish whether it stops there or continues into the fiberglass laminate, core, backing, or nearby support.
That distinction determines the repair. Gelcoat can restore a damaged finish, but it cannot replace fractured reinforcement or stabilize a panel that continues to flex. A durable repair therefore begins with documentation, cautious screening, and identification of the stress source—not filler.
The procedure below is intended primarily for gelcoat-finished boats and similar solid-fiberglass surfaces. It can help you decide whether to monitor the cracks, treat them as a reasonable cosmetic-repair candidate, avoid further loading while seeking an assessment, or arrange structural reconstruction. These field checks reduce uncertainty but cannot certify concealed layers as sound.
What spider cracks are—and what their appearance cannot tell you
“Spider cracks” commonly describes fine, branching fractures that form a web or radiate from a central point. They are usually noticed in gelcoat or another hard surface finish. The terms hairline cracks, crazing, spider cracks, and stress cracks are used inconsistently, so the label is less useful than two questions:
- Which layer is damaged?
- Does the area remain stable under ordinary loading?
On a typical fiberglass boat, gelcoat provides the colored, polished outer finish and contributes relatively little structural strength. The fiberglass laminate beneath it—glass reinforcement held in resin—provides most of the panel’s rigidity and strength. Some structures also contain a core, backing plates, stringers, bulkheads, or other supports. This distinction between finish and laminate damage is central to choosing an appropriate repair (Atlantic Boat Repair).
Damage can therefore be classified by its deepest affected layer:
- Finish-only damage: The fracture is confined to gelcoat or another coating.
- Laminate damage: Reinforcement or its resin matrix is fractured, crushed, separated, or inadequately supported.
- Core or backing damage: Material beneath the laminate is wet, crushed, detached, degraded, or unable to distribute a load.
- Support failure: A bulkhead, stringer, joint, transom, mounting surface, or other supporting component has moved or failed.
A small, localized web on a firm surface can be consistent with finish-only damage. A long crack that opens, grows, follows a joint, or appeared after an impact deserves more concern. Neither shape proves depth: a thin line can conceal deeper damage, while an extensive-looking web may remain confined to the finish.
Location and behavior are consequently more informative than appearance alone. Cracks near cleats, transoms, motor mounts, hatch corners, bulkheads, fasteners, joints, or other load concentrations should not be treated like isolated marks in lightly loaded cosmetic panels. A crack that opens or closes when the surrounding structure is loaded gently also warrants more concern than one that remains unchanged on a rigid surface.
The governing rule is simple: a web-like pattern may be consistent with cracked gelcoat, but it cannot rule out damage underneath.
Triage the damage before sanding or filling
Before altering the surface, place the damage into one of four cautious pathways.
1. Document and monitor
Monitoring may be reasonable when:
- The web is isolated and limited in area.
- The surrounding surface feels comparable to an equivalent undamaged area.
- There is no known collision, grounding, hard impact, or unusual loading event.
- The cracks do not visibly open or close under gentle pressure.
- There are no exposed fibers, raised areas, leaks, stains, or signs of persistent moisture.
- The location is not obviously load-bearing or safety-critical.
This does not prove that the cracks are harmless or establish that continued use is safe in every situation. Monitoring preserves evidence and helps determine whether the pattern is stable.
2. Plan a cosmetic repair
An isolated web can be treated as a reasonable cosmetic-repair candidate when it is on a firm, non-critical surface and screening finds no sign of laminate, core, backing, or support damage.
That classification is not a structural guarantee. Opening the cracks during preparation may reveal their depth, and you must be prepared to stop if you expose fibers, softness, moisture, a void, or an unexpectedly deep channel.
3. Avoid further loading pending assessment
Stop the cosmetic process and avoid loading the affected component if you find:
- Softness, sponginess, or unusual flex
- A hollow response compared with nearby sound material
- Bulging, lifting, or distortion
- Cracks that open or close under gentle pressure
- Exposed, white, or torn fibers
- Persistent dampness, discoloration, or leakage
- Recent growth or spreading
- Recurrence after an earlier repair
- Damage associated with an impact
- Uncertainty about the construction or crack depth
There is no supported universal crack width, growth rate, or monitoring interval that determines when every fiberglass product must be taken out of service. The appropriate response depends on construction, location, loading, water exposure, and the consequence of failure.
4. Arrange structural reconstruction
Structural repair is appropriate when inspection establishes fractured laminate, damaged core, failed backing, or movement in a supporting component. Depending on the defect, the work may require removal of damaged material, replacement or drying of core, laminate rebuilding, improved hardware backing, or repair of a support before the exterior finish is restored.
Give particular scrutiny to cracks around transoms, motor mounts, cleats, hatches, fasteners, corners, floors, joints, bulkheads, supports, and below-waterline areas. Widening, spreading, flexing, leakage, visible fiberglass, recurrence, and proximity to important structural features can indicate more than a finish defect; gelcoat alone cannot restore strength to fractured reinforcement (JBRV Mobile RV Repair).
Professional evaluation is the safer course for post-impact damage, widespread cracking, soft areas, visible laminate, leakage, continuing movement, uncertain depth, failed earlier repairs, or damage in a load-bearing location. Depending on the product, the appropriate assessor might be a qualified fiberglass repairer, marine surveyor, boatyard, manufacturer-authorized technician, or composite specialist.
If a warranty or insurance claim may apply, photograph the undisturbed damage and check the applicable warranty, policy, and claim instructions before grinding, sanding, filling, or painting. Authorization and evidence requirements vary, so contact the dealer, manufacturer, or insurer rather than assuming that preliminary work is permitted.
Run a cautious inspection and create a crack record
The first inspection should reveal and preserve evidence, not conceal it.
Clean only enough to see the pattern
Remove ordinary dirt with a method compatible with the existing finish. Do not apply filler, paint, polish that could pack into the cracks, or an aggressive solvent whose compatibility is unknown. Avoid broad grinding during the initial assessment.
Once the area is clean and dry, examine it in direct and oblique light. Light arriving from the side can make raised edges, depressions, and distortion easier to see.
Record the baseline
Create a written entry containing:
- Date
- Product and component
- Exact location
- Approximate length and width of the affected area
- Number or general arrangement of branches
- Nearby hardware, joints, corners, and supports
- Discoloration, staining, bulging, or distortion
- Known impacts, groundings, collisions, or dropped objects
- Recent heavy loading, towing, trailering, or unusual vibration
- Previous repairs nearby
- Leakage, dampness, or interior evidence
Take one context photograph showing the crack location, followed by close-ups with a ruler or another scale in the same plane as the surface. Include enough surrounding detail to reproduce the position later. Comparisons are most useful when lighting, camera angle, distance, and scale remain consistent.
For products exposed to repeated towing or loading, photographs taken before and after use can reveal new branches or lengthening that may be difficult to recall by eye. An RV owner discussion illustrates this documentation approach, although its diagnoses and reported warranty outcome are anecdotal rather than general engineering guidance (Forest River Forums).
Compare firmness gently
Using modest hand pressure, compare the cracked area with an equivalent undamaged area of the same component. The goal is to detect a difference, not to prove the panel’s strength.
Stop if the area:
- Depresses noticeably more than the comparison area
- Feels spongy
- Flexes independently of its surroundings
- Produces an obvious hollow response
- Appears to separate, rise, or change shape
These findings justify further assessment but do not identify the exact defect. Softness can have multiple causes, while a firm surface can still conceal localized delamination, wet core, or fractured laminate.
Watch for movement
If the location can be checked without creating risk, observe whether a crack opens or closes as the surrounding surface is loaded very gently. Do not jump on a deck, pull hard on hardware, run an engine, or impose a test load that could worsen the damage.
Visible movement raises concern that the laminate or its supports are participating in the deformation. Stop treating the area as an ordinary cosmetic defect until the source of that movement is understood.
Inspect the reverse side
Where access is available, inspect the corresponding interior surface for:
- Cracked resin or fiberglass
- White, torn, or exposed fibers
- Distortion
- Water staining or dampness
- Detached or damaged supports
- Movement around backing plates
- Loose hardware
- An earlier patch
- Separation between a panel and a bulkhead or frame
An intact reverse side is reassuring but not conclusive. Hidden core damage or internal separation may not be visible from either surface.
These checks are screening tools. They can reveal warnings and establish whether the damage is changing, but they cannot rule out concealed delamination, moisture, or laminate fracture. Where hidden damage could have serious consequences, use an appropriate professional assessment rather than escalating to destructive DIY exploration.
Find and correct the source of stress first
A repaired finish cannot restrain an inadequately supported or damaged laminate. Before filling the visible lines, ask what loaded the area strongly enough to fracture its harder outer surface.
Possible contributors include:
- A localized impact
- Repeated panel flexing
- Engine, road, or equipment vibration
- Hull or body twisting
- Concentrated hardware loads
- Overtightened fasteners
- Weak or undersized backing
- Uneven or inadequate support
- Poor trailer or cradle support
- Movement at a joint
- Insufficient laminate stiffness
- Excessively thick or poorly applied gelcoat
- A manufacturing defect
- Failure of an earlier repair
The crack pattern does not identify which cause applies. Aging, sunlight, temperature changes, and freezing are sometimes proposed as contributors, particularly for older boats, but they should not be assigned as the cause of an individual defect without supporting evidence.
Work through a cause checklist
Nearby fasteners: Check for screws or bolts that are loose, corroded, pulling through, overtightened, or clamping a visibly distorted surface.
Backing and load distribution: Examine accessible backing plates and determine whether a cleat, rail, hinge, windshield, console, seat, or motor attachment distributes its load over an adequate area.
Moving hardware: Look for hinges, latches, rails, or mounts that shift during ordinary operation. A new gelcoat surface is likely to crack again if hardware continues to pry against the panel.
Panel supports: Inspect accessible bulkheads, frames, stringers, deck supports, bonded joints, and tabbing. Gaps, detached supports, or failed bonds can allow recurring flex.
Corners and joints: Tight radii and abrupt changes in stiffness can concentrate strain. Determine whether the crack follows a seam, termination, corner, or edge of an internal support.
Impact evidence: Look for chips, dents, compression marks, interior whitening, and distortion that might indicate a stronger blow than the surface pattern initially suggests.
Trailer or cradle fit: Check whether bunks, rollers, pads, tie-downs, or storage supports concentrate load near the cracking, particularly if the pattern changes after towing or storage.
Previous repair: Look for color variation, sanding halos, filler edges, or separated repair material. Recurrence can result from unresolved movement, substrate damage, incomplete removal, poor preparation, cure problems, or incompatible materials.
Boat-repair guidance links recurrent cracking with flexing hardware, vibration, twisting, insufficient support, and compromised core, and places correction of the cause ahead of cosmetic refinishing (Power & Motoryacht).
Recurrence is diagnostic evidence, not merely an inconvenience. If cracks grow, branch, or return, reassess the load path, backing, supports, laminate stiffness, moisture condition, preparation, cure, and material compatibility instead of repeatedly adding filler.
Choose the repair by the deepest damaged layer
Select the repair system only after determining, as far as reasonably possible, how deeply the damage extends. The visible line may not define the full repair boundary.
Gelcoat or finish only
For a shallow defect reasonably assessed as confined to boat gelcoat, matched repair gelcoat is the typical surface-restoration material. It replaces the damaged finish after the crack has been opened to clean, sound edges.
Confirm that the selected product is suitable for the existing substrate, repair orientation, service environment, and any expected immersion. Product instructions—not a generic recipe—must govern preparation, mixing, application, cure, sanding, and overcoating.
Deeper but nonstructural surface channel
A channel can be too deep or wide for a thin gelcoat application while still stopping short of fractured reinforcement. Material selection then depends on channel dimensions, substrate chemistry, service environment, and finishing system.
One boat-oriented procedure uses gelcoat for shallow channels, polyester filler for medium-depth channels, and polyester resin with fiberglass strands for deep, wide channels. Treat this only as an example of depth-based selection, not as a universal specification.
Fractured laminate
Visible torn fibers, cracked reinforcement, crushed laminate, or a fracture extending beneath the gelcoat requires structural repair. The supported principle is to remove damaged material back to sound laminate and rebuild with compatible reinforcement and resin; gelcoat is only the final finish and cannot replace lost structural material.
This is commonly the point at which DIY cosmetic work should stop. Decisions about access, repair geometry, reinforcement, resin compatibility, original construction, and load transfer cannot be made reliably from the surface pattern alone.
Damaged core or backing
A cored deck or panel may appear intact while the core beneath it is wet, crushed, detached, or degraded. Hardware backing may also be loose, undersized, corroded, or separated from the laminate.
Correcting those conditions can require access to the concealed material, replacement or reinforcement, and restoration of the surrounding laminate. Because the required method depends strongly on the original construction, core and backing work should be treated as a referral criterion unless you have appropriate product-specific repair information and experience.
Failed supporting structure
When a bulkhead, stringer, frame, joint, transom, mount, or other support has moved or failed, the exterior finish is not the primary problem. The support and load path must be assessed and restored before laminate and gelcoat refinishing.
Where epoxy fits
Epoxy may be suitable for some fiberglass repairs, but that does not make it interchangeable with every polyester filler, resin, or gelcoat system. Sanding and subsequent polyester-gelcoat finishing can require system-specific preparation and compatibility guidance. Do not assume that polyester gelcoat can be applied directly over every cured epoxy surface.
For any resin, filler, or gelcoat, consult the current manufacturer documentation for:
- Acceptable substrates
- Surface preparation
- Catalyst or hardener ratio
- Application conditions
- Batch size and working time
- Cure requirements
- Surface-cure or air-inhibition treatment
- Sanding and overcoating
- Immersion or below-waterline suitability
Do not treat caulk, cyanoacrylate adhesive, automotive body filler, or a generic crack sealer as a permanent universal solution. Such products may conceal a line without replacing cracked gelcoat, restoring reinforcement, or correcting movement.
How to repair isolated cosmetic spider cracks in gelcoat
This workflow is limited to isolated damage on a firm, non-critical surface that remains a reasonable cosmetic-repair candidate after inspection. It is a high-level sequence rather than a substitute for the selected cleaner, gelcoat, catalyst, filler, or resin manufacturer’s current label, technical instructions, and safety data.
If preparation reveals fibers, softness, movement, moisture, a substantial void, or a crack continuing into the laminate, stop and return to triage.
1. Prepare the work area
Place the boat or part in a sheltered work area that meets the ventilation, temperature, and environmental requirements stated for the selected products. Keep the area protected throughout application and cure.
Before opening containers or creating dust, review the labels, technical data, and safety data for every cleaner and repair product. Use the specified protective equipment, handling practices, ventilation, ignition controls, storage, spill response, and disposal methods.
Stop point: If you cannot provide the required work conditions or controls, do not begin the repair.
2. Clean before opening the cracks
Remove wax, oil, polish, salt, dirt, and other contamination using a cleaner approved for both the existing finish and the repair system. Cleaning first helps prevent contamination from being carried into the opened channel.
Some published boat procedures use acetone, but it should be used only when permitted by the surface and selected system. Follow the product label and safety data rather than substituting generic handling instructions.
Stop point: Reassess if cleaning reveals internal staining, persistent moisture, a bulge, or a larger crack pattern than expected.
3. Open each crack to sound material
Do not wipe filler directly across unopened cracks. Their edges and bottoms can contain fractured, contaminated, or poorly bonded material.
Using a suitable hand tool or controlled rotary tool, make shallow passes that convert each line into a narrow V-shaped channel. Follow the crack rather than grinding a broad depression. The objective is to expose clean, sound edges—not to reach a predetermined depth.
BoatLIFE describes the general sequence of cleaning, opening or sanding confirmed outer-gelcoat damage, removing residue, applying repair gelcoat, curing, and refinishing (BoatLIFE).
Stop point: If you expose glass fibers, torn reinforcement, moisture, a void, or unexpected depth, stop the surface-only repair.
4. Remove residue and inspect again
Remove grinding residue by a method approved for the selected repair system, complete any specified cleaning step, and allow the area to dry as required.
Inspect the opened channels under good light. Confirm that their edges are firm, the channels remain supported, and the surrounding panel has not revealed movement or softness.
Stop point: Stop if a channel leads beneath surrounding gelcoat, enters a void, exposes reinforcement, or changes when the panel is loaded gently.
5. Prepare the repair material
Select a compatible, color-matched gelcoat repair product or other material specified for the channel and substrate. Prepare only a manageable batch and measure components according to the manufacturer’s stated ratio and method.
Do not estimate catalyst or hardener by habit. Formulation and application conditions affect working time and cure.
Stop point: Do not proceed if the product documentation does not approve the substrate, conditions, or intended service.
6. Fill the channels
Place the material firmly into each channel using the method specified for the product. Avoid bridging over an empty space. Slight overfilling may be appropriate if the finishing procedure anticipates leveling after cure, but avoid spreading a thick mound over sound gelcoat.
Surface-cure requirements vary. Some gelcoat systems require a surfacing additive or approved air-exclusion method; others are formulated differently. Plastic film is not a universal requirement.
Stop point: If material drains into an unseen cavity, repeatedly releases bubbles from below, or lacks support, stop and investigate the substrate.
7. Allow the specified cure
Protect the repair and leave it undisturbed for the full cure required by the product documentation. A surface that feels hard may not yet be ready for sanding or overcoating.
Do not change ratios or improvise a heating method to force a faster cure.
Stop point: If the repair remains soft, sticky contrary to the expected surface condition, discolored, or separated at its edges, consult the product guidance before adding material.
8. Level the repair
Where the surface geometry permits, use a hard or suitably firm sanding block. Select the starting abrasive according to the cured material, amount of overfill, and manufacturer’s finishing instructions rather than assuming one coarse grit fits every repair.
Keep the block aligned with the surrounding contour and stop using the coarser abrasive as soon as the repair is level.
Stop point: If sanding reveals pinholes, uncured material, edge separation, or a crack beneath the fill, remove the defective material as appropriate and reassess preparation, cure, compatibility, and movement.
9. Refine and finish
Progress through finer abrasives appropriate to the repair system, then compound or polish as specified. Apply a compatible protective finish only after the required cure and finishing period.
One published boat-repair example progresses from 220- through 600-grit paper before wax or polish, but this is an example rather than a universal schedule (Power & Motoryacht).
Stop point: If the line returns during finishing or after service, do not simply coat it again. Investigate movement, substrate condition, preparation, cure, and material compatibility.
Curing, sanding, and color matching without overpromising the finish
A structurally adequate repair and an invisible repair are different goals. Aged gelcoat may have faded, oxidized, stained, or changed unevenly, so even a careful repair may remain visible under some lighting.
For a newer boat or component, ask whether the original manufacturer can identify the gelcoat formulation, color, or supplier. That information provides a starting point, although the in-service surface may no longer match its original color exactly.
For an aged finish, prepare several small test batches rather than tinting the main repair immediately. Let each sample cure fully, then sand and polish it before judging color and gloss. Uncured material may not represent the finished appearance. Manufacturer information and fully finished test samples are both recommended approaches for color matching (American Fiberglass Tank).
Cure behavior varies with formulation, measured component ratio, ambient and substrate conditions, batch size, mixing, application thickness, and whether the product is designed to cure at an air-exposed surface. Do not add extra catalyst merely to accelerate the process or assume that every sticky surface has the same cause.
During sanding, protect adjacent sound gelcoat through careful masking and tool control. A firm block helps prevent finger pressure from cutting a hollow around the repair. For compound curves or molded details, use a backing shape that follows the intended contour without concentrating pressure.
Choose the starting abrasive according to the material and amount of excess. A coarse abrasive may level an overfill quickly but can leave deep scratches and unnecessarily thin adjacent gelcoat. Stop coarse sanding once the repair is flush, then remove the existing scratch pattern progressively.
Keep a repair record containing:
- Product names and batch or lot details
- Colorants and proportions
- Mixing proportions
- Application conditions
- Approximate batch size
- Application and cure times
- Preparation steps
- Abrasive progression
- Date returned to service
These details are useful if the repair remains soft, changes color, separates, or cracks again.
Do not transfer a boat repair method blindly to every fiberglass product
The workflow above is supported primarily for gelcoat-finished boats and similar solid-fiberglass surfaces. “Fiberglass” describes a broad range of constructions, not one interchangeable substrate.
Solid laminate versus cored construction
A solid laminate consists primarily of reinforced resin through its thickness. A cored panel places lightweight material between skins or beneath an outer skin to gain stiffness without equivalent weight.
A cored panel can conceal wet, crushed, detached, or degraded material beneath a surface that initially looks intact. Sponginess or localized movement requires assessment of the core and skin bond, not merely a wider gelcoat patch. The finish should not be restored until its support is understood and corrected.
RV Filon and laminated exterior panels
RV Filon and related laminated panels are not molded boat gelcoat under another name. Their skins, adhesive layers, backing materials, seams, panel pinching, and delamination behavior may require a different diagnosis and repair system.
In one owner-reported case, the manufacturer was said to have attributed front-corner cracking to factory-pinched Filon and accepted the vehicle for warranty repair. That anecdote illustrates why construction and manufacturing history matter; it does not establish a general cause or warranty outcome.
Document RV cracks before altering them, especially when warranty coverage may apply. Record panel bulges, seam condition, towing history, and changes after trips, then consult the manufacturer’s approved panel-repair process rather than routing the lines as though they were thick boat gelcoat.
Composite kayaks
Owner discussions distinguish superficial gelcoat cracking from damaged reinforcement, but they also show disagreement over suitable sealants and repair materials. Identify the kayak’s construction and obtain product-specific guidance before adapting a boat-deck method (North Shore Paddlers Network).
Industrial FRP tanks
Do not apply a recreational-boat procedure to an industrial FRP tank without qualified, service-specific assessment. Chemical, potable-water, wastewater, and food-service tanks can involve material compatibility, contamination, access, containment, and structural requirements beyond appearance.
Follow the facility’s established inspection, containment, emergency, and service procedures, and refer the damage to the responsible qualified tank professional. Do not improvise shutdown, entry, grinding, or repair instructions from a boat article.
Tubs, pools, doors, and automotive panels
Before adapting any repair, identify:
- The substrate
- The visible coating
- The backing or core
- Expected movement
- Water, heat, chemical, and sunlight exposure
- Whether the component carries load
- The manufacturer’s approved repair system
A repair may adhere initially and still fail if its stiffness, chemistry, thermal behavior, or service suitability differs from the original construction.
The compact decision rule is: identify the construction first. If you cannot identify it confidently, do not choose a repair solely because the damage resembles spider cracks in boat gelcoat.
Frequently asked questions
Are spider cracks in fiberglass only cosmetic?
No. They may be cosmetic when confined to gelcoat, but appearance does not establish depth. Softness, movement, exposed fibers, leakage, impact history, growth, recurrence, or a critical location warrants further assessment.
Treat an isolated web on a firm, non-critical surface as a reasonable cosmetic-repair candidate—not proof that concealed layers are sound.
Can I apply new gelcoat directly over spider cracks?
Not as a reliable general repair. Coating unopened cracks can leave fractured or contaminated material beneath the new surface. For a reasonable gelcoat-only candidate, the usual sequence is to clean, open the cracks to sound edges, remove residue, inspect, fill with a compatible product, cure, and refinish.
Stop if preparation exposes reinforcement, moisture, a void, softness, or movement.
Why do spider cracks return after they have been repaired?
Recurrence can result from continuing flex, vibration, concentrated hardware loads, weak backing, damaged core, failed supports, incomplete removal, poor preparation, cure problems, or incompatible materials.
A returning crack calls for reassessment of the substrate and repair process—not another superficial coat.
Can epoxy be used to repair spider cracks under gelcoat?
Sometimes, when it forms part of a compatible repair system. Epoxy may be appropriate for certain laminate repairs, but subsequent sanding and polyester-gelcoat finishing can require specific preparation or an approved intermediate system.
Follow the instructions for both products and do not assume every polyester gelcoat will bond correctly over every cured epoxy.
When should spider cracks be inspected by a professional?
Arrange an appropriate assessment when cracks:
- Appeared after an impact, collision, or grounding
- Are widespread, growing, or recurrent
- Move when the surrounding surface is loaded gently
- Occur with softness, hollowness, bulging, or distortion
- Expose fiberglass reinforcement
- Leak or show persistent moisture or discoloration
- Are below the waterline
- Occur near a transom, motor mount, cleat, bulkhead, joint, support, or other important load-bearing feature
- Involve uncertain construction or depth
- Affect an industrial tank or specialized composite product
- Require insurance, warranty, or sale documentation
Document spider cracks before altering them, identify the construction and likely stress source, and treat visual and touch checks only as screening. Reserve the DIY gelcoat workflow for isolated damage on a firm, non-critical surface. If preparation exposes fibers, softness, movement, moisture, recurrent cracking, or damage near a structural feature, stop treating the problem as a finish defect and arrange an appropriate assessment or structural repair.