
Fiberglass Cloth: Choosing Weight, Weave and Format
Compare finish, curvature, buildup, fiber direction, resin compatibility and usable area, with application checks for repairs and layups.
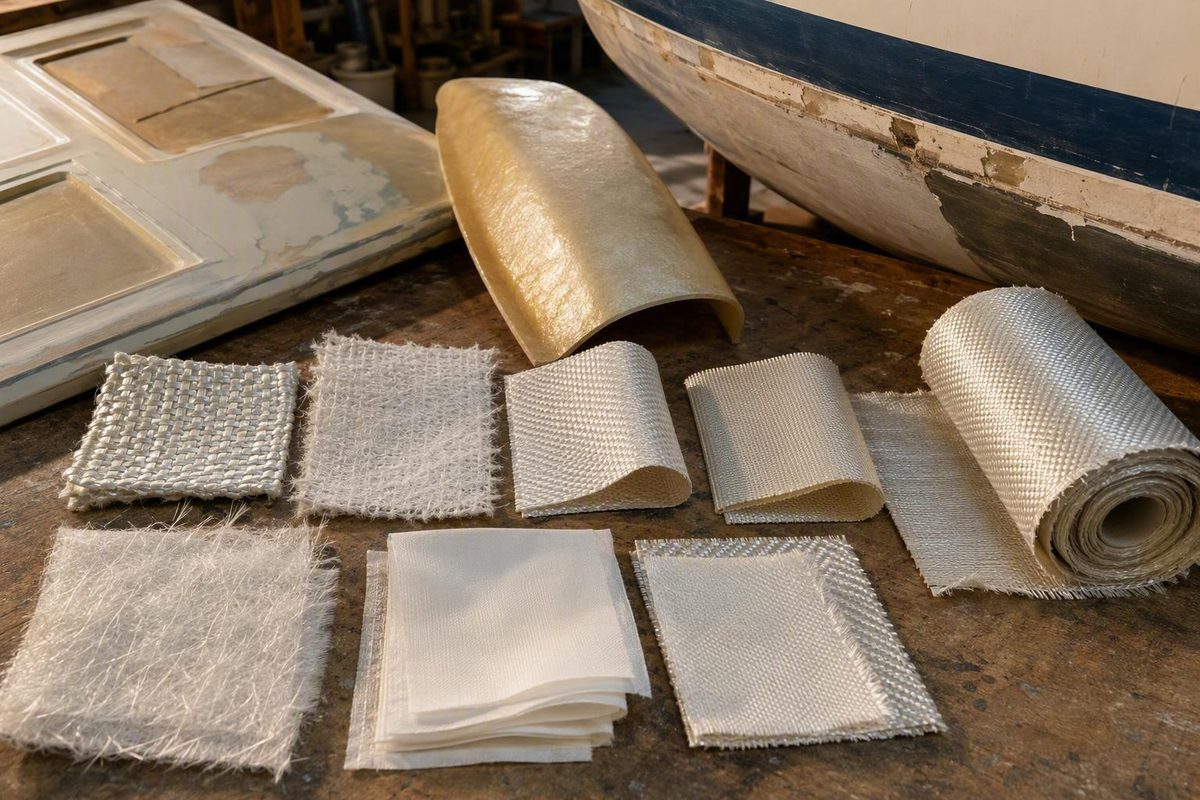
Fiberglass cloth is not selected by ounce weight alone. The right choice depends on the desired finish, the shape the fabric must follow, how quickly the laminate must build, the directions in which reinforcement is needed, available roll width, and compatibility across the complete resin-and-coating system.
These factors provide a practical screening process for routine purchasing and noncritical projects. For structural repairs, they do not replace the original laminate specification, manufacturer repair instructions, engineering calculations, or assessment by a qualified professional.
What fiberglass cloth is—and what it is not
Fiberglass cloth is glass-fiber yarn woven into fabric. When combined with a compatible resin and properly cured, the fibers reinforce the resulting composite laminate.
Fill, or weft, yarns cross the roll width. These principal directions matter because yarn quantity, spacing, crimp, and construction can differ. A fabric may appear balanced without providing identical properties in both directions.
A product listing commonly includes:
- Nominal weight, usually expressed in ounces per square yard in the US market
- Width, generally in inches
- Weave, such as plain or satin
- Glass type, commonly E-glass and sometimes S-2 glass
- Finish or sizing, such as Volan or silane
- Dry-fabric thickness
- Style number
- Sale unit, such as a linear yard, package, or full roll
- Continuous-length availability
- Delivery condition, such as rolled or folded
Keep four measurements separate:
- Nominal fabric weight is the product class printed in the name.
- Actual dry weight is the measured or specified mass per unit area.
- Dry-fabric thickness is the uncured cloth thickness under the supplier’s stated conditions.
- Cured laminate thickness depends on the fabric, resin content, compaction, process, and number of plies.
For example, Fiberglass Warehouse lists Style 1522 as nominal 4 oz cloth but gives an actual dry weight of 3.7 oz/yd². Its catalog lists dry thicknesses ranging from 1.2 mils for 0.75 oz Style 106 to 14 mils for 10 oz Style 7500. These product specifications show why fabric weight and thickness are not interchangeable measurements (Fiberglass Warehouse cloth catalog).
One concrete market example is plain-weave 6 oz E-glass, 50 inches wide, sold in contiguous one-yard increments. That is an understandable general-purpose format, but it is not automatically suitable for a particular hull, panel, seam, cosmetic skin, or structural repair (AeroMarine 6 oz fiberglass cloth).
Use this guide to screen reinforcement formats, decode listings, estimate purchasing area, and ask better questions. Do not use fabric weight alone to decide that a structural laminate is adequate.
Choose cloth weight by finish, drape, and buildup—not by a universal ranking
The ounce rating describes dry fabric mass per square yard. It does not guarantee strength, resin demand, cured thickness, or suitability for a particular repair.
As a general screening principle, lighter cloth usually conforms more readily and leaves a finer surface texture. Heavier cloth builds reinforcement and thickness faster and is often easier to lift and position without distorting the weave. Neither characteristic makes one weight universally better.
Loads, fiber orientation, resin content, compaction, existing laminate construction, curvature, and repair geometry all affect the result. Conversely, very light cloth may require more plies and more handling to achieve meaningful buildup.
| Weight range | Relative drape | Weave visibility | Handling | Rate of buildup | Questions to ask before buying |
|---|---|---|---|---|---|
| Below 4 oz/yd² | Usually highest; useful on detailed or tightly curved surfaces | Generally lowest, particularly with fine yarns | Delicate and easier to distort, fray, or float during wet-out | Slow | Is the priority a smooth skin, transparency, print control, or tight curvature? Can the cloth be placed without disturbing its weave? |
| 4–6 oz/yd² | Generally balanced | Moderate | Often manageable for routine hand layup | Moderate | Does it follow the shape without excessive relief cuts? Does the width suit the panel? Is its construction consistent with the existing laminate? |
| Approximately 9 oz/yd² | Usually lower than light cloth, although weave strongly affects conformity | More apparent unless filled and faired | Substantial but potentially harder to place around corners | Faster | Is it plain or satin weave? Will it bridge recesses? How much surface filling and fairing is acceptable? |
| 10 oz/yd² | Generally lower on tight compound curves | Usually pronounced | Often easier to lift and position but harder to conform | Fastest of these groups | Is rapid buildup more important than a fine surface? Can the fabric be consolidated without wrinkles or resin-rich pockets? |
These are relative screening characteristics, not engineering use categories. Weave, yarn construction, finish, and application process can change how two fabrics of similar weight behave.
The commercial range is broad. One catalog includes 0.75 oz Style 106, 1.5 oz Style 108, 3.2 oz Style 120, nominal 4 oz Style 1522, 6 oz Style 3733, 8.9 oz Style 7781, and 10 oz Style 7500. The seller positions lighter examples for surfacing or smoother finishes and heavier examples for easier handling and faster buildup. Those descriptions are seller positioning rather than standardized comparative test results.
Retailers also describe several middle weights as common or popular. Fiberglass Supply identifies 4 oz and 6 oz cloth as its most popular options and lists sheet-cloth widths from 27 to 60 inches. That is useful evidence of market availability, not proof that either weight is technically superior (Fiberglass Supply woven fabrics and tapes).
You cannot reliably calculate ply count or finished laminate thickness from ounce weight alone. Such a calculation would require product-specific dry thickness, target fiber content, resin uptake, compaction, process details, and a defined cured-laminate requirement. Nor does doubling the ply count guarantee a simple doubling of real-world strength.
Begin by identifying the main priority:
- Surface quality or tight curvature: screen lighter, finer cloth first.
- Balanced handling and buildup: screen common middle weights.
- Faster buildup: evaluate heavier cloth or a purpose-designed stitched reinforcement.
Then verify the candidate against the original laminate, expected load paths, resin documentation, required finish, and available application process.
Compare plain weave, satin weave, fiber direction, and glass type
Weight tells only part of the story. Weave controls how yarns interlace, how readily the fabric distorts, how well it follows curves, and how stable its cut edges remain.
Plain weave alternates warp and fill yarns over and under one another. It is common and relatively manageable. Fiberglass Warehouse describes its plain weave as less prone to unraveling during cutting than the satin fabrics it sells.
A four-harness satin pattern allows a fill yarn to float over three warp yarns and under one. An eight-harness satin extends that float over seven warp yarns and under one. Longer floats generally let the fabric move and conform more readily around curves, although they can make edge stability and handling more demanding. Fiberglass Warehouse markets its satin weaves as more pliable—and also as stronger—than plain weave, but it supplies no standardized test data that would make the strength comparison a universal rule (Fiberglass Warehouse weave comparison).
This is useful only when that direction is identified and aligned with the intended reinforcement objective. Do not assume every woven cloth contains equal quantities of reinforcement in both directions merely because yarns are visible both lengthwise and crosswise.
Fiber orientation should follow the load path. A conventional woven ply may place fibers at 0° and 90° relative to a chosen reference. Rotating a ply can place those directions at approximately +45° and −45°, which may be relevant to in-plane shear. This is a design concept, not a universal laminate schedule. Required directions depend on geometry, supports, loads, access, and the original construction.
E-glass and S-2 glass
E-glass is the recurring general-purpose glass type in the supplied retail listings. It appears in plain, satin, and directionally biased products.
Fiberglass Supply markets S-2 glass for projects seeking greater stiffness and strength. Its catalog, however, does not provide standardized mechanical data under matched test conditions. A buyer therefore cannot calculate a dependable quantitative advantage over a particular E-glass fabric from the listing alone.
Finish and sizing
Listings may identify Volan, silane, or another treatment.
Check both the fabric documentation and the resin manufacturer’s compatibility information. Product-specific confirmation is particularly important for critical bonds, infusion, clear finishes, unusual cure systems, or old stock with uncertain storage history.
Consider how much remains unanswered by a label such as:
6 oz, 50-inch-wide, plain-weave E-glass
A buyer still needs to ask:
- What is the actual dry-weight tolerance?
- What sizing or finish is applied?
- Which resin systems does the fabric supplier support?
- What is the specified dry thickness?
- Will the order arrive as one continuous length?
- Is the cloth shipped rolled or folded?
- Are warp and fill yarn counts balanced?
- Is a technical data sheet available?
- Is there lot traceability?
- What storage conditions and shelf-life limits apply?
A complete product specification is more useful than a familiar ounce number.
Fiberglass cloth versus tape, veil, mat, biaxial fabric, and 1708
“Fiberglass” describes a material family, not one reinforcement format. Product titles—especially marketplace titles—sometimes use cloth, mat, fabric, and tape loosely. Confirm the actual construction before buying.
| Format | Construction | Best screening fit | Important limitation or question |
|---|---|---|---|
| Woven cloth | Continuous yarns woven in two principal directions | Broad coverage, controlled fiber directions, skins, and laminate plies | Check weave, yarn balance, sizing, width, and orientation |
| Woven tape | Narrow woven cloth with stable or finished edges | Seams, edges, joints, and localized strips | Narrow width can require more laps across broad areas |
| Veil | Very light, randomly oriented surfacing reinforcement | Surface finish, print control, and corrosion-barrier details | Not a substitute for primary woven reinforcement |
| Chopped-strand mat | Random short fibers held together with binder | Contouring, rapid buildup, or combination with compatible woven reinforcement | Binder compatibility must be verified |
| Stitched biaxial fabric | Fiber bundles arranged in two directions and held by stitching | Directional reinforcement and efficient buildup | Confirm fiber angles, total weight, stitching, and attached layers |
| Products sold as 1708 | Marketplace designation generally used for heavy biaxial reinforcement, commonly with attached mat | Substantial buildup where the documented construction suits the laminate | Verify orientation, backing, weight convention, stitching, and resin compatibility |
Full-width woven cloth is useful where a panel needs broad coverage with fewer seams. Specialist listings illustrate the distinction: woven tapes range from approximately 0.5 to 12 inches wide, while sheet cloth is listed from 27 to 60 inches wide.
Fiberglass Supply, for example, lists a continuous-strand C-veil at 0.76 oz/yd² and 39.4 inches wide.
Chopped-strand mat uses short, randomly oriented fibers held together with a binder. Retailer guidance commonly positions it for contouring, rapid thickness buildup, reducing weave print-through, or combining with woven reinforcement. When controlled fiber direction and an efficient, lighter laminate are priorities, woven cloth is generally screened before mat. That does not make mat useless; the formats solve different problems.
Binder compatibility is critical. Conventional chopped-strand mat may use a binder intended to dissolve in styrene-containing polyester or vinyl ester resin. Epoxy-compatible mat also exists. Therefore, both “all mat works with epoxy” and “no mat works with epoxy” are unsafe shortcuts. Verify the exact mat product rather than transferring a mat-specific warning to woven cloth.
Biaxial and 1708 products also require close reading. Narrow-product catalogs list 6 oz woven tape and 1708 biaxial tape as separate products, reinforcing that those labels are not interchangeable (Fiberglass Supply Depot reinforcement category).
For any biaxial or 1708 product, determine:
- Are the fibers oriented at ±45°, 0°/90°, or another combination?
- Are the reinforcement bundles stitched, woven, or both?
- Is chopped-strand mat attached?
- Does the stated weight include the mat?
- Are the binder and stitching compatible with the resin?
- Is the listed width suitable for the repair?
- Does the product data define how its weight is reported?
Match the cloth to epoxy, polyester, or vinyl ester resin
The correct question is not simply, “Will glass work with this resin?” Compatibility belongs to the entire material system:
- Fabric finish or sizing
- Mat binder, if present
- Resin
- Hardener or catalyst
- Substrate
- Existing laminate
- Fillers
- Gelcoat or primer
- Final coating
- Cure environment
- Service environment
Fiberglass Warehouse states that its woven fiberglass fabrics are compatible with epoxy, polyester, and vinyl ester resin. That is a seller-level statement about its own products, not a universal rule for every fiberglass fabric or resin formulation.
Do not confuse woven-cloth sizing with chopped-strand-mat binder. Conventional mat may depend on styrene to break down its binder, while specially manufactured epoxy-compatible mat can use a different system. A binder warning for one mat does not automatically apply to ordinary woven fiberglass cloth.
Some general repair guidance favors epoxy where secondary bonding or structural repair is important and describes polyester as a common lower-cost alternative. That does not establish epoxy as best for every substrate or polyester as incapable of bonding. Performance depends on the precise formulation, surface preparation, contamination, cure conditions, existing laminate, flexibility, and repair objective.
When the original laminate is unknown, generic sources disagree over whether to favor epoxy or match a likely polyester system. Product-specific documentation and qualified judgment should resolve the choice. Do not rely on broad claims that a resin bonds to “anything” or that another resin is never suitable for bonding.
Before purchasing, retrieve the resin technical data sheet and verify:
- Resin-to-hardener ratio or catalyst range
- Mixing method
- Batch-size limits
- Induction time, if applicable
- Pot life and working time
- Minimum and maximum application temperatures
- Cure schedule
- Recoat window
- Surface preparation between stages
- Time before sanding, loading, or water immersion
- Approved fillers and fairing compounds
- Primer, paint, and gelcoat compatibility
- Ventilation, personal-protection, spill, and disposal requirements
Gelcoat over an epoxy repair requires particular caution. The supplied evidence does not establish one universal application method. Use only a resin, preparation procedure, tie coat if required, and gelcoat combination explicitly supported by the selected manufacturers.
Pre-purchase compatibility checklist
Confirm every line before treating the materials as a system:
- [ ] Cloth style and sizing are identified.
- [ ] Any attached or separate mat has a binder approved for the resin.
- [ ] The resin family suits the substrate and repair objective.
- [ ] The exact hardener or catalyst matches the resin.
- [ ] The existing laminate is identified as far as practicable.
- [ ] Surface preparation is supported for that substrate.
- [ ] Fillers are approved for the resin and stage of work.
- [ ] Gelcoat or primer is approved over the cured repair.
- [ ] The final coating has a documented preparation and recoat path.
- [ ] Required cure temperature and recoat conditions are achievable.
- [ ] The required delay before loading or immersion is achievable.
Calculate usable area and compare prices fairly
A low “per yard” price can be misleading because a linear yard describes length, not area. One linear yard of 30-inch cloth contains much less material than one linear yard of 50- or 60-inch cloth.
Distinguish three price forms:
- Price per linear yard: one yard of roll length at the specified width
- Price per package: one fixed piece or roll that may contain several yards
- Price per unit area: cost normalized to a square foot, square yard, or square meter
To normalize a purchase:
- Convert width and length to the same units.
- Multiply width by length to calculate area.
- Add shipping, tax, duties, and other unavoidable charges.
- Divide delivered cost by the usable area.
For width in inches and length in yards:
Area in square yards = (width in inches ÷ 36) × length in yards
Delivered cost per square yard = item price + shipping + tax + fees ÷ area in square yards
This is a purchasing comparison. It does not calculate resin quantity, cured thickness, structural capacity, or required ply count.
Why width changes the comparison
For one linear yard:
- 30-inch cloth covers 30/36 = 0.833 yd².
- 50-inch cloth covers 50/36 = 1.389 yd².
- 60-inch cloth covers 60/36 = 1.667 yd².
If all three had the same price per linear yard, the 60-inch cloth would provide twice the gross area of the 30-inch cloth. It could still be the worse purchase if much of the width becomes offcut, shipping is disproportionate, or its weave, finish, or sizing is unsuitable.
Width also affects labor and laminate layout. Broad cloth can reduce seam count across a hull or panel. Narrow tape can reduce cutting waste along joints. On complex shapes, narrower material may nest more efficiently and leave less unusable scrap.
Representative listings show the range of sale formats: 6 oz cloth may be sold 50 inches wide in contiguous one-yard increments; specialist sheet cloth spans roughly 27 to 60 inches; and woven tape ranges from fractions of an inch to 12 inches. Marketplace listings introduce fixed package sizes, international currency, delivery charges, and ambiguous naming, making headline price a poor comparison.
Do not assume that a quantity of “3” means one continuous three-yard piece. Confirm whether the seller supplies a contiguous length, separate packages, or only full rolls.
Also account for:
- Currency and conversion fees
- Shipping and oversized-roll surcharges
- Taxes or duties
- Package length
- Minimum order quantity
- Continuous-yard availability
- Overlaps and seam layout
- Trimming around curves
- Required fiber orientation
- Edge damage or defects
- Waste allowance
- Return restrictions
Material-area worksheet
Use one row for every patch shape or panel. Enter all dimensions in the same unit.
| Input | Unit | Entry |
|---|---|---|
| Finished project or patch area | ft², yd², or m² | |
| Number of plies specified by the repair plan | count | |
| Base cloth area: finished area × plies | area | |
| Added overlap area | area | |
| Added trimming or orientation area | area | |
| Subtotal before waste | area | |
| Waste allowance | percent | |
| Total cloth area to purchase | area |
Use:
Subtotal area = (finished area × plies) + overlap area + trim/orientation area
Purchase area = subtotal area × (1 + waste rate)
Enter a 10% waste allowance as 0.10, not as 10. Do not include the same trimming loss both as a measured area and again within the waste percentage.
For example, suppose a noncritical project has a 6 ft² finished footprint, a documented three-ply schedule, 1.5 ft² of total overlap, 1 ft² for trimming and orientation, and a disclosed 10% waste allowance:
(6 × 3) + 1.5 + 1 = 20.5 ft²
20.5 × 1.10 = 22.55 ft²
The purchasing target would therefore be at least 22.55 ft², rounded upward to suit the seller’s width and sale unit.
If patches are progressively sized, calculate each patch separately rather than multiplying the largest footprint by the number of plies. This worksheet estimates dry cloth area only. It cannot determine the correct ply count or required resin quantity.
Final buying checklist
Before checkout, record:
- Nominal and actual fabric weight
- Width and package length
- Weave and yarn orientation
- Glass type
- Finish or sizing
- Dry thickness
- Continuous-length availability
- Linear-yard, package, or roll sale unit
- Rolled or folded delivery condition
- Fabric and resin technical documentation
- Storage condition and age, if known
- Shipping, taxes, duties, and currency
- Return and restocking terms
Cut, place, wet out, and finish fiberglass cloth
Application must follow the selected resin and reinforcement instructions. The following is a process overview, not a universal recipe or structural repair schedule.
1. Assess and prepare
Determine whether the damage is cosmetic, superficial, or structural. Remove loose, cracked, contaminated, or otherwise unsound material until the repair can bond to sound laminate. Abrade or taper the surface as required by the documented repair design, then remove dust and contamination using methods approved by the resin manufacturer.
Do not laminate over hidden moisture, oil, wax, weak paint, damaged core, or unidentified loose material. Surface preparation is part of the bond, not a cosmetic preliminary.
2. Dry-fit and cut the cloth
Make templates for irregular shapes. Use sharp scissors and cut pieces oversize before mixing resin. Keep warp, fill, and any directional markings aligned with the planned fiber orientation.
Compound curves may require pleats, notches, or relief cuts. Plan them before wet-out where possible. Handle small pieces lightly and avoid pulling yarns from the edge.
WEST SYSTEM’s general epoxy instructions call for an overlap of approximately two inches when multiple sheets are required. That is manufacturer process guidance, not a universal structural overlap requirement. The proper joint geometry still depends on laminate design and load (WEST SYSTEM cloth application instructions).
3. Choose dry or wet placement
With the dry method, place cloth on the prepared dry substrate and then apply resin through it. WEST SYSTEM presents this method as generally easier for positioning, particularly with thin cloth.
With the wet method, coat the substrate first and lay the cloth into wet or suitably tacky resin before completing wet-out. This may help cloth cling to some vertical surfaces, but larger sheets can be harder to position and de-wrinkle.
Neither method excuses inaccurate mixing or poor surface preparation. Follow the selected resin’s instructions for ratio, batch size, mixing, induction if applicable, temperature, and working time.
4. Wet out evenly
Apply resin progressively rather than flooding the entire cloth. In WEST SYSTEM’s epoxy guidance, properly wetted glass changes from white to evenly transparent. White fibers or pale areas indicate incomplete wet-out.
Use a compatible spreader, squeegee, brush, or laminating roller to move resin into dry areas and release trapped air. Excessive brushing or squeegeeing can disturb the fibers and introduce fine bubbles.
The objective is saturated, consolidated reinforcement—not the largest possible quantity of resin. Remove pools without pressing so aggressively that the fibers become starved.
5. Consolidate each ply
Inspect each area from more than one angle and, where possible, with side lighting. Correct:
- Bridging over corners or recesses
- Wrinkles and folded yarns
- Air bubbles
- Dry white fibers
- Lifted edges
- Floating cloth
- Resin pools
When adding plies, avoid dragging the lower layer out of alignment. Generic sources disagree on whether progressively sized patches should always be placed largest-first or smallest-first. Follow a documented laminate schedule instead of choosing an order from a generic demonstration.
6. Select lap or butt joints deliberately
A lap joint overlaps two cloth edges. It provides reinforcement across the seam but creates a ridge that may need filling and fairing.
A butt joint brings accurately cut edges together without overlap. It produces a flatter surface but provides less reinforcement across the joint. WEST SYSTEM describes a lap as stronger and a butt joint as flatter but weaker. Do not substitute a butt joint where the repair design requires continuity across a structural seam.
7. Trim, fill, fair, and finish
At the resin’s specified initial-cure stage, overhanging cloth may be easier to trim with a sharp knife than it will be after full cure. Timing is product-dependent: trimming too early can move the cloth, while trimming too late can make cutting difficult.
Apply additional compatible coats as required to fill the weave before final sanding. WEST SYSTEM says two or three epoxy coats are generally needed in its process, but that is not a rule for every fabric, resin, application method, or finish (WEST SYSTEM application and finishing guidance).
Fair transitions with an approved resin-and-filler system. Sand the fairing material and resin rather than cutting into the glass yarns. Exposed or abraded reinforcement may require further assessment and repair before coating.
Small-patch carrier-sheet method
For small or irregular pieces that fray during cutting, forum contributors describe placing cloth between clear polyethylene sheets, wetting and squeegeeing it through the plastic, marking the required shape, cutting through the sandwich, peeling away one carrier, placing the patch, and then removing the second carrier (Sailing Anarchy carrier-sheet discussion).
Treat this as workshop advice, not a validated structural standard. Confirm that the carrier will release cleanly, that no plastic remains trapped, and that the method fits the resin manufacturer’s process. Do not improvise solvent handling based on forum comments.
Troubleshooting
| Symptom | Possible issue | Immediate response |
|---|---|---|
| White fibers | Incomplete wet-out, resin absorption by a porous substrate, or lost working time | Add only enough properly mixed resin to saturate the area while still within working time; follow product instructions if cure has advanced |
| Trapped air | Bridging, rapid placement, poor consolidation, or surface texture | Work air toward a free edge with an approved roller or squeegee |
| Wrinkles | Misalignment, excessive handling, or insufficient drape | Lift and reposition early; use relief cuts only where permitted |
| Floating cloth | Excess resin beneath the fabric | Gently remove excess without starving the reinforcement |
| Frayed edges | Dull scissors or excessive handling | Recut with sharp tools and stabilize small pieces during transfer |
| Resin-rich pools | Over-application or low spots | Remove excess while maintaining full saturation |
| Surface contamination | Dust, wax, oil, moisture, or an unsupported cleaner | Stop and prepare the surface according to the resin instructions |
| Amine blush | Surface film associated with some epoxy cures | Use the epoxy manufacturer’s specified cleaning method before sanding or recoating |
If defects are discovered after cure, do not automatically bury them beneath another coat. Determine whether the defect is superficial or compromises the laminate, then follow the resin manufacturer’s repair and recoat procedure.
Know when cloth selection becomes a structural and safety decision
A cosmetic surfacing layer, abrasion skin, or small noncritical patch is fundamentally different from a repair intended to restore a hull shell, stringer, bulkhead, cored panel, mast step, suspension component, pressure vessel, or another primary load path.
For structural work, the following factors interact:
- Ply count and fabric weight
- Fiber orientation
- Patch footprint and taper
- Original laminate thickness and sequence
- Core condition
- One-sided versus two-sided access
- Local stiffness
- Load direction and fatigue
- Cure conditions
- Final geometry
Generic guidance does not provide one safe taper rule. One forum discussion recommends a taper of at least 8:1, while Sea Tow’s general boat-repair guide uses 12:1; other guidance expresses taper distance per original laminate ply. Sources also disagree on whether progressively sized plies should be installed largest-first or smallest-first. These are context-dependent design decisions, not interchangeable universal instructions (Boat Design Net repair discussion; Sea Tow fiberglass repair guide).
A very stiff local patch can transfer stress into the adjacent, more flexible laminate.
Seek qualified assessment for:
- Major hull breaches
- Damage extending through a core
- Wet core or widespread moisture intrusion
- Damaged stringers or bulkheads
- Widespread delamination
- Distorted structure
- Repeated cracking at a loaded attachment
- Highly loaded structural areas
- Damage whose failure could cause injury, flooding, loss of control, or major property loss
Personal and environmental protection
Resin, hardener, catalyst, solvent, and sanding hazards vary by product. Read the label and safety data for every component before beginning work.
At minimum, plan for:
- Effective ventilation
- Chemical-resistant gloves appropriate to the selected chemicals
- Protective clothing
- Eye protection
- Product-directed respiratory protection
- Clean mixing tools and controlled batch sizes
- Product-compliant storage
- Manufacturer-directed spill and waste handling
Contain the work, use suitable respiratory, skin, and eye protection, and clean by methods that minimize recirculating dust. Do not wash uncured resin, solvent, or sanding waste into household drains or onto the ground. Follow product instructions and applicable local disposal requirements. Sea Tow’s general repair guidance likewise calls for ventilation, protective clothing, gloves, respiratory protection, dust control, and appropriate waste disposal (Sea Tow safety guidance).
Generic cure times are unreliable. “Overnight” is not a technical specification.
Stop-work checklist
Stop and obtain product-specific or professional guidance if:
- The original laminate or resin is unknown and compatibility cannot be established.
- Moisture may be trapped behind the skin or within a core.
- The structure is distorted or no longer holds its designed shape.
- Damage passes through a core, stringer, bulkhead, frame, or critical attachment.
- Delamination extends beyond the visible defect.
- Required technical data is unavailable.
- Cloth sizing, mat binder, resin, or coating compatibility is uncertain.
- The required cure environment cannot be maintained.
- Failure would have consequences beyond a cosmetic defect.
Frequently asked questions
Is 4 oz or 6 oz fiberglass cloth better for a general-purpose project?
Neither is universally better. Four-ounce cloth generally provides finer buildup and easier conformity, while 6 oz cloth builds faster and may be easier to handle. Retailers repeatedly position both as common products, which indicates availability rather than superior technical performance.
Choose according to curvature, desired surface texture, acceptable ply count, width, weave, and the existing laminate. For a noncritical project where either product is compatible, dry-fit a sample over the most difficult contour before buying the full quantity.
Can fiberglass cloth be used with epoxy, polyester, and vinyl ester resin?
Some sellers state that their woven cloth is compatible with all three resin families, but that statement should not be generalized to every product. Verify the cloth finish or sizing against the exact resin system.
If mat is attached, verify its binder as well. Then evaluate the resin, hardener or catalyst, substrate, existing laminate, fillers, primer, gelcoat, and final coating as one system. Follow the manufacturers’ mixing, cure, recoat, and service instructions.
What is the difference between fiberglass cloth and chopped-strand mat?
Fiberglass cloth contains continuous yarns woven in defined directions. Chopped-strand mat contains randomly oriented short fibers held together by a binder.
Cloth is generally screened first when controlled fiber direction and an efficient laminate are priorities. Mat is commonly positioned for contouring, rapid buildup, print control, or combination with woven reinforcement. Conventional mat may use a styrene-soluble binder intended for polyester or vinyl ester resin, while epoxy-compatible mat also exists. Check the exact product.
How can I tell when fiberglass cloth is fully wet out?
In WEST SYSTEM’s epoxy guidance, fully wetted cloth appears evenly transparent, while white fibers indicate dry areas. Also inspect for bubbles, lifted edges, wrinkles, bridging, and cloth floating in excess resin.
Transparency is a practical process indicator, not proof that the laminate has the correct resin content or structural quality. Consolidate with the recommended tool, remove pools, and avoid squeezing out so much resin that the fibers become starved.
How many layers of fiberglass cloth does a repair need?
There is no safe universal number. Required plies depend on the original laminate, fabric weight and construction, fiber orientation, repair footprint, taper, resin content, compaction, access, stiffness, and expected loads.
Do not infer ply count from cloth weight alone or assume that every added layer produces a proportional increase in strength. For a known product and structure, follow the original manufacturer’s repair schedule. For an unknown laminate or structural damage, obtain a qualified assessment.
The defensible selection process is straightforward: identify the reinforcement format, choose weight and weave around finish, curvature, buildup, and fiber direction, verify the complete resin-and-coating system, compare purchases by usable area, and follow product-specific application data. When the laminate is unknown or the damage is structural, the correct next step is assessment—not guessing at cloth weight or ply count.