
Curing Resin With UV Light Requires the Right Resin
Ordinary two-part epoxy generally won't cure faster under UV. UV resin needs the specified wavelength, shallow layers and full light coverage.
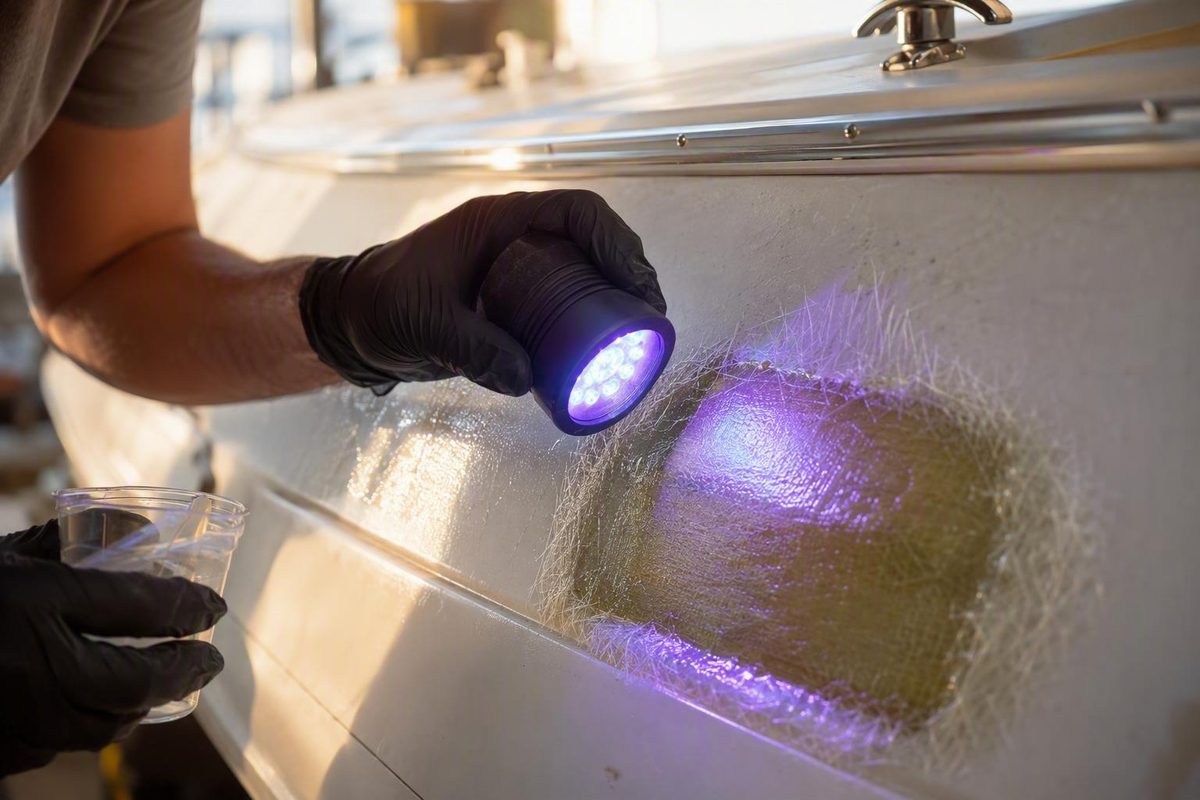
To cure resin with UV light successfully, start with the resin—not the lamp. The material must be formulated for UV curing, and the light must match the wavelength specified by the resin manufacturer while providing sufficient, reasonably uniform exposure to the whole resin layer.
There is no universal lamp wattage, exposure time, working distance, or layer thickness that guarantees a complete cure. A dependable process combines documented compatibility, shallow layers, full light coverage, conservative inspection, and protection from both uncured resin and UV radiation.
Where product documentation does not provide the necessary wavelength, exposure, temperature, or layer limits, this guide cannot supply substitute thresholds. Contact the manufacturer or choose a resin-and-light system with documented instructions rather than relying on trial and error.
First, confirm that your resin can cure under UV light
Before switching on a lamp, look for an explicit statement such as “UV resin,” “UV-curable,” “light-curable,” or a specified curing wavelength on the container, technical data sheet, or manufacturer’s instructions. Words such as “epoxy,” “resin,” “casting resin,” or “clear resin” do not establish UV compatibility by themselves.
A one-part UV-curable resin contains photoinitiators. When they receive compatible light, they initiate polymerization and turn the liquid material into a solid. Ordinary two-part epoxy works differently: resin and hardener react after mixing, so placing the mixture under a UV lamp generally does not make that chemical cure happen faster. Incure, a commercial UV-equipment and materials supplier, makes the same distinction in its comparison of UV-curable resin and conventional two-part epoxy.
This distinction matters in fiberglass work. Do not assume that a polyester or epoxy resin supplied in a fiberglass patch kit is UV-curable. Follow the kit’s instructions for identifying, preparing, mixing, and curing its resin system unless the manufacturer expressly documents UV curing as part of the process. Fiberglass Guide’s separate coverage of fiberglass patch kits and polyester-versus-epoxy resin can help identify the type of conventional repair system involved, but it does not establish UV compatibility.
UV resin is commonly positioned for small, shallow applications in which light can reach the material: jewelry details, domed coatings, decorations, open bezels, small molds, and localized nonstructural repairs. It should not automatically replace a documented laminate or structural-repair resin.
Use this decision tree:
- The label or technical data sheet confirms UV curing: Proceed to the wavelength and light-selection checks.
- The product is a conventional two-part resin: Follow its specified resin-to-hardener process and ambient-cure instructions.
- The resin is unidentified or its instructions are unavailable: Do not expose it experimentally and assume that a hard-looking surface proves compatibility. Identify the product or replace it with a documented system.
- The project is large, deep, opaque, enclosed, or structural: Confirm that the resin manufacturer supports that exact type of application. If not, select a more suitable resin system.
What the UV light must deliver
The first specification to check is wavelength. In plain language, the lamp must emit the kind of UV energy that the resin’s photoinitiator can absorb. A light can appear bright to your eyes and still be ineffective if its output does not overlap the resin’s required wavelength.
Many commercial craft-resin guides refer to approximately 365–405 nm as a common market range. That is not proof that every resin will cure under every light within that range. The resin manufacturer’s specified wavelength or approved light type takes priority.
The second concept is irradiance: the UV power arriving at a given area of the work surface. Irradiance and exposure time together influence the dose delivered to the resin. Longer exposure may increase dose when the wavelength is compatible and the light reaches the material, but time cannot reliably compensate for the wrong wavelength or a physical obstruction.
Do not confuse irradiance with advertised electrical wattage. A lamp’s wattage may describe electrical consumption or a nominal device rating; it does not, by itself, tell you how much useful UV reaches the project. LED count has the same limitation. Lights with similar wattage or emitter counts can produce different wavelength distributions, beam patterns, coverage, and irradiance at the work surface.
Several physical factors affect the exposure:
- Working distance: Changing the distance can alter both the intensity and the illuminated area.
- Beam spread: A narrow beam concentrates exposure in a smaller region; a broad beam covers more area but may not illuminate it uniformly.
- Lamp position: A tilted or off-center source can leave one edge less exposed.
- Useful curing area: The effective illuminated region may be smaller than the lamp housing.
- Exposure angle: Mold walls, bezels, recesses, overhangs, and embedded objects can create shadows.
- Equipment condition: Dirty optics, weak batteries, aging bulbs, or inconsistent operation may reduce useful output.
Material and project variables matter as well. Resin formulation, layer depth, pigment, mica, glitter, embedded objects, mold transparency, temperature, and geometry can all affect the outcome. A schedule that works for a shallow clear pendant may fail for the same shape filled with opaque pigment. Tank007, a flashlight manufacturer, lists wavelength, intensity, distance, thickness, additives, and temperature among the variables in its commercial comparison of UV flashlights and lamps.
These variables are why there is no defensible universal curing-time chart when the resin, wavelength, measured irradiance, distance, layer configuration, and project conditions are unknown. General online recommendations often conflict because they describe different products under incompletely documented conditions.
Before buying or using a light, check:
- The resin’s required wavelength or approved light type
- The resin manufacturer’s exposure instructions
- The permitted layer depth or application method
- The useful illuminated area
- The required working distance and orientation
- Whether timer controls accommodate the specified exposure sequence
- Whether the project fits without resting at weakly illuminated edges
- The inspection and maintenance instructions for the lens, batteries, bulbs, cable, housing, and controls
- Any shielding, guards, covers, or interlocks supplied with the device
If the resin documentation does not identify a wavelength, layer method, or exposure process, ask the supplier. Buying a more powerful-looking lamp does not resolve missing compatibility information.
Choose a flashlight, lamp, curing station, or sunlight
The best UV source depends on the resin, project shape, and workflow. A flashlight is not inherently better than a lamp, and a lamp is not automatically faster or more complete. Each option offers a different balance of targeted control, coverage, portability, and hands-free use.
A handheld UV flashlight is useful when you need to expose one small area at a time. It can help tack a decorative inclusion in place, reach an accessible localized repair, hold a detail before the main cure, or direct light toward an edge or recess.
Its main trade-off is limited coverage. A narrow beam requires systematic movement, and the user must maintain a reasonably consistent distance and angle. Moving too quickly over a broad piece can create bands or patches that receive different exposure. The work may also need to be rotated, where the resin and mold instructions permit it, so accessible edges and sides are not left in shadow.
A desk or nail-style lamp is often more convenient for flatter work, several small pieces, or a project that fits entirely within the illuminated area. It leaves both hands free and can expose a broader region at once. Useful features include:
- Even emitter spacing
- Enough clearance around the work
- A curing area large enough for the whole piece
- Stable or adjustable positioning
- Timers compatible with the specified cure process
- Shielding intended to limit stray UV
- Access for inspection and cleaning
Avoid placing work partly outside the lamp or against an edge unless the manufacturer identifies that region as part of the effective curing area. A broad housing does not prove uniform exposure throughout its footprint.
An enclosed curing system can provide more controlled positioning and may limit stray light when used with its guards and covers in place. Some systems make it easier to expose several sides. An enclosure still does not guarantee a complete cure: wavelength compatibility, delivered dose, depth, opacity, temperature, and shadows remain relevant.
Sunlight can post-cure some compatible photosensitive materials, but it is difficult to reproduce. Available UV changes with weather, season, location, time, orientation, and intervening glazing. A 2015 Formlabs community discussion reported sunlight as an option for post-curing one named printing resin while describing a lamp as more predictable; that example is material-specific and should not be generalized to arbitrary craft resin or two-part epoxy. Use sunlight only when the current instructions for the exact resin permit it.
| UV source | Targeted control | Coverage | Portability | Hands-free use | Best project fit |
|---|---|---|---|---|---|
| Handheld flashlight | High | Small | High | Low | Details, tack curing, and localized accessible repairs |
| Desk or nail-style lamp | Moderate | Medium to broad | Moderate | High | Flat pieces, jewelry, and several small items |
| Enclosed curing system | Moderate | Depends on chamber | Low | High | Repeatable batches or compatible work that fits fully inside |
| Sunlight | Low | Potentially broad | No equipment required | High | Materials expressly approved for sunlight where variable exposure is acceptable |
Choose according to documented compatibility, useful coverage, and project geometry—not a universal minimum wattage or LED count.
Set up for UV and chemical safety
UV radiation and uncured resin are separate hazards. Shielding yourself from the lamp does not prevent chemical contact, and gloves do not protect your eyes from UV.
Before starting, read the resin’s Safety Data Sheet and the curing device’s operating instructions. Use those documents to determine the required ventilation, gloves, eye and skin protection, storage, first aid, cleanup, and disposal measures. If the documentation is missing or does not address your intended use, stop and obtain it rather than improvising protective thresholds.
Work in a clean, protected area with the ventilation required by the resin documentation. Wear chemical-resistant gloves selected for the specific resin, cover exposed skin as directed, and use UV-protective eyewear appropriate to the device’s emitted wavelengths.
Avoid looking directly at operating emitters or strong reflections. Use the manufacturer-provided guards, covers, curtains, or enclosure, and keep children, pets, and unnecessary bystanders away. Uvitron, a commercial UV-equipment supplier, identifies eye and skin exposure, uncured-material contact, damaged guarding, and bypassed interlocks as UV-curing hazards and recommends combined controls including shielding, suitable protective equipment, ventilation, training, and maintenance in its industrial UV-curing safety overview.
Uncured resin can cause irritation or allergic sensitization, so it should not contact bare skin. Follow the resin’s Safety Data Sheet if exposure occurs rather than relying on a generic cleaning method.
Before use, complete the inspections required by the device manufacturer. At minimum, confirm that:
- The lens or lamp window is clean and intact.
- The housing, cable, plug, and controls appear serviceable.
- Guards and shields are installed as designed.
- Batteries, bulbs, or emitters are operating consistently.
- Cooling openings are unobstructed.
- No interlock has been defeated.
- Reflective objects are controlled or removed from the exposure area.
Take equipment out of service if a required guard or interlock is not functioning. Do not bypass a safety feature to make the work easier to reach.
Industrial UV equipment may require controls beyond those used with a small craft lamp. Some medium-pressure mercury systems can generate ozone, for example, so their manufacturers may require specific ventilation or air controls. Follow the instructions for the actual system rather than transferring craft-lamp practices to industrial equipment.
Contain spills and failed resin as directed by the Safety Data Sheet. Follow the product instructions and applicable local requirements for cleanup, storage, transport, and disposal. Do not assume that partly cured resin can be discarded as ordinary hardened plastic.
Use only the bubble-control and heating methods expressly permitted by the resin manufacturer.
Step by step: cure UV resin evenly
The following process is specification-led. If the resin or light manufacturer gives a more restrictive instruction, follow it.
1. Read all available documentation
Check the resin label, technical data sheet, Safety Data Sheet, and curing-light instructions. Record:
- Confirmation that the resin is UV-curable
- Required or supported wavelength
- Approved light type
- Exposure instructions
- Permitted layer depth or application method
- Working-distance requirements
- Temperature restrictions
- Required protective equipment
- Cleanup and disposal procedures
Do this before adding pigment or pouring the resin. If compatibility cannot be established, stop and obtain reliable product information.
A documented system should provide the values needed for its own process. This article cannot create a safe substitute distance, temperature limit, or exposure period when the manufacturer provides none.
2. Prepare and protect the workspace
Cover the work surface with a disposable barrier compatible with the resin. Establish the specified ventilation, put on the required protective equipment, and arrange tools so you do not have to reach across uncured material.
Keep the resin away from sunlight and the operating lamp until you are ready to expose it. Close or shield the resin container promptly so stray light does not begin curing material in the bottle or dispensing tip.
3. Prepare the mold or repair surface
The mold, bezel, or substrate should be clean, suitably dry, and free of dust or contamination as required by the product instructions. Position it so the light can reach the intended resin area without unnecessary movement of the uncured piece.
Think through the exposure path before pouring. Can compatible light reach the edges, bottom, mold walls, recesses, and areas behind inclusions? If not, change the orientation, use an appropriate light-transmitting mold, revise the design, or select another resin system.
4. Apply an even, shallow layer
Use a shallow layer rather than a deep pour. Do not rely on one universal millimeter limit: recommendations vary, and the correct limit depends on the formulation, optical clarity, color, light, and geometry.
Spread the resin evenly. A thin edge and a thick center may not cure at the same rate. If the project requires greater depth, build it through separately cured layers only when the manufacturer permits that method.
5. Remove bubbles with a compatible method
Use the method specified for the resin. Depending on the product, this may involve careful dispensing, slow stirring, resting, or an approved tool.
Do not default to open flame or uncontrolled heat. If no bubble-removal method is documented, contact the manufacturer or test only a conservative, non-flame method on disposable material.
6. Position the compatible light
Place the work within the useful curing area and set the light at the specified distance. Align it so the entire layer receives reasonably even exposure.
With a flashlight, move the beam systematically without changing distance abruptly. With a lamp, keep the whole piece within the documented effective region. Begin with the resin manufacturer’s exposure setting; a timer preset is only a control feature, not proof of a complete cure.
7. Expose accessible sides where necessary
Rotate the piece or expose additional accessible sides when the resin instructions and mold design permit it. Pay particular attention to edges, undersides, recesses, overhangs, and areas around embedded objects.
Do not treat “cure both sides” as a universal rule. An opaque substrate may block underside exposure, while some uncured pieces cannot be moved safely until an initial stage has set.
8. Stop for unexpected heat or visible change
Some systems may become warm, but this guide cannot define an acceptable temperature without product-specific limits. If the resin, mold, project, or light becomes hotter than expected—or if distortion, discoloration, or equipment malfunction appears—stop the exposure and follow the cooling and inspection instructions for the products involved.
Shorter exposure intervals or cooling breaks are appropriate only when the manufacturer permits them. A commercial flashlight guide also recommends interrupting exposure when overheating occurs, but its suggested settings are generalized rather than resin-specific; use it only as supporting context, not as a substitute for the product instructions.
9. Inspect conservatively
Look for:
- Persistent tackiness
- Soft or flexible areas that should be hard
- Uneven hardness
- Visible liquid beneath the surface
- Clouding, rippling, yellowing, or distortion
- Areas that sat outside the strongest coverage
- Resin hidden behind pigment, glitter, or an inclusion
A hard surface does not establish a full-depth cure. Visual inspection and surface feel cannot certify the center of an arbitrary deep, opaque, or enclosed casting.
Do not press bare skin into the resin or puncture, drill, or sand the piece to look for liquid. If internal cure remains uncertain, isolate the item and treat it as potentially undercured rather than wearing, installing, or finishing it.
10. Cure successive layers separately and record the result
Add another layer only after the previous layer has met the product’s cure requirements. Record the exact resin, batch where practical, lamp, wavelength, distance, layer characteristics, pigment load, orientation, exposure sequence, temperature conditions, and observed result.
Those notes are a starting point for repeating the same documented combination. Do not automatically apply them to a darker color, deeper layer, different resin, replacement lamp, or changed distance.
For an unfamiliar resin-and-light pairing, make a disposable test piece first. Begin with manufacturer-specified settings and add exposure incrementally only if the instructions allow it. Check for unevenness, trapped liquid, unexpected heat, distortion, and color change. A successful clear, shallow sample does not validate a much thicker or opaque casting.
Establish a firm stop condition: if compatibility cannot be confirmed, or repeated permitted exposure leaves the resin soft or tacky, stop treating more UV as an automatic cure. Also stop if the material overheats, distorts, clouds, or changes color unexpectedly. Reassess the resin, wavelength, coverage, depth, equipment condition, and suitability of the process.
Why depth, color, molds, and shadows cause incomplete cures
UV-sensitive resin can polymerize only where suitable light reaches it. As a layer becomes deeper, useful light may be reduced before it reaches the lower regions. Anything that absorbs, scatters, or blocks the light makes the process harder to control.
That is why a clear, shallow layer generally cures more predictably than a dark or opaque casting. Dense pigment, mica, glitter, ink, fillers, and embedded objects can interfere with exposure. The surface may harden while liquid or soft resin remains beneath an inclusion or in the center.
Use colorant only within the resin manufacturer’s limits. Adding more pigment can change how light travels through the layer. Translucent effects may be easier to expose than fully opaque effects when the design permits, but even translucent resin can contain shadowed regions.
Mold choice matters too. A transparent mold may permit exposure from additional directions, while an opaque mold can block the bottom and sides. Let’s Resin, a commercial resin retailer, similarly warns that non-light-transmitting molds and excess colorant can leave UV resin undercured in its tutorial on mold transparency and pigmentation. Transparency is not a guarantee: mold thickness, tint, shape, and surface condition can still affect the light path.
Before curing, perform a coverage check:
- Can light reach along every mold wall?
- Is the underside accessible through the mold or substrate?
- Are any edges outside the effective illuminated area?
- Do recesses or overhangs create shadows?
- Does an embedded object block resin behind it?
- Is pigment concentrated in one region?
- Does a bezel, fixture, or clamp shade the layer?
- Can the project be rotated without spilling or deforming it?
More electrical wattage cannot reliably cure resin that is physically shielded from the light. The practical options are to reduce depth, use a more light-transmitting effect, cure compatible successive layers, alter exposure angles within the product instructions, or redesign the piece.
If a project is large, deep, enclosed, fully opaque, or structurally demanding, UV resin may be the wrong material. Choose a resin system whose documented curing mechanism and intended application match the job.
Troubleshoot tacky, soft, uneven, cloudy, or overheated resin
Curing failures have overlapping symptoms. Diagnose the whole system rather than assigning every problem to insufficient exposure time.
| Symptom | Possible causes | What to check |
|---|---|---|
| Entire layer remains liquid or soft | Resin is not UV-curable; wavelength mismatch; failed light; insufficient or blocked exposure | Confirm resin identity, specified wavelength, lamp operation, distance, and unobstructed exposure |
| Surface is firm but center is soft | Excessive depth; dense pigment or filler; opaque mold; blocked light | Isolate the piece, reassess depth and geometry, and use shallower layers or another material |
| Hardness varies across the piece | Uneven beam; work at lamp edge; changing distance; shadow; dirty lens; weak battery or aging bulb | Inspect and clean the equipment, center the work, stabilize distance, and rotate where permitted |
| Surface remains tacky | Inadequate dose; incompatible wavelength; uneven coverage; excessive depth; pigment; equipment condition; resin-specific behavior | Consult the resin instructions before adding exposure or attempting a surface treatment |
| Clouding, yellowing, or distortion appears | Heat, incompatible process, unsuitable exposure sequence, material interaction, or another formulation-specific issue | Stop exposure, follow the cooling instructions, and verify compatibility with both manufacturers |
| Resin or equipment becomes unexpectedly hot | Exposure sequence, equipment condition, resin volume, restricted cooling, or incompatible conditions | Stop and inspect the setup; resume only if the applicable instructions support doing so |
For an entirely liquid layer, return to the first decision point. Is the material definitely UV-curable? Does the light match the specified wavelength? Is the lamp operating correctly? Did light reach the resin? If any answer is unknown, more exposure is not a controlled solution.
A firm top with a soft center points more strongly toward penetration or access problems. Consider layer depth, mold opacity, pigment concentration, fillers, embedded objects, and inaccessible geometry. Do not sand or drill into the piece to determine whether liquid remains inside.
Uneven hardness calls for a coverage and equipment inspection. Check whether the work sat near a lamp edge, whether a flashlight was moved inconsistently, whether the curing angle created shadows, and whether the optics are dirty. Replace or service batteries, bulbs, or other components only as directed by the device manufacturer.
Persistent surface tack is less specific. It can reflect underexposure, wavelength mismatch, blocked or uneven light, excessive depth, pigmentation, degraded equipment, or behavior particular to the resin. Oxygen inhibition should not be diagnosed as the universal explanation.
In one informal Formlabs community report, a user making miniature clear-resin lenses said the material cured beneath the surface but retained a tacky outer layer. The user also reported that wiping reduced surface quality and that water exposure caused rippling. Because the resin formulation, lamp wavelength, irradiance, distance, and exact exposure were not documented, the forum account is an anecdote, not a validated remedy or diagnosis.
If overheating, clouding, yellowing, or distortion develops, stop repeated continuous exposure. Follow the product instructions for cooling and inspection, and verify the resin’s compatibility and exposure limits. These symptoms do not have one universal cause, so a shorter or longer cure cannot be assumed to solve them.
Additional exposure may help genuine underexposure when the wavelength is compatible and the light can reach the resin. It cannot necessarily correct:
- A conventional two-part resin
- An incompatible wavelength
- A deep or opaque pour
- Resin hidden by a mold or embedded object
- A failed lamp
- Resin-specific surface behavior
- Damage that has already occurred
Do not wear, install, package, sand, polish, or otherwise treat persistently tacky or soft resin as a finished item. Isolate it to prevent contact and contamination, then manage it according to its Safety Data Sheet and applicable local requirements.
Keep craft curing, 3D-print post-curing, and fiberglass repair separate
Freshly applied craft UV resin and a washed resin 3D print may both involve photopolymerization, but they are not the same workflow.
With craft resin, you are exposing a freshly dispensed liquid layer, often in a bezel, mold, or repair area. Layer depth, additives, mold transparency, spill control, and access from different angles are immediate concerns.
A printed part has already been shaped through controlled layer-by-layer exposure inside a printer. Post-curing occurs after the part has been removed and prepared according to the printing-resin manufacturer’s process. A commercial overview from Mach5ive likewise describes wavelength, intensity, duration, resin type, and layer characteristics as relevant to UV exposure in resin 3D printing.
Historical forum guidance about post-curing one named printing resin should not be generalized to arbitrary liquid craft resin. It is even less applicable to conventional two-part epoxy.
Fiberglass repair introduces another distinction. Conventional polyester and epoxy repair systems must be handled according to their specified resin, catalyst or hardener, temperature, and cure instructions. Do not add UV exposure unless the formulation expressly documents it.
UV resin’s practical advantage is concentrated in small, accessible, shallow applications where compatible light can reach the material. When a project is deep, large, opaque, enclosed, structural, or outside the manufacturer’s supported uses, select another documented resin system.
| Use case | Appropriate approach |
|---|---|
| Thin craft layer | Confirm UV compatibility, use the specified wavelength, and cure in shallow, fully exposed layers |
| Localized small repair | Use UV resin only if approved for the substrate and service conditions; a compatible flashlight may provide targeted exposure |
| Production batch of small pieces | Consider a broad lamp or enclosed system that fits the batch within its useful curing area |
| Washed resin print | Follow the exact printing-resin manufacturer’s washing, drying, positioning, temperature, and post-cure schedule |
| Conventional fiberglass laminate | Use the specified polyester or epoxy catalyst or hardener process rather than generic UV-resin instructions |
| Deep opaque casting | Choose a formulation and cure system documented for deep, opaque work; ordinary craft UV resin may be unsuitable |
Frequently asked questions
Can UV light make two-part epoxy cure faster?
Generally, no. Ordinary two-part epoxy cures through the reaction between resin and hardener. UV exposure does not substitute for correct proportioning, thorough mixing, suitable temperature, or the specified ambient-cure period.
Use UV light only if the product documentation identifies the resin as UV-curable or describes UV exposure as part of its approved cure process. The word “epoxy” by itself is not enough.
How long should UV resin stay under the light?
Use the exposure schedule supplied for the exact resin and compatible light. There is no universal number of seconds or minutes because cure performance changes with wavelength, irradiance, distance, depth, pigment, geometry, temperature, and equipment condition.
Begin with the manufacturer’s setting. If incremental exposure is permitted and the resin appears underexposed, add it cautiously while watching for unexpected heat, distortion, or discoloration. Do not assume that a lamp’s timer preset represents a complete cure.
If no exposure schedule or compatible-light information is available, do not invent one. Contact the manufacturer or use a documented system.
Can I use a UV flashlight or nail-style lamp to cure resin?
Yes, if the device’s wavelength is compatible with the resin and it can provide adequate, reasonably uniform exposure over the relevant area.
A flashlight suits targeted details and localized work but must be repositioned carefully. A nail-style or desk lamp provides broader, hands-free coverage for pieces that fit completely within its useful illuminated area. Resin Studio, a commercial craft-resin retailer, makes the same general distinction in its comparison of UV torches and lamps, while also noting that depth, pigment, and opaque molds can restrict curing.
Neither device type is universally superior. Select by documented compatibility, curing area, positioning, shielding, and project geometry—not wattage or LED count alone.
Why is my UV resin still sticky after curing?
Possible causes include:
- The resin is not actually UV-curable.
- The lamp wavelength is incompatible.
- The delivered exposure was insufficient.
- The beam did not cover the piece evenly.
- The layer is too deep for the formulation and setup.
- Pigment, glitter, a mold, or an embedded object blocked the light.
- The lamp lens is dirty or the equipment is no longer operating consistently.
- The resin has formulation-specific surface behavior.
Consult the resin instructions before adding exposure or applying a surface treatment. Do not assume oxygen inhibition is always responsible, and do not handle or finish persistently tacky resin as though it were fully cured.
Can sunlight cure UV resin?
Sunlight may cure some photosensitive resin when the product manufacturer expressly permits it. Results are difficult to reproduce because available UV varies with weather, season, location, time, orientation, and glazing.
Do not use sunlight as proof that an unidentified resin is UV-curable or as a substitute for the documented post-cure process of a printing resin. Follow the exact product instructions for exposure, temperature, orientation, and handling.
The final rule has five parts: verify that the resin is UV-curable; match the light to the manufacturer’s wavelength specification; work in shallow layers with complete coverage; protect yourself from both UV and uncured resin; and stop rather than repeatedly exposing material that stays soft or develops unexpected heat, distortion, or discoloration. The correct setting belongs to a specific resin-and-light combination—not to UV resin as a universal category.