
Fiberglass With Epoxy Resin Hinges on Compatibility
Conventional chopped-strand mat may use a binder made for polyester resin's styrene and can therefore resist wet-out with epoxy.
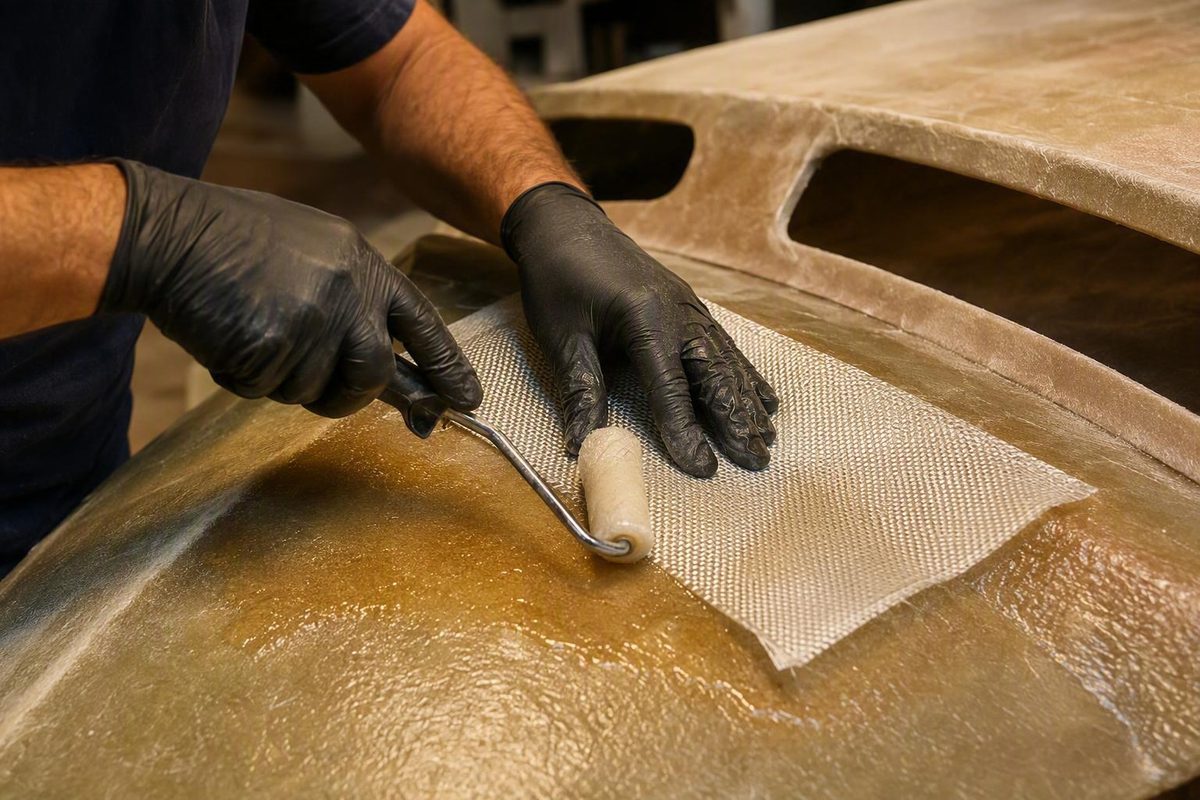
What happens when fiberglass and epoxy are combined
Yes, fiberglass can be used with epoxy resin. Choose fiberglass cloth, tape, biaxial fabric, or another reinforcement that the reinforcement supplier or epoxy manufacturer explicitly approves for the selected epoxy system.
The materials perform different jobs:
- Fiberglass is the reinforcement. Its fibers carry and distribute loads according to their type, quantity, and orientation.
- Epoxy is the matrix. Mixed resin and hardener wet the fibers, bind them together, adhere the laminate to a suitable substrate, and cure in the required shape.
Epoxy alone can coat, seal, or bond a surface. Adding fiberglass turns that coating into a reinforced laminate. Depending on its design, the laminate may improve abrasion and impact resistance, add thickness, bridge a seam, distribute loads, or form part of a composite component. The outcome depends on fabric construction, fiber direction, number of layers, adhesion, resin content, and substrate condition—not merely on adding “some glass.”
That distinction is especially important when sheathing wood. Fiberglass sheathing on a wooden hull may primarily reinforce and protect the epoxy coating rather than materially increase the hull’s structural capacity. System Three makes this distinction in its guidance on fiberglassing wooden boats with epoxy: surface cloth can protect the coating, while appropriately placed tape may reinforce chines, corners, keels, and seams.
Common applications include:
- Sheathing wood surfaces
- Reinforcing seams and corners
- Repairing sound fiberglass laminates
- Building hand-laminated composite parts
- Adding abrasion protection
- Laminating localized patches
- Covering fair, shaped substrates before painting or varnishing
A general application guide cannot establish a safe structural laminate schedule. Stop before proceeding if a project involves a damaged core, high-load hardware attachment, widespread delamination, uncertain existing construction, recurring structural cracks, or significant damage below the waterline. Such conditions may require inspection and a repair specification from a qualified marine or composites professional.
Choose fiberglass by construction, not just by its label
“Fiberglass” describes a broad family of reinforcements. Products that look similar can have different fiber orientations, binders, surface treatments, or intended resin systems. Choose by construction and documented compatibility rather than weight, appearance, or a familiar product name alone.
| Reinforcement | Construction and typical use | Epoxy considerations |
|---|---|---|
| Woven fiberglass cloth | Interlaced warp and fill fibers; commonly used for sheathing, repairs, and general composite work | Frequently compatible with laminating epoxy. Lighter cloth usually conforms and finishes more easily; heavier cloth builds thickness faster but requires more resin and may show more weave |
| Fiberglass tape | Narrow woven or directional reinforcement with finished edges | It is not adhesive tape. Useful for seams, corners, joints, and localized reinforcement |
| Biaxial reinforcement | Fibers stitched in two principal directions, often on opposing diagonals | Useful where its fiber directions align with expected loads. It may suit a loaded seam better than plain woven tape |
| Stitched 1708-type fabric | Heavy directional reinforcement commonly associated with a mat layer | “1708” alone does not establish epoxy compatibility. Verify how the mat is attached and whether the entire product is approved for epoxy |
| Woven roving | Coarse woven bundles used to build thickness | Can be compatible when documented, but it is bulky and may conform poorly around tight curves |
| Conventional chopped-strand mat | Random short fibers held together with a binder | May resist epoxy wet-out when the binder is intended to dissolve in the styrene present in polyester resin |
| Explicitly epoxy-compatible mat | Mat made with a compatible binder, without a problematic binder, or incorporated by stitching | May be suitable, but approval must be confirmed for the particular product and epoxy system |
Woven cloth is often the easiest starting point for routine hand layup. It can be positioned dry, smoothed before mixing begins, and cut with ordinary shears. Heavier fabric builds laminate thickness faster, but it also increases resin demand and may be harder to make visually unobtrusive.
Fiberglass tape is reinforcement supplied in narrow widths with finished edges. It has no adhesive backing. Its convenient width makes it useful for seams, chines, corners, and localized reinforcement without requiring long strips to be cut from a wider roll.
Biaxial fabric differs from plain woven material because its primary fibers are placed in selected directions and held together by stitching. On a loaded seam, that construction can put more useful fiber across the joint—provided the material is oriented to match the load. It does not eliminate the need for an appropriate width, number of layers, taper, or structural design.
Treat 1708 as a description to investigate, not a compatibility guarantee. Products sold under that designation can differ in how their layers are assembled. The mat component may be stitched, binder-free, specially formulated, or made with a binder intended for another resin. A beginner guide to fiberglass constructions distinguishes conventional binder-held mat from stitched material containing binder-free mat, but the current data sheet for the actual reinforcement must control the decision.
The conventional mat problem arises because some chopped-strand mat uses a binder intended to dissolve in polyester resin’s styrene. Epoxy does not supply that styrene, so the mat may remain stiff, resist conformity, or fail to wet out properly. This does not mean every product called “mat” is unusable. Stitched, binder-free, or specially formulated products may work, but the specification—not the generic label—must settle the question.
Use this compatibility sequence:
- Identify the construction. Is it woven cloth, woven tape, stitched biaxial, mat-backed fabric, loose mat, or woven roving?
- Find the current product data sheet. Do not rely only on a marketplace title or roll label.
- Read the resin-compatibility statement. Look specifically for epoxy, polyester, vinylester, or all-resin compatibility.
- Check the binder description. For mat-containing products, determine whether the fibers are stitched or held by a chemical binder.
- Confirm approval. Ask the reinforcement manufacturer, distributor, or epoxy maker if the documentation is unclear.
- Do not infer compatibility from appearance. Two white fiberglass products can behave differently once resin is applied.
- Do not infer compatibility from “1708” or “mat.” Neither term supplies enough information by itself.
A test coupon that turns clear or remains milky may reveal a practical wet-out problem, but it is not an authoritative compatibility test. It cannot prove that the reinforcement has the required mechanical properties or will provide a durable bond.
Select the epoxy system and plan the working conditions
Choose an epoxy intended for laminating fiberglass or for the specified repair. A table-top or deep-pour label does not establish suitability for fiberglass hand layup.
Start with a system whose manufacturer explicitly lists fiberglass laminating, composite construction, wood sheathing, or the intended repair as an application. Use only resin and hardener combinations approved for one another.
Epoxy is supplied as resin and hardener, but there is no universal mix ratio. Commercial products include 1:1, 2:1, and 4:1 systems, and the stated ratio may be based on volume or weight. The measurement basis is part of the specification, as shown by the differing product categories and ratios in this epoxy product range. A 2:1 volume ratio cannot be treated as a 2:1 weight ratio unless the manufacturer provides that conversion.
Fast, medium, and slow hardeners are selected according to the manufacturer’s approved temperature range and the required working and cure time. A small flat patch may need less open time than a large hull panel, multiple overlapping pieces, or a complicated vertical layup. Geometry matters because the cloth must be positioned, fully wetted, de-aired, and inspected before the mixture becomes too viscous to work effectively.
Product-specific figures must remain product-specific. For example, FGCI lists one slow laminating epoxy at 1:1 by volume but 100:84 by weight, with a stated working range of 70–85°F and times referenced to 77°F. Those values apply only to that named resin-and-activator combination, as stated in the FGCI product instructions.
Before opening the containers, decide:
- Which reinforcement will be used
- How each piece will be oriented
- Where seams and overlaps will fall
- Whether the substrate needs pre-coating
- How many layers and fill coats are planned
- Which section will be completed with each batch
- How vertical areas and sharp contours will be restrained
- Where mixed epoxy, tools, and waste containers will be placed
- How the required temperature will be maintained through application and cure
Do not estimate resin solely from floor area. Demand depends on fabric areal weight, total area, number of layers, substrate porosity, fill coats, losses in tools and containers, and application technique. Use the selected epoxy manufacturer’s coverage or laminate guidance for purchasing and batch calculations.
Planning worksheet
| Field | Project entry |
|---|---|
| Surface area | |
| Reinforcement type and product | |
| Fabric areal weight | |
| Number of layers | |
| Substrate material | |
| Substrate porosity or expected absorption | |
| Planned seams and overlaps | |
| Estimated wet-out resin from manufacturer guidance | |
| Number of fill coats expected | |
| Resin allowance for substrate pre-coating | |
| Waste allowance | |
| Selected resin and hardener | |
| Specified ratio | |
| Measurement basis: weight or volume | |
| Approved temperature range | |
| Expected working time under project conditions | |
| Planned batch sequence |
Treat the completed worksheet as a check against the manufacturer’s instructions, not a substitute for them.
Prepare the substrate, cloth, and work area
Complete the dry work before mixing.
Pre-layup checklist
- [ ] The substrate is sound and suitable for the intended repair.
- [ ] Loose, cracked, delaminated, rotten, or otherwise failed material has been removed.
- [ ] Required shaping and fairing are complete.
- [ ] The surface is clean and dry.
- [ ] Paint, wax, release agents, grease, and incompatible coatings have been removed as required.
- [ ] Sanding or mechanical preparation follows the epoxy maker’s instructions.
- [ ] Outside corners have suitable radii for the selected cloth.
- [ ] Fiberglass pieces are pre-cut and labeled.
- [ ] Fiber directions, seams, overlaps, and layer order are planned.
- [ ] Adjacent surfaces are protected.
- [ ] Temperature and ventilation can be maintained.
- [ ] Measuring and application tools are within reach.
- [ ] Personal protective equipment is ready.
- [ ] There is a plan for holding cloth against vertical, overhead, or sharply curved areas.
Wood substrates
Porous wood can absorb resin from the laminate and leave the wood-to-glass interface resin-starved. Pre-coating or sealing may therefore be appropriate when the selected epoxy procedure calls for it. Complete fairing and shaping first because cloth does not conceal abrupt defects; it tends to reproduce them.
Do not expect cloth to wrap a knife-sharp outside corner unaided. Fiberglass naturally tries to straighten, while wet resin provides limited holding force before cure. Round or otherwise prepare the contour where the design permits, and plan suitable restraint where it does not.
Existing fiberglass or polyester laminates
Do not assume epoxy will bond reliably to every old laminate. Paint, wax, oil, moisture, degraded resin, hidden delamination, and an unsound substrate can all interfere. Remove coatings and failed material, inspect what remains, and follow the selected epoxy manufacturer’s secondary-bonding procedure for cleaning, drying, and mechanical preparation.
If the existing laminate’s construction is unknown or damage extends beyond a clearly localized surface defect, inspection is more important than adding a cosmetic patch. A new skin over loose or damaged material does not restore the underlying structure.
Cutting and staging cloth
Cut pieces slightly oversize so small positioning errors do not expose an edge. Mark the layer order outside the final laminate area or use a staging diagram. Dry-fit every piece, including tapes and patches, before mixing.
WEST SYSTEM’s general cloth-application procedure suggests an overlap of approximately two inches when adjacent pieces are required. That is one manufacturer’s general application instruction—not a universal structural-joint dimension—and appears in its dry- and wet-method fiberglass guide. Structural overlaps must follow the applicable repair design.
Tools and protective equipment
Prepare:
- Clean, compatible mixing containers
- Accurate scales, graduated containers, or approved dispensing pumps
- Mixing sticks with square edges
- Plastic spreaders or squeegees
- Suitable rollers or brushes
- Fiberglass scissors
- A sharp utility knife and spare blades
- Release film where appropriate
- Masking materials and surface protection
- Gloves and eye protection
- Protective clothing
- Ventilation appropriate to the products and workspace
- Suitable respiratory protection for sanding dust
Resin and fiberglass work requires appropriate skin and eye protection and suitable ventilation. Sanding cured epoxy and fiberglass also requires dust control, respiratory protection, and protective clothing; current product labels and safety data sheets govern the specific precautions, first aid, spill response, and disposal requirements. These basic precautions are also identified in fiberglass-and-resin safety guidance from the specialty retailer cited above.
Do not begin a safety-critical structural repair solely from a generic tutorial. Damaged cores, heavily loaded attachments, substantial hull cracking, and widespread delamination require a verified repair approach.
Measure and mix epoxy without causing a cure failure
Use only the ratio printed in the current instructions for the exact resin-and-hardener combination. Confirm both the numerical ratio and whether it is specified by weight or volume.
A hypothetical example illustrates the rule:
- If a manufacturer specifies 2:1 by volume, use two stated volume units of resin for each one volume unit of hardener.
- If it specifies 2:1 by weight, use two stated weight units of resin for each one weight unit of hardener.
- Do not convert one basis to the other unless the manufacturer supplies the corresponding values.
Different liquid densities mean equal volumes do not necessarily have equal weights. An improvised conversion can change the chemistry even when the arithmetic appears correct.
Adding extra hardener is not a valid way to accelerate cure. Epoxy depends on the specified resin-to-hardener proportion; changing it can leave uncured or improperly cured material. If a faster cure is needed, select an approved faster hardener or adjust the conditions only within the system’s published limits.
Use a clean container compatible with the materials and large enough for thorough stirring without overflowing. Mix manageable batches sized for the available working time and layout. A large batch offers no advantage if it begins setting before it can be spread and inspected.
A reliable basic sequence is:
- Confirm the resin, hardener, ratio, measurement basis, and temperature range.
- Dispense or weigh the required quantity accurately.
- Combine the components in a clean container.
- Mix thoroughly.
- Scrape the sides and bottom repeatedly while mixing.
- Check for unmixed streaks or material trapped in corners.
- Apply the batch promptly within the specified working period.
Mixing time is product-specific. FGCI, for example, directs users of its named slow laminating system to mix small quantities for at least three minutes while scraping the container’s sides and bottom. That is a labeled instruction for that product, not a universal timer.
Temperature changes viscosity, working time, and cure behavior. Hardener choice also affects the usable schedule. If the work area or materials fall outside the listed range, stop and consult the product instructions instead of assuming the epoxy will eventually recover.
Avoid hand-drawn ratio lines or homemade calibration cups unless they have been validated for the exact container geometry, product, and measurement basis. User-developed cup-marking methods are anecdotal techniques rather than manufacturer specifications. Approved pumps, accurate scales, or suitable graduated containers reduce uncertainty.
Stop-work checklist
Do not apply the batch if:
- [ ] The resin or hardener quantity may be wrong.
- [ ] The wrong measurement basis was used.
- [ ] The components may not have been mixed completely.
- [ ] The wrong hardener was selected.
- [ ] The work or material temperature is outside the approved range.
- [ ] The mixture has become unusually hot, thick, stringy, or difficult to spread.
- [ ] The batch has already begun to set.
- [ ] The resin and hardener are not an approved combination.
Do not try to correct a mixed batch by guessing how much additional resin or hardener it needs. Exotherm and disposal procedures are product-specific; follow the product label and safety data sheet and contact the manufacturer for corrective guidance. Chemical and exothermic hazards are among the reasons manufacturer instructions must take priority over general repair advice, as reflected in this marine resin discussion.
Apply and wet out the fiberglass step by step
For beginners and thin fabrics, the dry method is generally easier because the cloth can be aligned, smoothed, and adjusted before epoxy is introduced.
Dry application method
- Prepare the surface. Confirm that it is sound, clean, dry, shaped, and ready for bonding.
- Position the dry cloth. Smooth it without distorting the weave. Secure it outside the laminate area if necessary.
- Recheck seams and fiber direction. Make sure overlaps and layer order match the plan.
- Mix a small batch. Use the exact ratio and measurement method specified for the product.
- Place epoxy near the center. On a horizontal surface, begin with a controlled amount rather than flooding the panel.
- Spread toward dry areas. Use a spreader, roller, or brush suited to the fabric and geometry.
- Watch the fabric change. Correctly wetted glass generally becomes evenly translucent or transparent.
- Work out trapped air. Move it toward an open edge using controlled strokes.
- Remove excess resin. Leave the fibers fully wetted and in contact with the substrate.
- Pause for inspection. Correct faults before the epoxy thickens.
White or milky-looking fibers can indicate incomplete wet-out, although persistent poor wet-out may also point to an incompatible reinforcement. Add only enough resin to saturate the affected fibers and substrate while the laminate remains workable.
Glossy pools indicate excess resin above the reinforcement. Another warning sign is cloth that appears to float or slide on a resin layer. Resin surrounding fully wetted fibers is necessary, but pools that can be pushed around without improving saturation are excess.
Use a spreader or squeegee at a shallow angle with moderate pressure. The goal is to move resin and air while preserving complete saturation and fabric contact. Excessive pressure can squeeze out too much resin and create dry areas. Aggressive or repeated brushing can disturb fiber alignment and suspend small bubbles, especially where a clear finish is planned.
Porous substrates need enough resin for both the fabric and the material beneath it. If white areas repeatedly appear over wood, the substrate may be absorbing resin. Supply what the interface needs, but do not mistake absorption for permission to leave a glossy resin layer floating above the cloth.
Wet application method
The wet method begins by applying epoxy to the prepared substrate before positioning the cloth:
- Apply the specified wet coat.
- Place the fabric onto the coated surface.
- Smooth it carefully without trapping folds.
- Add resin where needed to complete wet-out.
- Remove air and excess resin.
- Inspect the laminate before cure advances.
Use it only when it suits the selected system and geometry.
Multiple pieces and layers
Follow the epoxy manufacturer’s instructions for layer timing, recoating, and overlaps. Do not assume that one overlap width or layer count makes every repair structurally adequate. A surface-sheathing seam, decorative laminate, and load-carrying hull repair have different requirements.
When applying multiple layers wet-on-wet, keep the sequence manageable. Wet and inspect each layer before covering it with the next. Once buried, a wrinkle, dry patch, or trapped bubble becomes harder to correct.
Vertical and overhead work
Use smaller pieces so their weight does not pull them out of position. Apply resin in controlled quantities and use a method approved by the epoxy manufacturer for holding the reinforcement against the substrate. Avoid flooding the cloth because excess resin encourages sagging and fabric movement.
For sharp edges or difficult contours, a user-authored fiberglassing tools tutorial describes placing thin plastic release film over the wet laminate and applying compliant foam pressure. Treat this only as an experience-based option. It is not engineered vacuum bagging, a substitute for suitable contour preparation, or an instruction that overrides the epoxy manufacturer’s procedure.
In-process inspection pause
After each section or layer, stop and check:
- [ ] Are any fibers white or milky?
- [ ] Is air trapped beneath the cloth?
- [ ] Are there wrinkles or folds?
- [ ] Have edges lifted?
- [ ] Are there glossy resin pools?
- [ ] Is the cloth floating or moving?
- [ ] Has the weave been distorted?
- [ ] Is the fabric in continuous contact with the substrate?
- [ ] Has the batch begun to thicken or set?
Correct problems while the laminate remains workable. If cure has advanced too far for a clean correction, stop and follow the manufacturer’s procedure for allowing cure and preparing a secondary operation.
Trim, fill the weave, cure, and prepare for finishing
Trimming and filling are part of the laminate process, not cosmetic afterthoughts.
Excess cloth can often be trimmed during the initial or “green” cure, when the epoxy is firm enough that the reinforcement will not pull out of position but remains pliable enough to cut. The exact window varies by product, temperature, hardener, and laminate thickness. Use the product’s stated cure stages rather than a fixed number of hours.
Use a sharp blade and cut away from the finished laminate. If cutting pulls, lifts, or distorts the cloth, the laminate is not ready. If the epoxy has become fully hard, later trimming may require mechanical cutting and sanding.
After wet-out, the fabric weave often remains visible and textured. Apply additional epoxy as required to fill the low spaces before final sanding. Do not sand exposed weave flat because doing so removes reinforcement fibers and changes the laminate.
WEST SYSTEM says its procedure generally requires two or three epoxy coats to fill cloth weave sufficiently for final sanding. That count is system-specific rather than universal; fabric weight, resin viscosity, application tool, finish standard, and coat thickness can all change the requirement.
When sanding:
- Allow the epoxy to reach the cure stage required by the manufacturer.
- Use a fairing board or suitable sander for the surface.
- Sand the cured resin rather than the fiberglass.
- Stop if the weave or pale reinforcement fibers begin to appear.
- Control dust and use appropriate respiratory and skin protection.
- Clean and prepare the surface according to the next product’s requirements.
Distinguish recoating from secondary bonding. A coat applied within a manufacturer-approved recoat window may require different preparation from a layer bonded after full cure. Once the laminate has cured, contamination removal, washing, drying, and abrasion requirements must come from the selected epoxy system. Do not rely on a universal assumption about surface films or amine blush; formulations and approved preparation procedures differ.
Treat every subsequent material as part of a complete system, including:
- Epoxy primer
- Paint
- Varnish
- Fairing compound
- Barrier coating
- Polyester resin
- Gelcoat
- Adhesive or sealant
Some vendors warn against applying conventional polyester materials or gelcoat over cured epoxy. Boats.net, for example, says in its guide to polyester resin applications that polyester does not bond well to epoxy. That does not establish that every possible gelcoat system always fails or that another finishing system automatically succeeds. Obtain written compatibility and preparation guidance from both the epoxy manufacturer and the finish manufacturer.
Final quality-control checklist
- [ ] The laminate has cured as specified for the product and conditions.
- [ ] There are no sticky, rubbery, or soft areas.
- [ ] No dry reinforcement remains visible.
- [ ] There are no lifted edges or obvious voids.
- [ ] No delamination is visible or detectable.
- [ ] The cloth remains in contact with the substrate.
- [ ] The weave was filled before final sanding.
- [ ] Reinforcement fibers have not been sanded through.
- [ ] The next coating or finish is approved over the cured epoxy.
- [ ] Required cleaning, abrasion, and recoat procedures have been completed.
Diagnose common fiberglass-and-epoxy problems
Visible defects can have more than one cause. Diagnose the material, substrate, environment, and technique together rather than treating a surface symptom as proof of one specific failure.
| Visible symptom | Possible causes | Immediate response | Prevention |
|---|---|---|---|
| White or milky fibers | Incomplete wet-out, substrate absorption, epoxy becoming too viscous, or incompatible reinforcement | If still workable, add a controlled amount of resin and spread it through the fibers. If wet-out remains poor, stop and verify the reinforcement specification | Pre-coat porous substrates where required; use compatible fabric; work within approved temperature and time limits |
| Glossy pools | Too much resin or insufficient removal | Redistribute or remove excess without drying the fabric | Apply resin gradually and inspect under angled light |
| Floating or sliding cloth | Excess resin beneath the reinforcement, aggressive tool movement, or poor restraint | Remove excess and reposition the fabric while workable | Avoid flooding; secure the cloth and use smaller sections |
| Bubbles or voids | Trapped air, wrinkles, excessive working, substrate out-gassing, or loss of contact | Move air toward an edge with controlled strokes; do not churn the surface | Prepare the contour, apply resin steadily, inspect each section, and avoid overworking |
| Lifted edges | Sharp contour, cloth spring-back, inadequate restraint, or unsuitable fabric weight | Re-establish contact using an approved positioning or pressure method if still workable | Round permissible corners, choose more conformable fabric, and plan suitable restraint |
| Wrinkles or distorted weave | Poor dry fitting, moving wet cloth too aggressively, or attempting too large a piece | Reposition only while the material remains workable; otherwise follow the maker’s post-cure repair procedure | Dry-fit, use smaller pieces, and work from a stable center toward the edges |
| Sticky or soft cure | Incorrect ratio, wrong measurement basis, incomplete mixing, unsuitable temperature, wrong hardener, or incompatible components | Isolate the area and do not coat over it. Follow the epoxy manufacturer’s removal and repair instructions | Confirm the exact system, ratio, measurement basis, mixing method, and temperature before every batch |
| Delamination | Contamination, inadequate abrasion, trapped moisture, unsound substrate, unsuitable materials, or structural movement | Stop cosmetic work and determine how far the separation extends | Prepare to the manufacturer’s standard and repair the underlying cause |
| Exposed fibers after sanding | Insufficient weave filling or excessive sanding | Stop sanding and consult the system instructions for restoring the resin surface | Apply enough fill coats and use fair sanding methods |
| Recurring cracking | Possible unresolved movement, inadequate repair design, damaged core, or loads beyond the patch design | Stop repeated surface patching and obtain an assessment | Identify the structure and load path before selecting the laminate |
A white area should not automatically receive a large pour of resin. First determine whether the fabric is merely dry, whether the substrate is absorbing resin, or whether the reinforcement is resisting wet-out. Persistent stiffness or milkiness in a mat-containing product is a reason to stop and inspect its data sheet.
Likewise, a shiny surface is not proof of good saturation. Correct wet-out means resin has penetrated the reinforcement and the cloth remains in contact with the substrate. A deep glossy layer above already saturated fabric adds weight and may allow the reinforcement to float without improving fiber wet-out.
For bubbles, use deliberate spreading and inspection rather than aggressive repeated brushing. Work air toward an open edge. If a bubble results from fabric bridging a hollow or sharp contour, adding more resin will not force the cloth to adopt the shape; the geometry or restraint must be corrected.
A sticky or soft cure requires restraint, not improvisation. Possible causes include:
- Wrong resin-to-hardener ratio
- Measuring by weight when the ratio was specified by volume, or vice versa
- Incomplete mixing
- Material left on the container wall or bottom
- An unapproved resin-and-hardener combination
- Temperature outside the specified range
- Coating over incompatible or uncured material
Do not apply another coating over improperly cured epoxy in the hope that it will harden the layer beneath. Isolate the area and consult the resin manufacturer for removal, cleaning, and repair instructions. No universal rescue procedure is appropriate for every formulation and substrate.
Delamination also demands investigation. A localized loose edge caused by poor contour contact differs from widespread separation over a contaminated or damaged laminate. Extensive or load-bearing delamination should not be hidden beneath filler or a cosmetic skin.
Escalate the project for professional assessment when it involves:
- A wet, crushed, rotten, or otherwise damaged core
- High-load hardware such as chainplates, engine mounts, steering attachments, lifting points, or substantial deck fittings
- Widespread delamination
- Unknown laminate construction
- Significant structural cracking below the waterline
- Damage around major bulkheads, stringers, keels, or transoms
- Recurring failure after an earlier repair
- Any repair whose failure could endanger occupants or the vessel
These conditions exceed what can be diagnosed or specified safely from a general hand-layup guide. The extent of hidden damage, existing laminate construction, and load path must be assessed before a repair schedule is selected.
Go-or-stop decision
Proceed only when:
- The reinforcement is documented as epoxy-compatible.
- The substrate is sound and properly prepared.
- The exact resin-to-hardener ratio is known.
- The measurement basis—weight or volume—is confirmed.
- The resin and hardener are an approved combination.
- The work and materials are within the stated temperature range.
- The available working time is sufficient for wet-out, air removal, and inspection.
- The required finishing system has been checked for compatibility.
During layup, aim for uniformly translucent fibers with no white areas, trapped air, floating cloth, lifted edges, or glossy resin pools. Trim the cloth and fill the weave according to the product’s cure schedule.
Stop and obtain manufacturer or professional guidance when reinforcement compatibility is uncertain, epoxy remains soft, delamination is extensive, or the work involves a damaged core, high-load attachment, or structural below-waterline damage.
Frequently asked questions
Can you use ordinary fiberglass cloth with epoxy resin?
Usually, yes—provided the cloth manufacturer or epoxy supplier lists it as compatible with the selected laminating system. Woven fiberglass cloth is commonly used for epoxy sheathing, repairs, and hand-laminated parts. Verify the cloth finish and resin compatibility rather than assuming every unidentified roll is suitable.
Can chopped-strand mat or 1708 be used with epoxy?
Some products can, but the label alone is not enough. Conventional chopped-strand mat may use a binder designed to dissolve in polyester resin’s styrene and can therefore resist wet-out with epoxy. Stitched, binder-free, or specially formulated epoxy-compatible mat may be suitable.
Likewise, “1708” does not prove compatibility. Check the current data sheet to determine how the mat layer is attached and whether the complete reinforcement is explicitly approved for epoxy. Informal discussions of mat binders and stitched reinforcement illustrate why the products must be distinguished, but manufacturer documentation should control the decision.
How can I tell when fiberglass is fully wetted with epoxy?
Properly wetted fiberglass is generally evenly translucent or transparent, with its weave still visible. White or milky fibers can indicate dry or poorly wetted areas. Glossy pools, freely moving resin, or cloth floating above the substrate indicate excess resin rather than better saturation.
Inspect under angled light, correct dry areas while the epoxy remains workable, remove trapped air, and squeegee away excess without pressing hard enough to create new dry spots.
Should an epoxy mix ratio be measured by weight or by volume?
Use whichever basis the manufacturer specifies for the exact resin-and-hardener combination. A ratio stated by volume is not automatically the same ratio by weight.
For example, a hypothetical 2:1 instruction means two specified units of resin for one specified unit of hardener only on the stated basis. Do not convert between weight and volume unless the manufacturer supplies the correct conversion.
Can gelcoat or polyester resin be applied over an epoxy laminate?
Do not assume either universal compatibility or universal failure. Some suppliers warn that conventional polyester resin or gelcoat will not bond reliably over cured epoxy, but the result depends on the complete epoxy, preparation procedure, intermediate coating, and finishing system.
Before proceeding, obtain approval and surface-preparation instructions from both the epoxy manufacturer and the manufacturer of the gelcoat, polyester resin, primer, or other finish. If no validated system is available, choose a finish explicitly approved for the cured epoxy.