
Polyurethane Tooling Board for Fiberglass: Choose and Prepare It
Choose polyurethane tooling board for fiberglass patterns or short-run molds. Check density, resin compatibility, cure heat, sealing and release.
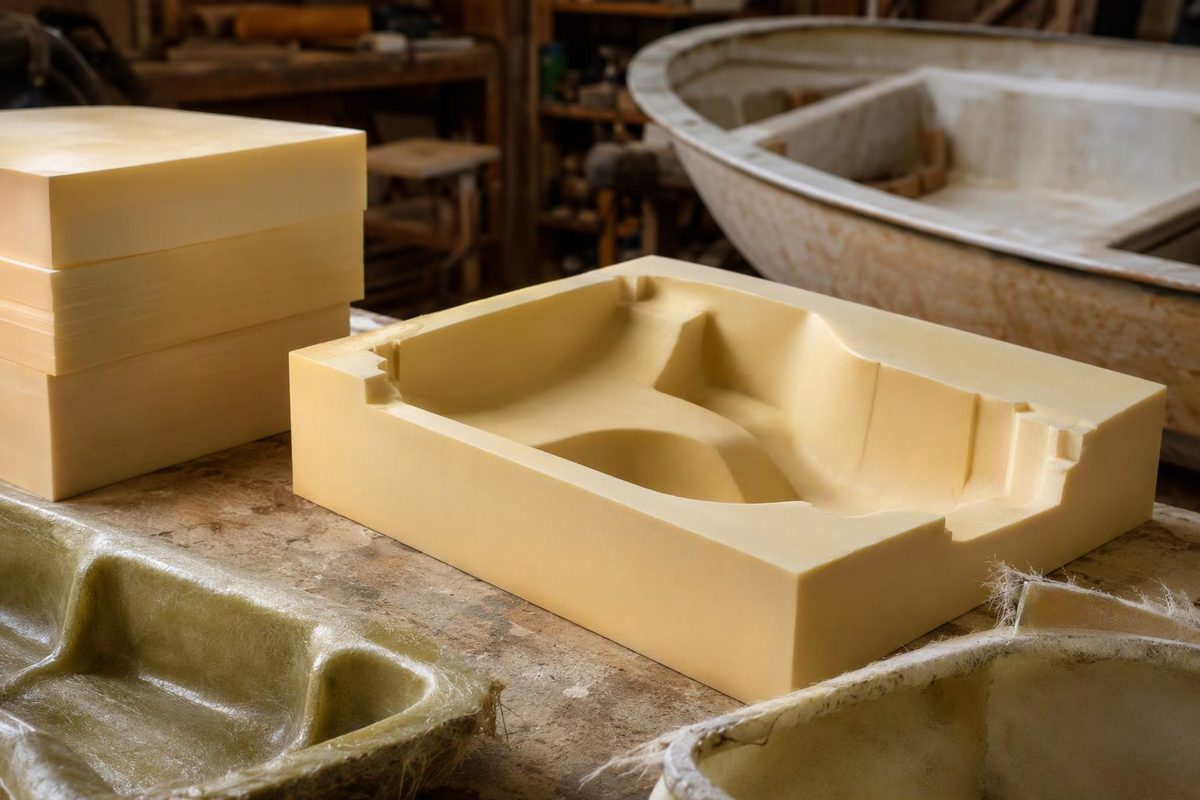
Polyurethane tooling board is a rigid, machinable material used to make patterns, plugs and, with suitable preparation, some short-run fiberglass molds. Choose it for the shape you need to create—not as a substitute for fiberglass reinforcement or an automatically suitable repair core. General Plastics lists fiberglass mold plugs and composite layup tools among its tooling-board applications; core applications are identified separately by product grade in its tooling and molds guide.
For a custom rigid cover, small housing or replacement trim piece, the buying decision comes down to four checks: whether the board is a pattern or the final mold, how you will shape it, the required finish, and the resin’s cure conditions.
1. Decide whether you need a plug or a direct mold
A plug or pattern is the master shape from which you make a separate mold. A direct mold is the surface on which you lay up the finished part. Direct tooling removes the pattern-making stage, but puts the board and its coating directly through each molding cycle. Composites UK describes sealed, finished tooling board as an option for short-run direct tools in its mold-tooling guidance.
Use that distinction when planning the job:
- Making a separate fiberglass mold: select board that is practical to shape and finish as a master.
- Making a few parts directly on the board: also verify release performance, resistance to cure heat and durability through the intended number of cycles.
- Repairing an existing hull, deck or shower pan: first identify whether you need a temporary former, reinforcement or replacement core. A tooling-board label alone does not establish suitability for a load-bearing repair.
Before buying, check how the part will come off. Return flanges and other features that cannot release in one pull direction may require split tooling. More release agent will not solve that geometry problem. See Composites UK’s guidance on shape and tooling complexity.
2. Match density to shaping and finish
“High density” is not a universal specification. Compare the actual density and mechanical properties, not just the product name.
| Example grade | Practical fit | Trade-off |
|---|---|---|
| PU240: 240 kg/m³, about 15 lb/ft³ | Hand-shaped or CNC-machined patterns; temporary short-run molds | Easier to carve, but lower strength and a less refined surface than denser board |
| PU600: 600 kg/m³, about 37 lb/ft³ | Detailed machined patterns and low-volume molds | More durable and better finishing potential, but tougher to hand-carve |
These are examples from Easy Composites’ PU240 instructions and PU600 instructions, not density thresholds for every manufacturer.
Include finishing in the comparison. Composites UK notes that the part mirrors the tool’s surface texture and that scratches or defects can appear on the molded part. A cheaper block that needs extensive filling may not be the cheaper finished tool. Source: mold-tooling guide.
3. Check resin compatibility and cure heat separately
Easy Composites lists PU600 as compatible with epoxy, polyester and vinyl ester, but that does not approve every process using those resins. Its technical datasheet specifically excludes elevated-temperature epoxy prepreg molding because of cure inhibition. The supplier also reports that its S120 sealer did not overcome that problem in testing. Source: PU600 product guidance.
Do not turn that product restriction into a blanket claim that all polyurethane tooling boards are unsuitable for heat curing: General Plastics offers specialized high-temperature grades with specified sealer, release and cure requirements. Source: manufacturer’s tooling guide.
Check the exact board, adhesive, coating and resin combination. Also distinguish heat-distortion temperature from an approved working cure temperature. PU600’s datasheet gives a typical heat-distortion temperature of 75°C; that number alone does not qualify a complete mold for a 75°C cure.
Allow for resin-generated heat, not just room or oven temperature. Thermoset resin releases heat while curing, and excessive exotherm can damage the tool. Source: Composites UK’s temperature-control guidance. If the expected peak temperature is unknown, resolve it before committing to a full layup.
4. Prepare the board as a complete tooling system
- Acclimatize and support it. Follow the grade’s instructions before machining. PU600 specifies 18–25°C and flat, dry storage.
- Bond larger blanks with the specified adhesive. Clean mating surfaces first. Match cured adhesive hardness to the board where a seam crosses the finished surface, so it sands evenly.
- Shape, inspect and finish-sand. Check edges, seams and tool marks before coating. PU600’s supplier recommends dry sanding to at least 600 grit for release preparation; use your chosen board’s specification rather than applying that grit universally.
- Seal or surface-coat it. Select a coating compatible with the board, resin and release system. Let it harden and finish it as instructed.
- Apply compatible mold release. Sealing fills the surface; release enables separation. Do not assume a glossy sealed surface is ready for fiberglass layup.
These steps follow the PU600 datasheet, supplier’s finishing instructions and General Plastics’ bonding and finishing guidance.
Capture machining and sanding dust at the cutting head. Use eye protection and dust respiratory protection appropriate to the product’s safety instructions; cured board is not dust-free. Sources: General Plastics’ dust guidance and Easy Composites’ safety sheet.
Final stop point: make a small trial layup on an offcut using the intended coating, release agent, resin and cure schedule. Check cure at the tool-contact surface, release, coating damage and the transferred finish before proceeding. General Plastics explicitly recommends testing under expected process conditions. A successful small trial checks compatibility; it does not prove that a larger, thicker layup will have the same heat behavior.
Choose the laminate separately using the guides to fiberglass cloth and fiberglass resin chemistry and cure. The board defines the shape; the laminate must meet the part’s requirements.