
Laminate Bubbling: Diagnose the Void Before Repair
Identify whether laminate bubbling is a coating flaw, trapped air, delamination or osmotic blistering, then match the repair to its depth and cause.
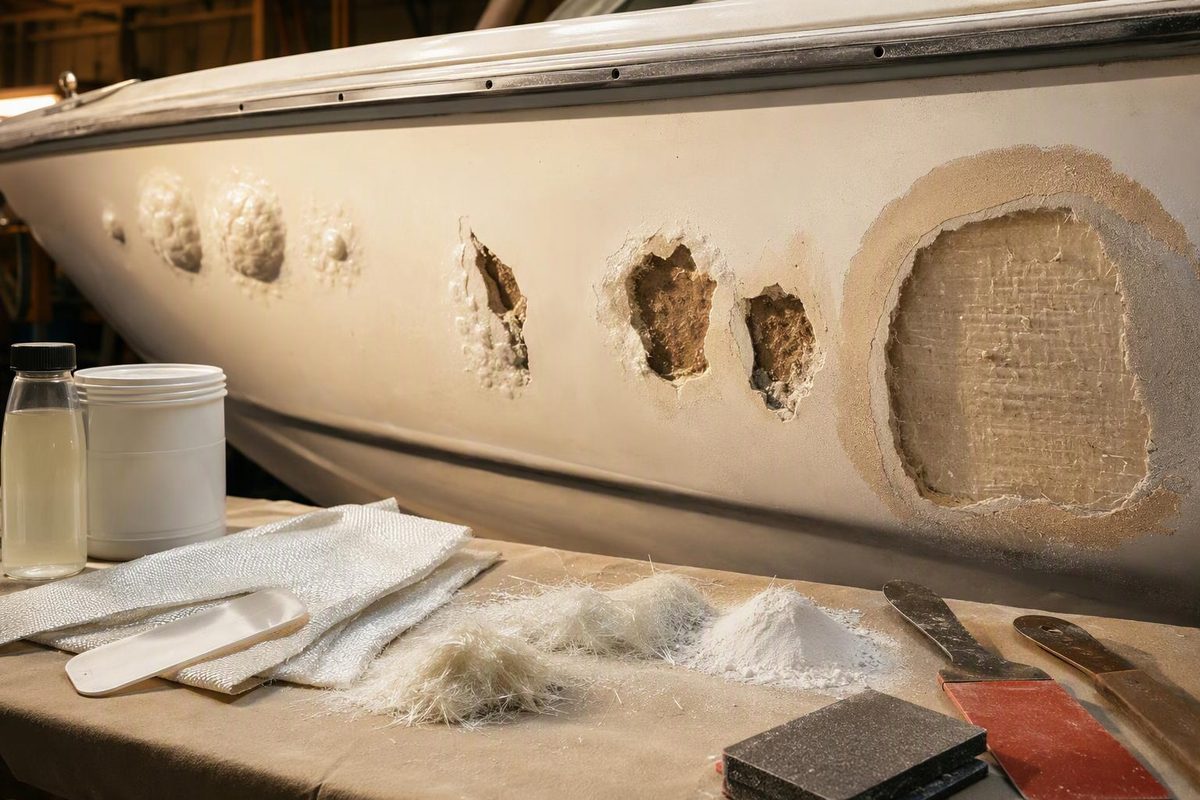
A bubble in fiberglass laminate is not one specific defect. It may be air trapped during a new layup, a cured void between plies, a skin separating from a core, or an osmotic blister beneath a boat’s gelcoat. Sanding the bump flat does not fix all four—and can hide the boundary of a structural problem.
First identify where the bubble is
| What you observe | Likely defect | Initial response |
|---|---|---|
| Bubble appears while the resin is still workable | Trapped air, fabric bridging or substrate outgassing | Consolidate before gel |
| Small bump exists only in paint, varnish or an epoxy topcoat | Coating bubble | Remove the failed coating and inspect beneath it |
| Pale or white pocket is visible inside cured glass | Dry fabric or an interlaminar void | Determine whether reinforcement is disconnected |
| Raised skin sounds dull and may flex when pressed lightly | Delamination, possibly involving a core | Stop and inspect the core and surrounding bond |
| Dome lies under gelcoat on an immersed hull, sometimes containing liquid | Osmotic or hydrolytic blistering | Assess the surrounding hull, not just the dome |
Mark the visible edge before sanding. On a cured panel, tap outward in a regular pattern with a small mallet and compare the response with known sound laminate. A dull response can help map a wet or delaminated area, while sound laminate generally produces a sharper response. Tapping cannot establish whether a hidden core is wet or degraded, however. The WEST SYSTEM fiberglass repair manual says deeper or more widespread delamination represents a more serious structural problem.
Stop using the part or boat and obtain an appropriate inspection if the area leaks, flexes, grows or appeared after a significant impact, or if it is near a stringer, bulkhead, transom, chainplate, engine mount or heavily loaded fitting. A below-waterline gelcoat blister deserves investigation but, by itself, does not prove that the hull is unsafe. The concern rises when laminate integrity is uncertain because a filler-only repair does not restore disconnected reinforcing fibers.
If the layup is still wet
Act only while the resin remains within its stated working time:
- Check for fabric bridging over a corner, tight radius or surface hollow. Lift and reposition the reinforcement rather than forcing stiff cloth into a shape it cannot follow. Cut a relief only where the laminate design permits it.
- Work from the center of the pocket toward a free edge with a plastic squeegee, using enough pressure to move air without shifting the reinforcement. A squeegee can force resin through fabric and extract trapped air. A grooved consolidation roller retains more resin but may split one bubble into smaller ones if the air lacks an escape route, according to Epoxyworks’ application-tool guidance.
- Add resin where fibers remain dry, not simply to flood the pocket. A resin-rich puddle is not a substitute for consolidation.
- If bubbles keep rising from wood, foam or another porous substrate, suspect outgassing. Heating a porous substrate after applying liquid epoxy can expand trapped air and drive it through the coating. WEST SYSTEM advises waiting until its epoxy has gelled before warming the work (fiberglass repair manual). Follow the temperature and cure instructions for the resin actually in use.
Once the resin has gelled, stop rolling or pressing it. Let the laminate cure according to its product data, then assess it as a cured void.
If the bubble has cured into the laminate
Do not inject resin blindly into a structural void. Injection can leave contamination, moisture or disconnected fibers in place, with no reliable visual confirmation that the cavity filled.
For a shallow, nonstructural surface void, grind only enough to expose its full boundary. Continue until the remaining laminate is firmly bonded and properly wetted. If inspection confirms that no load-carrying reinforcement was interrupted, fill the prepared cavity with a compound approved for that depth and exposure. Fairing compound is for restoring contour, not replacing structural glass.
If the defect passes through reinforcing plies, replace the affected reinforcement:
- Grind out loose, white, dry or poorly bonded material to sound laminate.
- Taper the perimeter rather than leaving a square-edged recess. For larger laminate voids repaired with its epoxy system, WEST SYSTEM specifies a minimum 12:1 bevel. Other engineered laminates may require a different manufacturer- or designer-approved repair schedule.
- Prepare the surface as required by the selected resin system. It must be sound, clean, dry and suitably abraded.
- Replace the removed reinforcement with the specified cloth type, fiber orientation and cured thickness. Wet out and consolidate every ply.
- Allow the repair to complete its specified cure before fairing, drilling or loading it.
For more on separating harmless pinholes from consequential voids, see air bubbles in fiberglass.
If a skin has lifted from a core
A bubble over balsa, foam, plywood or honeycomb is a sandwich-panel problem. Find and stop any water path through a fastener, crack, joint or exposed edge. The repair then depends on what is beneath the skin:
- Dry, sound core and a small, accessible disbond: controlled rebonding may be possible if the failed interface can be prepared, fully filled and evenly clamped.
- Wet, crushed, rotten or chemically damaged core: remove enough skin to replace the damaged core, then rebuild the laminate skin.
- Large or load-bearing disbond: obtain a suitable repair schedule. Surface fairing will not reconnect the skin to the core.
If the “bubble” is a gelcoat blister
On an immersed polyester boat hull, a blister can form as water accumulates in a void beneath the gelcoat. Water-soluble material may create an acidic solution, while hydrolysis can damage the resin matrix and resin-to-fiber bonds. Blisters may therefore be isolated finish defects or evidence of damage extending into the laminate, as the WEST SYSTEM blister guide explains.
Open isolated blisters with the boat hauled out and the work area prepared to contain liquid and grinding waste. Inspect the cavity, remove unsound material and let the laminate dry before repairing to the depth found. Numerous blisters, fiber whitening, persistent moisture or broad dull-sounding areas call for a hull-wide assessment rather than repeated spot filling. A barrier coat belongs over a prepared, dry and repaired substrate; it does not cure wet or delaminated laminate beneath it.
Prevent the next bubble
Use reinforcement compatible with the resin—especially when selecting chopped-strand mat for epoxy, as explained in fiberglass with epoxy resin. Follow the resin maker’s recoat preparation: some epoxies develop water-soluble amine blush that must be washed off before sanding and secondary bonding. Keep the substrate dry, avoid rising substrate temperatures during coating, mix without whipping in air, stay within working time and provide an escape path while consolidating each ply.
Wear the PPE specified by the safety data sheets for the resin, hardener, solvent and coating. Control grinding dust and prevent skin contact with uncured resin. NIOSH notes that fibrous glass can harm the eyes, skin and lungs, while OSHA identifies uncured epoxy as a significant skin-exposure hazard associated with irritation, dermatitis and sensitization.