
Can RV Delamination Be Fixed? Rebonding or Rebuilding
Closed-wall injection is a reasonable option only with a dry assembly, sound substrate, access to the failed interface, and broad, even clamping.
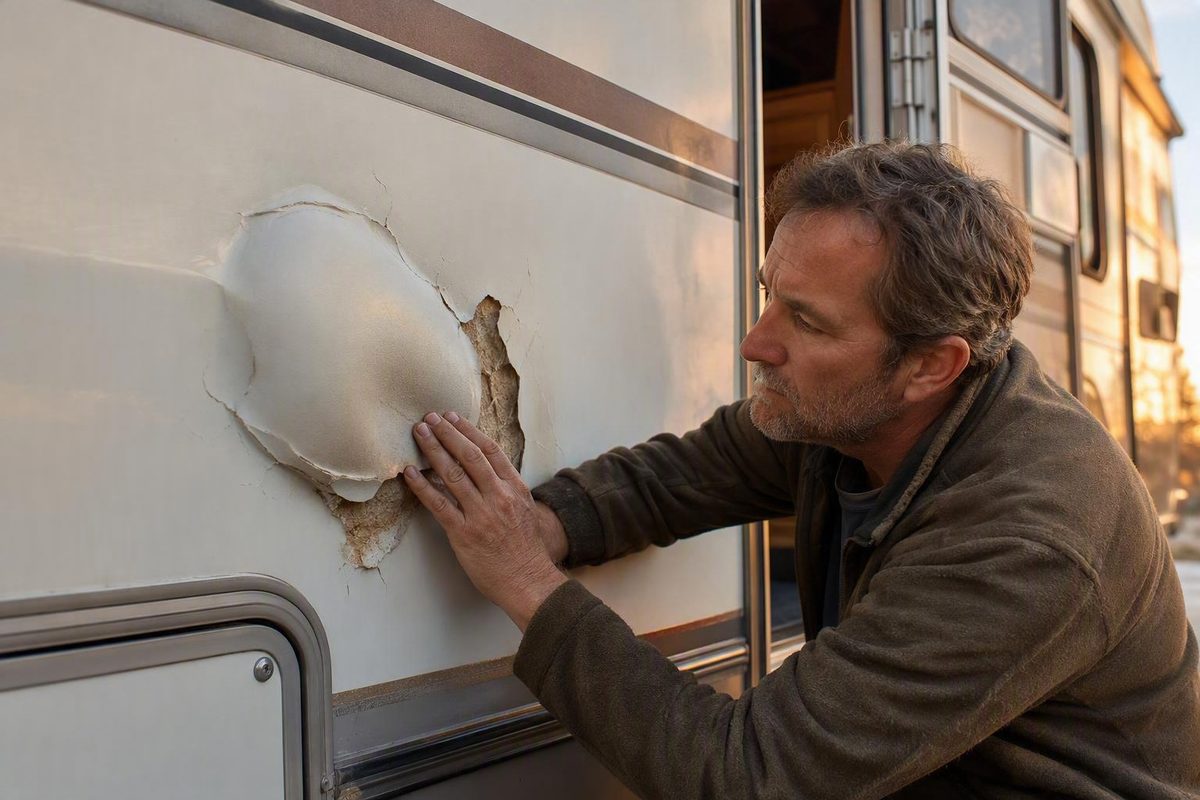
A bubble in an RV wall is a warning to investigate—not an automatic invitation to inject epoxy. Similar-looking defects can result from different failures, and the correct response depends on what separated, why it separated, and whether the concealed wall materials remain usable.
Localized RV delamination over dry, stable backing may be a candidate for rebonding. Wet plywood, rotten luan, weak foam, damaged framing, open siding, or several failed layers can turn the same outward symptom into a reconstruction project.
Before buying a kit or drilling into the wall, work through the diagnosis in this order:
- Find and stop the leak or other initiating problem.
- Determine how the wall was built.
- Identify which layer or bond line may have failed.
- Check whether the concealed material is dry and sound.
- Confirm that adhesive can reach the separation and that the entire area can be clamped evenly.
- Choose localized rebonding, section rebuilding, full-panel work, or professional evaluation accordingly.
What RV delamination means inside a laminated wall
RV delamination is separation between bonded layers in a laminated wall assembly. It is not simply a scratch, faded paint, damaged gelcoat, or another flaw confined to the visible finish.
A laminated RV wall can be thought of as a sandwich, but its ingredients vary by manufacturer, model, production year, and location on the vehicle. A wall may contain:
- An exterior fiberglass-reinforced skin or gel-coated fiberglass panel
- Thin luan, plywood, or another structural backing
- Rigid foam insulation
- A composite panel such as Azdel
- Interior decorative paneling
- Wood or aluminum framing
- Adhesive between some or all of those layers
Composet Products, which sells RV delamination repair systems, describes laminated walls containing combinations of fiberglass, plywood, rigid foam, fiberboard paneling, and wood or aluminum framing. Its overview is useful for understanding the general concept, but it cannot establish what is inside a particular RV. See its overview of laminated RV walls and delamination types.
That construction uncertainty matters because “delamination” does not identify one specific failed interface. A bubble could indicate that:
- The exterior skin released from the layer behind it.
- Plies within a sheet of plywood or luan separated.
- Plywood released from foam.
- Foam fractured or lost cohesion.
- More than one bond line failed.
- An impact crushed or dented material beneath an intact skin.
- Swollen or deteriorated material left a void.
The visible fiberglass may therefore be only the messenger. If plywood has separated internally, bonding the skin to the outermost damaged ply may not stabilize the rest of the sheet. If foam is crumbling, adhesive may attach to a weak surface that later tears away. If rot has removed the backing, glue cannot replace the missing material.
Two broad conditions help define the likely repair path.
Closed-wall delamination means the exterior skin remains substantially intact and in position but looks bubbled, loose, rippled, or displaced. Access to the failed interface is limited, so an injection repair—if otherwise appropriate—must deliver adhesive into a concealed void.
Open-wall separation means the exterior skin has peeled away or opened far enough to expose the backing. Some separated surfaces can be inspected and prepared directly, but they may also require replacement. Open separation is not simply a larger blind-injection job; it can call for direct surface preparation, material replacement, and a different bonding approach.
The essential diagnostic question is not merely, “Is this delamination?” It is, “Which materials separated, and are they still capable of holding a dependable bond?”
Warning signs—and what they cannot prove
Common screening signs of possible RV delamination include:
- Bubbles or blisters
- Bulges
- Ripples, waves, or creases
- Loose edges near trim or seams
- A soft or spongy response to light pressure
- A hollow or different sound when the wall is tapped
- Interior staining
- Musty odors
- Exterior distortion around a window, vent, hatch, rail, or attachment
Inspect a clean, dry wall in favorable lighting. Low-angle sunlight or strong side lighting can make subtle changes in reflection easier to see. Walk along the RV rather than viewing it only straight on, and compare the suspect area with an apparently unaffected part of the same wall.
RV LIFE describes sunlight, gentle pressing, and tapping as informal screening methods. It also notes that an impact can deform underlying wood or foam without puncturing the exterior fiberglass. These checks are indicators, not conclusive tests. Review its illustrated discussion of possible delamination signs.
A change in feel or sound can establish that the assembly is different beneath one spot. It cannot reliably establish:
- Which bond line failed
- Whether the backing is wet
- Whether plywood is rotten
- Whether foam is fractured
- Whether framing is involved
- How far concealed damage extends
- Whether adhesive injection is suitable
The available evidence does not provide a universal owner test that reliably distinguishes all these conditions without considering the wall construction or examining concealed material.
Look for related clues around the affected area. Check the roof and upper wall, nearby trim and seams, windows, lights, vents, awning mounts, compartment openings, and other penetrations. Inside, look for stains, discolored paneling, lifted coverings, damaged cabinetry edges, or changes around the corresponding opening.
Stains, odors, persistent softness, and loose edges strengthen the case for concealed-wall investigation, but they still do not prove one particular failure. A musty odor may indicate moisture or microbial growth somewhere nearby without locating it or identifying the affected material.
When the construction is unknown, seek model-specific information before drilling. Useful sources may include the RV manufacturer, an authorized service center, model-specific repair documentation, construction photographs, or a technician familiar with that wall system. If those sources cannot resolve the uncertainty, selective disassembly or professional inspection may be more informative than another surface test.
Trace the cause before choosing a repair
Water intrusion is frequently reported in connection with RV delamination, but it is not the only possible cause, and the available evidence does not establish a dependable prevalence rate. Other reported contributors include impact, original bonding or curing problems, aging adhesive or sealant, road vibration, ultraviolet exposure, and repeated temperature changes. A commercial RV repair provider summarizes these possible causes but does not provide comparative research or quantified rates. See its overview of reported delamination causes.
Build a leak-path map rather than inspecting only the spot directly above the bubble. Include:
- Roof-to-sidewall and roof-to-cap transitions
- Roof vents, skylights, antennas, and other roof openings
- Window and door frames
- Exterior vents and utility penetrations
- Hatches and access panels
- Marker lights and other mounted fixtures
- Horizontal and vertical trim
- Rails and molding
- Exterior storage compartments
- Slide-out openings and adjacent seals
- Awning arms and mounting hardware
- Ladders and other exterior attachments
- Cracks, holes, punctures, and previous repairs
- Missing, lifted, hardened, cracked, or poorly bonded sealant
Map the sequence if possible. Ask when the distortion first appeared, whether it changes after rain or heat, whether an opening was previously resealed, and whether interior staining aligns with an exterior attachment. When evaluating a used RV, request photographs and invoices rather than relying only on a statement that “the leak was fixed.”
Correct the initiating problem before rebonding. Otherwise, an improved exterior appearance may conceal continuing moisture entry and make later inspection harder. If impact or a loose attachment caused the separation, address that problem before restoring the laminate.
Leak correction and wall repair are separate tasks:
- Resealing addresses the entry path. It does not rebond layers that have already separated or replace damaged wood, foam, or insulation.
- Rebonding reconnects suitable remaining layers. It does not repair the roof seam, window frame, crack, or attachment that admitted water.
Do not choose one universal sealant from a generic list.
The repair-readiness check: dry, sound, accessible, and clampable
A closed-wall injection repair is a reasonable possibility only when four conditions can be confirmed: the assembly is dry, the remaining substrate is sound, the failed interface is accessible, and the area can be clamped broadly and evenly.
1. Dry
Stop the leak and allow the wall to dry before considering rebonding. Persistent moisture may interfere with adhesion and can indicate wet insulation, saturated wood, or another concealed moisture reservoir.
Dryness alone is not enough. Material can dry after becoming swollen, distorted, rotten, contaminated, or mechanically weak. Dry deteriorated luan is still deteriorated luan.
The supplied evidence provides no universal moisture value that proves every RV wall is ready to bond. Any readings or observations must be interpreted in the context of the actual wall materials and inspection access rather than treated as an automatic pass-or-fail number.
2. Sound and stable
The intended bonding surfaces must remain capable of carrying the bond. Warning conditions include:
- Swollen or visibly separated plywood
- Rotten, crumbling, or missing luan
- Contaminated surfaces
- Weak or fractured foam
- Wet insulation
- Widespread softness
- Persistent odor or suspected concealed mold
- Movement around framing or attachments
- Several unknown failed layers
- A previous repair that failed
- A wall profile that does not return toward position under gentle, controlled pressure
Composet Products states that a candidate for its injection system should be dry, free of contamination, accessible to adhesive, mechanically clampable, and capable of curing properly. The same seller identifies complete factory-style wall replacement as the best solution in appropriate cases—an important limitation from a company that sells rebonding kits. Read the seller’s repair-candidacy limitations.
3. Accessible
You need a plausible way to reach the failed interface, not merely the general area. Access may come from a removed window, trim piece, hatch, interior opening, exposed edge, or a product-specific injection plan.
Removing a nearby window can reveal the edges of the wall layers and may expose stained, swollen, soft, or separated luan. It can also show that the damage extends beyond the visible bubble. Anything removed must later be reinstalled and resealed correctly.
Drilling should not be the default response to uncertain construction. An owner discussion about a proposed epoxy repair illustrates the underlying uncertainty: participants could not confirm whether the skin, plywood plies, or water-damaged wood had failed, and the thread supplied no completed result that could validate a general procedure. It also warned against penetrating too deeply. See the construction and access concerns raised in the discussion.
If concealed components cannot be located with reasonable confidence, stop rather than drilling experimentally.
4. Clampable
Adhesive must reach the failed area, and the layers must remain in the intended position during the product’s specified cure. A few isolated clamp points are not equivalent to broad pressure over the repair.
Before proceeding, ask:
- Can a broad caul or support cover the full area?
- Does wall curvature complicate contact?
- Will windows, rails, awnings, compartments, or slide components obstruct the setup?
- Is there a suitable structure from which to brace or clamp?
- Can the finish be protected?
- Can the setup remain stable for the required cure schedule?
- Will the panel return toward position without excessive force?
A caul is a rigid or shaped support used to spread force across a surface. The appropriate arrangement depends on the wall shape, surrounding components, and adhesive instructions; no improvised clamping design is safe or effective for every RV.
Stop conditions for DIY injection
Pause and obtain model-specific information or qualified help if:
- Wall construction is unknown.
- Concealed wiring, plumbing, framing, or fasteners cannot be located.
- Damage is near a significant structural attachment.
- The entire area cannot be clamped.
- The wall remains wet or broadly soft.
- Backing is rotten, swollen, missing, or crumbling.
- Foam or framing appears damaged.
- Siding is extensively open or peeled away.
- Several layers may have failed.
- Material replacement appears necessary.
- A previous repair failed.
- Significant exterior refinishing will be required.
No universal square-foot limit, drilling depth, moisture value, or informal test can determine injection suitability for every RV. Use this decision path instead:
- Stop the cause.
- Inspect and dry the assembly.
- Determine whether the backing remains intact and stable.
- Confirm access and complete clamping.
- Rebond only if suitable material remains.
- Open and rebuild if material must be replaced.
- Seek professional evaluation when those conditions cannot be confirmed.
Repair paths from localized rebonding to wall reconstruction
RV delamination repair is a range of work, not one procedure. Match the scope to the concealed material condition rather than to the visible bubble alone.
Localized closed-wall rebonding
At a high level, a closed-wall injection repair involves:
- Gaining suitable access to the failed interface
- Introducing a compatible, sufficiently flowable bonding system
- Distributing it through the separation
- Returning the layers toward their intended position
- Applying broad pressure during cure
- Closing and resealing all access points
This approach is limited to localized separation over dry, clean, sound, stable backing. It also requires enough access to distribute adhesive and a realistic clamping plan.
“Injectable” does not mean a resin will automatically find every void. Narrow gaps, existing adhesive, absorbent material, obstructions, wall curvature, and multiple separated layers can complicate distribution and increase material use.
Open-wall repair
When siding has peeled away and the backing is exposed, blind injection may be neither necessary nor appropriate. The accessible layers can be inspected and prepared directly. Depending on their condition, the work may involve:
- Removing failed or contaminated adhesive
- Trimming unsound material
- Drying and cleaning retained surfaces
- Replacing localized backing
- Applying an adhesive suited to the accessible materials and gap
- Supporting the siding during cure
- Restoring edges and weather protection
A surface-applied adhesive may be more practical than a low-viscosity injection system in an open repair, but no adhesive category is universally correct. Compatibility must be established for the actual skin, wood product, foam, composite, existing adhesive, and finish.
Partial reconstruction
When the damage is localized but the backing is not reusable, the wall may need to be opened from the interior or exterior. Damaged plywood, foam, insulation, composite board, or localized framing is removed and replaced before the retained skin is reattached or a new exterior section is installed.
This approach is more invasive than injection, but it addresses missing or weak material rather than encapsulating it. Opening the section can also reveal the actual boundaries of moisture damage.
Full-panel or full-wall replacement
Widespread rot, wet insulation, framing damage, extensive open separation, severe deformation, or several failed layers may justify full-panel or full-wall work. This can involve removing interior or exterior components, rebuilding the laminated section, restoring openings and attachments, and refinishing the exterior.
Full replacement is the most invasive option, but it may be more controllable than injecting a large, irregular, poorly understood void.
Repair-scope matrix
| Observed or confirmed condition | Likely direction |
|---|---|
| Small closed area with dry, clean, stable, reachable, fully clampable backing | Localized rebonding may be considered |
| Closed separation with an uncertain bond line or hidden condition | Inspect further before choosing an adhesive |
| Localized rotten or missing backing | Open the section and replace damaged material |
| Exposed siding with accessible, sound layers | Prepared open-wall rebonding may be possible |
| Wet insulation or broad moisture migration | Open, dry, inspect, and replace material as needed |
| Weak or fractured foam | Rebuild the section rather than bond to unstable foam |
| Widespread plywood failure or several separated layers | Major reconstruction or panel replacement |
| Framing damage or movement near attachments | Professional structural assessment and reconstruction |
| Extensive open separation | Professional repair or panel replacement |
Owner discussions describe both injection and more invasive reconstruction. They also illustrate why anecdotes cannot select a method for another RV: one reported repair became solid without becoming perfectly flat, while participants disagreed about durability over swollen wood or weak foam. Review the differing owner experiences and limitations.
For any adhesive-based repair, follow the selected manufacturer’s instructions for material compatibility, surface preparation, mixing, working time, application conditions, cure, protective equipment, ventilation, and disposal. Do not assume that epoxy, polyurethane, construction adhesive, penetrating resin, or another product is suitable for every wall.
Why injection repairs fail—and how to plan the clamping dry run
Injection can fail even when the exterior initially looks better. Recurring reasons include:
- Residual moisture
- Rotten or contaminated backing
- Weak foam
- An incorrectly identified failed layer
- Incomplete adhesive distribution
- More separated layers than expected
- Inadequate access
- Adhesive loss into unintended spaces or absorbent material
- Working time expiring before filling and clamping are complete
- Application conditions outside the product’s requirements
- Uneven or unstable pressure
- A panel too distorted to return safely toward position
One owner reported that a repair near a window required a second attempt after the first produced only a partial bond. The revised attempt changed both access and clamping. This is an unverified anecdote, not proof of a standard procedure or long-term durability, but it demonstrates why “inject and clamp” is not a complete plan. Read the owner’s two-attempt repair account.
Complete a dry run before mixing
Set up and rehearse the operation without adhesive. The dry run should include:
- Masking and finish protection
- Access tools and application equipment
- Product-specified tubing or applicators
- Cauls, boards, or other broad supports
- A compatible release layer where required
- Braces, straps, wedges, or clamps
- Squeeze-out containment and cleanup supplies
- A sequence for filling and applying pressure
- A plan for keeping the setup undisturbed during cure
- A response if adhesive appears in an unintended location
A recent owner discussion likewise emphasizes finding the water source first and testing the clamping arrangement before mixing adhesive. That thread does not establish a universal setup, cure period, or suitable product. See the owner discussion of leak correction and clamping preparation.
Broad, controlled contact is the objective—not maximum available force. An unsuitable or unstable setup can leave areas unsupported, mark the finish, or place unintended stress on the skin and nearby components. If the panel will not return toward position without aggressive force, reconsider whether rebonding is the correct repair.
Set realistic expectations. A wall may become firmer while retaining waviness, a crease, or the outline of the original defect. Cosmetic restoration can require separate exterior refinishing. The available seller statements and forum accounts do not establish a typical service life for injection repairs through years of heat, freezing, vibration, and renewed moisture exposure.
Reject improvised adhesive modifications unless the product manufacturer expressly authorizes them. One forum participant suggested microwaving epoxy, while another owner discussion reported that thinning agents were not foam-friendly and that solvents affected the exterior finish. These anecdotes do not validate either practice; they reinforce the need to use the selected product only as directed. Review the conflicting owner-level suggestions and cautions.
DIY kit, repair shop, or reconstruction: making the decision
The DIY-versus-professional decision is less about confidence alone than about controllability. Compare the options using:
- Concealed substrate condition
- Size and shape of the failed area
- Wall curvature
- Number of suspected failed layers
- Access to the void
- Proximity to framing and significant attachments
- Ability to clamp the complete repair
- Skill with adhesives, disassembly, sealing, and finish work
- Available tools and workspace
- Cosmetic expectations
- Budget
- Tolerance for discovering a larger project after opening the wall
When DIY may be reasonable
DIY may avoid some labor charges, let an owner control scheduling, and make sense for a genuinely localized area with known construction and sound backing. It is most defensible when the owner can inspect the material, establish product compatibility, rehearse the application, and clamp the entire area without improvising after mixing begins.
The disadvantages are substantial. Concealed conditions remain uncertain, working time may be limited, and drilling or disassembly can damage the skin or interior. Removing a window or panel may also reveal that the visible bubble was only one part of the project.
What professional help may add
A repair shop may bring experience with different wall constructions, controlled disassembly, specialized adhesive applicators, fiberglass finishing, or vacuum-bonding equipment. Some businesses may offer a written warranty, but that is not automatic. Scope, exclusions, cosmetic standard, leak responsibility, and transferability should be confirmed in writing. A commercial comparison similarly identifies experience and specialized equipment as potential advantages while acknowledging higher costs and scheduling delays. See the service provider’s DIY-versus-professional comparison.
Professional assessment is particularly appropriate for:
- Large areas
- Open-wall damage
- Widespread softness
- Persistent moisture
- Suspected mold
- Damaged foam or framing
- Unknown wall construction
- Failed previous repairs
- Multiple suspected bond-line failures
- Damage around windows, awnings, slide-outs, rails, corners, or other significant attachments
- Repairs requiring exterior finish matching
What a commercial kit price does—and does not—tell you
As one transparent retail example, a seller listed a closed-wall kit for $162. The listing included 1.2 quarts of resin, syringes, tubing, shims, mixing supplies, gloves, and instructions, with qualified single-layer coverage of up to 10 square feet. The seller states that actual coverage depends on multiple variables. These are seller-provided price and marketing details that can change; they do not prove compatibility, sufficient quantity, or likely performance for a particular wall. See the listed kit contents and qualified coverage.
The kit price is not the repair price. A total-cost estimate may need to include:
- Diagnosis and moisture investigation
- Leak correction
- Drying
- Removal and reinstallation of windows, trim, rails, or hatches
- New sealing or bedding materials
- Cauls, clamps, braces, straps, masking, and finish protection
- Adhesive and application waste
- Replacement plywood, foam, insulation, composite board, or framing
- Mold assessment or remediation where appropriate
- Professional labor
- Fiberglass, gelcoat, paint, graphics, or finish matching
- Taxes, transport, storage, and shop supplies
- Warranty terms and exclusions
- Contingency for concealed damage
One online article presents repair ranges from hundreds of dollars for localized work to more than $10,000 for severe reconstruction, but it does not disclose a geographic market, invoice sample, survey, date basis, or consistent list of inclusions. Treat those numbers as unsupported general estimates rather than a forecast for an individual RV. Review the published ranges and stated pricing factors.
Obtain itemized, RV-specific quotes. Ask each shop:
- What inspection supports the proposed scope?
- Is leak correction included?
- Which materials will be retained or replaced?
- How far will the wall be opened?
- Will insulation and framing be inspected?
- What exterior finish standard is included?
- What happens if additional damage is found?
- What warranty, if any, applies to the leak, bond, and finish?
For major work, compare the quote with the RV’s current market value, mechanical and roof condition, deferred maintenance, hidden-damage risk, expected cosmetic result, and available repair documentation. A low kit price should not drive a decision about a wall that may require reconstruction.
Resealing, monitoring, and preventing another failure
A wall repair is not complete until every removed window, trim piece, hatch, rail, light, or access point has been reinstalled and resealed according to the applicable RV, component, and sealant guidance. Inspect adjacent seams disturbed during disassembly.
Document the project while access is open. Keep:
- Photographs before, during, and after repair
- The suspected entry path or non-water cause
- Inspection and moisture observations
- Locations of access holes or opened sections
- Materials removed and replaced
- Product names and batch information
- Mixing and cure records
- Required cure conditions
- Invoices and shop reports
- Sealant and adhesive instructions
- Written warranty terms
After cure, establish a reference photograph and inspect for renewed movement, waviness, loose edges, staining, odor, or moisture. Check both the repaired area and the suspected entry path, particularly after heavy weather, storage, and seasonal temperature changes.
Create a recurring exterior inspection routine covering:
- Roof transitions and edges
- Sealants around roof components
- Windows and doors
- Vents, hatches, lights, and access panels
- Trim, rails, and molding
- Exterior compartments
- Cracks, holes, and previous repairs
- Awnings, ladders, and mounted hardware
- Slide-out openings and adjacent seals
Correct damaged seals and active leaks promptly. Maintain the roof according to its manufacturer’s requirements, preserve ventilation during storage, use compatible washing and finish-care products, and use sheltered storage where practical.
One commercial repair article recommends roof inspections at least twice per year, but that schedule is not a universal manufacturer requirement. The appropriate interval depends on the RV, roof system, climate, storage, travel, and applicable maintenance instructions. See the article’s preventive inspection suggestions.
Long-term success rates for injection repairs are not established by the available vendor statements and forum anecdotes. Seasonal monitoring remains prudent even when the wall feels solid immediately after cure.
For a used RV with current or repaired delamination, request:
- Leak history
- Inspection findings
- Moisture observations or readings
- Repair photographs
- Invoices
- Product details
- A list of replaced materials
- Any transferable warranty
A documented, localized repair over sound material is not the same risk as an unexplained bubble or a recently concealed wet wall. Evaluate the cause, scope, repair quality, remaining uncertainty, price, and overall vehicle condition rather than accepting or rejecting the RV based only on the word “delamination.”
Frequently asked questions about RV delamination
Can RV delamination be repaired without replacing the whole wall?
Yes, in some cases. A localized closed-wall separation may be rebonded when the backing is dry, clean, sound, stable, reachable, and fully clampable. An exposed but limited area may also permit localized open-wall repair or section rebuilding.
Whole-wall replacement becomes more likely when damage is widespread, backing or insulation has deteriorated, foam or framing is weak, several layers have failed, or the exterior skin is extensively open. The visible area alone does not determine the repair scope.
Can I inject epoxy if the plywood or luan is wet or rotten?
Injection should not be treated as a substitute for sound backing. Wet material must first be dried and investigated. Rotten, missing, crumbling, or severely separated plywood generally requires removal and replacement.
Even after wood dries, prior swelling or decay may have left it too weak to hold a dependable bond. Owner discussions repeatedly identify substrate condition as a central limitation: adhesive may attach to the remaining surface without restoring failed material beneath it. See the substrate concerns raised in this owner discussion.
Do bubbles, soft spots, or a hollow sound prove that an RV is delaminated?
No. They identify an area that deserves investigation, but they do not prove which layer failed or whether concealed material is wet or rotten.
Similar symptoms can result from impact deformation, isolated finish damage, weak foam, plywood-ply separation, heat-related distortion, or failure at another bond line. Compare the area with unaffected wall sections, inspect nearby openings and seams, and seek model-specific construction information when the cause remains uncertain.
How much does RV delamination repair cost?
There is no dependable universal price. Cost depends on wall construction, affected area, hidden moisture, access, clamping difficulty, replacement materials, labor, leak correction, resealing, remediation, and finish matching.
For scale, one seller listed a closed-wall injection kit at $162, but that price excludes diagnosis, tools, leak correction, access work, replacement materials, refinishing, and labor. The seller’s coverage figure is qualified and does not predict the amount required for a particular wall. See the seller’s current listing.
Obtain itemized quotes based on an inspection and compare any major repair with the RV’s value and overall condition.
Should I buy a used RV that has current or repaired delamination?
Do not decide from surface appearance alone. Current unexplained delamination creates uncertainty about active leakage, hidden rot, wet insulation, weak foam, framing damage, and total repair scope.
A repaired area may present less uncertainty if the seller can document the cause, inspection findings, materials replaced, products used, photographs, invoices, and warranty. Have the RV inspected, confirm whether the initiating problem was corrected, and account for remaining uncertainty in the purchase decision. RV LIFE broadly cautions buyers about hidden damage, but that warning does not prove every repaired RV is a poor purchase. Review its used-RV cautions and inspection indicators.
Treat RV delamination as a concealed-wall diagnosis before treating it as an adhesive project. Stop the suspected leak, determine which materials and bond line may have failed, and confirm that the remaining substrate is dry, sound, reachable, and clampable. Localized closed-wall separation may justify a carefully planned rebond under product-specific instructions. Wet backing, rot, weak foam, open separation, structural involvement, or widespread damage changes the job from gluing to reconstruction. When those conditions cannot be ruled out, an inspection and itemized professional repair plan are safer than using a kit to conceal an unresolved problem.