
Hairline Crack in Acrylic Tub: Repair or Replace?
A hairline crack in an acrylic tub is not automatically harmless, but it does not automatically require replacement. The line’s appearance cannot establish how…
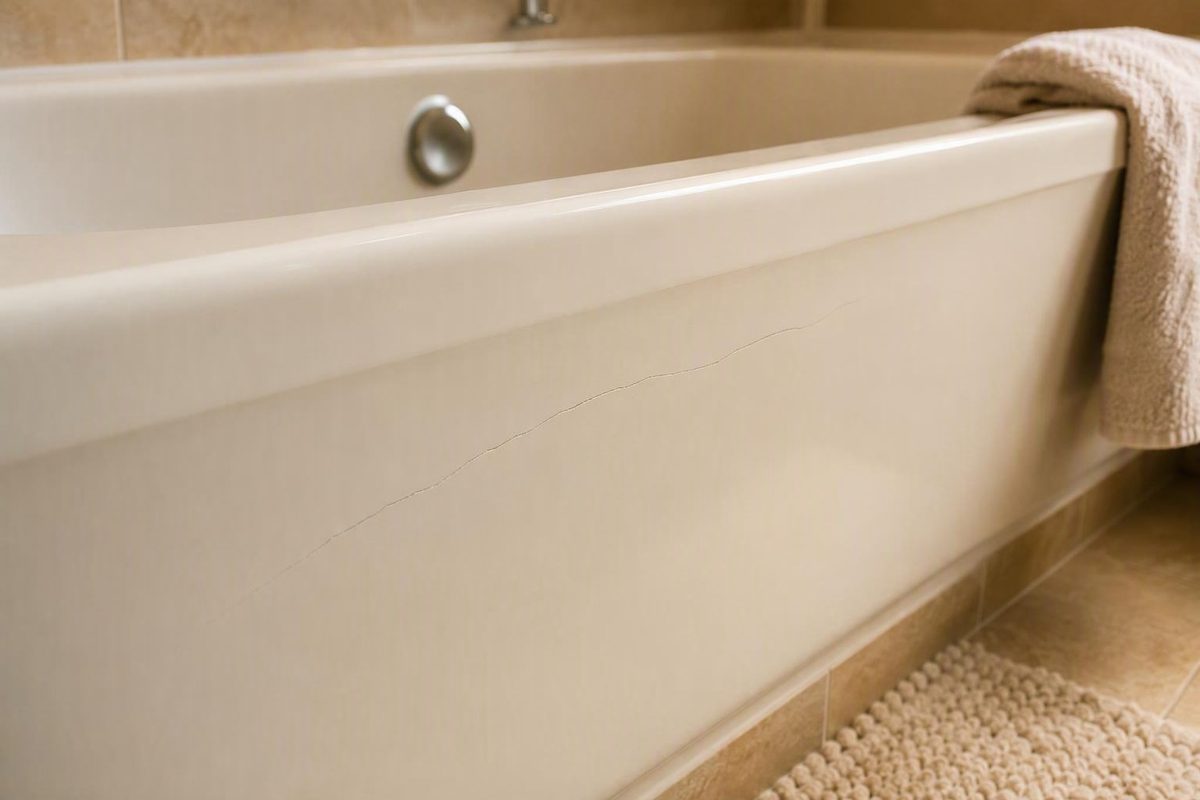
A hairline crack in an acrylic tub is not automatically harmless, but it does not automatically require replacement. The line’s appearance cannot establish how deeply it extends, whether water can pass through it, or whether the shell is moving because of inadequate support.
Before sanding or filling anything, document the damage, identify the tub, review the applicable warranty terms, and check for movement and moisture. Reserve DIY repair for one small, stable, non-leaking crack in a firm area. Flexing, softness, branching, recurrence, or possible leakage calls for qualified assessment before cosmetic work begins.
This is general troubleshooting guidance. The tub manufacturer’s documentation and the repair product’s technical and safety instructions control whenever they differ from a generic procedure.
First decide whether to stop using the tub
Use this three-level triage as a screening tool, not as proof of structural safety.
| Triage level | What you observe | What to do |
|---|---|---|
| Likely limited damage | One unchanged line; the area feels firm; no branching, softness, movement, staining, odor, or visible moisture | Document the damage and check warranty terms before altering it. Then determine whether manufacturer service, professional repair, or a compatible DIY system is appropriate. |
| Uncertain—inspection needed | Depth is unclear; the crack is in the basin floor, near a drain or fitting, or in another loaded area; nearby spaces cannot be inspected; or the cause is unknown | Limit use and arrange review by the manufacturer, installer, or a qualified tub-repair specialist. Do not repeatedly load the area to test it. |
| Urgent—stop using | The crack is growing or branching; the shell flexes or feels soft; sharp edges have formed; more cracks are appearing; or there is moisture, staining, musty odor, or nearby floor damage | Keep people off the affected area and seek qualified assessment. Contact a plumber as well if active water or plumbing leakage is suspected. |
Commercial troubleshooting guidance identifies flexing, soft spots, expanding cracks, stains, and musty odors as reasons to stop using the tub and investigate further. These observations are warning signs rather than a diagnosis of the concealed condition (HOROW’s bathtub-crack guide).
A single unchanged line in a rigid area, with no moisture or movement, may be a candidate for further evaluation rather than immediate replacement. That conclusion is deliberately narrow: it means repair may be possible, not that the tub has been proven safe.
Moisture below or behind the tub, discolored materials, a musty smell, or damage to nearby flooring may indicate escaping water. A narrow crack may admit water, but those warnings do not establish that mold, rot, or structural damage is already present. That requires inspection. A remodeling company that advocates replacement also identifies water entry and inadequate support as concerns, although its recommendations should be read in light of its commercial interest in replacement work (Total Bath Systems’ repair-versus-replacement discussion).
Do not repeatedly step on, press, or fill a flexing tub to see whether the crack changes. As a conservative precaution, stop testing if gentle initial inspection reveals movement and keep people off the weakened section until it has been assessed.
Is it a scratch, crazing, or a crack through the shell?
The following terms are useful visual categories, not definitive diagnoses:
- Crack: A fracture that may extend into or through part of the acrylic construction. It may be straight, curved, branched, separated, or discolored.
Clean and dry the area using a method permitted by the tub manufacturer. Examine it under bright light from several angles. Photograph the entire area, then take a close-up with a ruler or another fixed scale beside the line. Record the date, length, location, and visible branching.
During a gentle inspection, note whether:
- The line catches a fingernail.
- Its edges appear raised or separated.
- It branches at either end.
- Its appearance changes under light pressure nearby.
- The surrounding surface is discolored.
- The area feels soft or moves.
- Similar lines are appearing nearby.
These observations assist with triage, but they cannot establish crack depth or structural safety. A fingernail test, tapping sound, visual estimate, or measured width cannot prove that a line is confined to the finish. Conversely, a line that catches a fingernail does not by itself prove that the shell is failing.
Location changes the immediate concern. A stable mark on a rim above the waterline generally has less exposure to standing water than damage in the basin. Use greater caution when a crack is:
- In the basin floor where people stand.
- Near a drain, overflow, faucet penetration, jet, or other fitting.
- In an area that moves under ordinary loading.
- Beside an earlier repair.
- Accompanied by staining, dampness, softness, or branching.
A plumbing-forum case involving a newly installed tub illustrates the importance of location and warranty status: the reported crack was above the water-holding area, and the owner contacted the manufacturer before attempting an irreversible DIY repair. The account is anecdotal and does not establish a general manufacturer policy (Terry Love plumbing forum discussion).
Some commercial guides use crack width or length to distinguish DIY work from professional repair. The supplied evidence does not establish any measurement as a universal safety threshold. A short crack over inadequate support may be more concerning than a longer, stable finish mark above the waterline.
Why acrylic tubs crack—and why the cause matters
Commonly cited causes include:
- A dropped object or other one-time impact.
- Installation stress or incorrect fastening.
- Uneven or inadequate support beneath the tub.
- Repeated movement of the shell.
- Concentrated loads.
- Aging or material fatigue.
- Temperature-related expansion and contraction.
- Movement in the surrounding floor or framing.
Acrylic tubs are lightweight shells and may have reinforcing material behind the visible surface. If the base or surrounding installation allows repeated movement, the shell can experience concentrated stress. A patch may cover the visible fracture, but it does not stop movement beneath or around it.
Clues associated with inadequate support include:
- A tub floor that feels soft.
- Movement under normal loading.
- Popping or squeaking.
- A crack near the center of the basin floor.
- Branching around the original line.
- A previous repair that has reopened.
A repair-product vendor identifies soft flooring, popping or squeaking, floor-center cracks, and repeated repair failure as signs associated with inadequate support. This is commercial guidance rather than a model-specific installation standard, but it supports investigating movement instead of treating only the visible line (Tub Repair Company’s overview of crack causes).
Unresolved flex is a central reason a surface repair may reopen. If the shell bends during normal use, filling the line does not remove the stress acting on the area.
Do not automatically inject expanding foam, add mortar, or attach reinforcement. Tub construction and installation requirements vary. Any correction should follow the exact manufacturer’s instructions or model-appropriate guidance from a qualified installer.
A one-time impact crack and a recurring stress crack may require different responses. Impact can damage an otherwise firm area; a recurring crack may indicate continuing movement. The visible line alone may not reveal the cause, so consider its history, location, loading, surrounding movement, and installation details together.
Choose among warranty service, DIY repair, professional repair, and replacement
Before sanding, drilling, widening, disassembling, or applying resin:
- Photograph the damage from several angles.
- Record its length, location, and discovery date.
- Find the model and serial information, if available.
- Gather purchase and installation records.
- Review the manufacturer, retailer, installer, and applicable home-warranty terms.
- Contact the responsible company before making an irreversible alteration.
Warranty consequences depend on the actual contract. A bathtub retailer advises owners of its covered tubs to contact customer service before attempting repair, while general home-warranty guidance warns that disassembly may affect coverage. These examples do not create a universal rule, but they show why the terms governing the specific tub should be checked first (Giving Tree Home’s acrylic-tub repair guidance).
DIY repair
Consider DIY repair only when all of the following are true:
- The tub has been confirmed to be acrylic.
- The damage is small and unchanged.
- The area is firm and does not move under normal conditions.
- There is no branching, softness, or recurrence.
- There are no visible moisture or leak warnings.
- The line is not an obvious through-shell opening.
- The crack is not in the basin floor, beside a drain or fitting, or in another loaded location unless the manufacturer or a qualified professional has assessed it.
- Applicable warranty terms permit owner repair.
- The chosen system explicitly supports acrylic and the specific damage type.
- You can comply with all preparation, safety, ventilation, curing, and finishing instructions.
These conditions identify a conservative candidate; they do not guarantee a successful or invisible result.
Manufacturer service or professional spot repair
Contact the manufacturer or a qualified tub-repair specialist when:
- You cannot classify the mark confidently.
- It is in the floor, near a drain, or in another stressed location.
- The tub is new or may be covered.
- Movement or moisture cannot be evaluated.
- The finish is patterned, textured, unusual, or difficult to match.
- A previous repair has failed.
- You want the least-visible practical result.
Ask for examples on a similar finish and obtain written details about the repair scope, use restrictions, treatment of any underlying movement, and repair warranty.
Refinishing
Professional refinishing may be considered when broader surface restoration is needed and the tub remains structurally sound. It can address widespread finish wear or blend a localized repair across a larger area.
Refinishing is not a remedy for active flex, leakage, inadequate support, or a failing shell. Those conditions must be evaluated separately before a new surface coating is considered.
Replacement
Replacement may be appropriate when damage is:
- Deep or through the shell.
- Growing or spreading.
- Multiple or widely branched.
- Recurrent after repair.
- Associated with flexing or softness.
- Leaking.
- Part of significant deterioration identified during qualified assessment.
Commercial sources differ: repair businesses allow spot repair or refinishing for limited damage, while some remodelers broadly favor replacement. The defensible approach is condition-based. Replacement is not mandatory for every thin mark, but substantial deterioration, leakage, or continuing movement makes cosmetic-only repair difficult to justify.
Do not base the decision on national price claims or promised service life. Available commercial estimates vary by seller, region, access, finish, and scope, and the supplied evidence does not provide comparable testing. Obtain local written estimates that separately identify surface repair, support work, plumbing work, refinishing, surrounding demolition, and full replacement.
Select an acrylic-compatible repair system
First confirm that the tub is acrylic. Do not assume every lightweight tub is acrylic or that products for fiberglass, porcelain, enamel, and acrylic are interchangeable. Check the model documentation, manufacturer label, purchase record, or manufacturer support channel.
An acrylic tub may include fiberglass reinforcement behind the visible surface. That does not make every fiberglass patch product appropriate for exposed acrylic.
Choose a system that explicitly states:
- Compatibility with acrylic bathtubs.
- Suitability for cracks rather than only chips, scratches, or stains.
- Suitability for the repair location and expected water exposure.
- Compatibility with the tub’s color and finish.
- Complete preparation, mixing, application, safety, curing, and finishing requirements.
Common commercial kits use a two-part acrylic repair compound, resin, or compatible epoxy with a hardener. Terminology and formulations vary, so the product label and technical instructions—not the generic material name—must control. General home-warranty guidance likewise recommends identifying the tub material, choosing a material-appropriate kit, using protective equipment and ventilation, and following the package cure time (First American Home Warranty’s bathtub-repair guide).
Depending on the approved system, general supplies may include:
- Mild cleaning materials permitted by both the tub and kit manufacturers.
- Clean water, if rinsing is required.
- Soft, lint-free cloths.
- The abrasive types and grits specified by the kit.
- Approved measuring, mixing, and application tools.
- Disposable gloves and eye protection.
- Ventilation required by the product instructions.
- Masking materials, if permitted.
- The finishing compound, polish, or topcoat specified by the system.
Do not present silicone caulk, an unspecified household filler, or an arbitrary adhesive as a structural acrylic-crack repair. Such materials may conceal the line without providing a suitable acrylic repair or addressing movement.
Do not improvise with solvents, abrasive cleaners, fiberglass mesh, makeshift backing, crack widening, or drilling unless the tub manufacturer or repair-system instructions specifically require the step. Commercial cleaning and preparation recommendations conflict, making product-specific instructions particularly important.
If appearance matters, establish realistic expectations before application. If the system permits a cured color sample, compare it with the tub under bathroom lighting.
A cautious DIY process for an eligible minor crack
Do not proceed merely because the crack looks thin. Stop the DIY process if inspection or cleaning reveals movement, branching, softness, moisture, an opening through the shell, or any change since the damage was documented.
Because the evidence pack does not include a tub manufacturer’s repair manual or a repair product’s technical data sheet, the process below is intentionally high-level. The exact tub documentation and repair-system instructions override every generic step.
1. Document the damage and check coverage
Photograph and measure the line, record its location, and identify the tub model and material. Note whether it is on the rim, wall, basin, floor, or beside a fitting.
Complete the warranty check before altering the surface. Do not assume that reporting an owner-applied repair later will be treated the same as reporting the original damage.
2. Inspect accessible adjacent spaces
Without dismantling covered components, inspect any existing access panel, open ceiling below, unfinished wall side, or visible flooring edge. Look for:
- Dampness or droplets.
- Staining or tide marks.
- Softened or swollen materials.
- Musty odors.
- Visible support movement.
- Plumbing leakage near the drain, overflow, or supply connections.
A dry accessible area is useful information, but it does not rule out an intermittent or concealed leak.
3. Clean and dry the repair area
Use only a cleaning method permitted by both the tub manufacturer and the repair kit. Remove soap film and residue, rinse if instructed, and allow the surface and crack to dry completely.
Do not substitute a strong solvent or abrasive cleaner because a generic tutorial recommends one. An unapproved cleaner may affect the finish or interfere with adhesion.
4. Prepare only the prescribed footprint
Commercial acrylic-repair guidance commonly describes cleaning, light sanding, application, curing, and finish sanding, while directing users to follow the kit manufacturer’s mixing and drying requirements (American Bath Industries’ acrylic crack-repair guide).
The selected system must determine:
- Whether sanding is required.
- The abrasive type and grit.
- How far preparation extends beyond the line.
- Whether the glossy surface should be dulled.
- How preparation dust must be removed.
- Whether a finishing coat needs a separate preparation stage.
Avoid removing more surface material than the approved procedure requires.
5. Do not automatically drill or widen the crack
Do not drill a stop-hole, gouge a channel, or widen the line unless model-specific manufacturer instructions or the selected repair system expressly requires it.
These operations are irreversible. If a kit calls for deeper preparation than expected, pause and confirm that both the tub and the damage are within the system’s intended use.
6. Measure and mix exactly
If the system uses two components:
- Follow the specified ratio.
- Use the approved measuring and mixing method.
- Observe the stated working time.
- Comply with temperature and humidity limits.
- Prepare only the amount that can be applied in time.
- Do not add solvent, pigment, hardener, or filler unless permitted.
Do not estimate ratios or attempt to extend working time.
7. Apply as directed
Use the supplied or approved tool and apply the material only over the prepared footprint. If the system permits multiple thin applications, follow its sequence rather than assuming that one thick mound will be stronger.
Keep the compound away from drains, seals, jets, and fittings unless the instructions expressly address those locations.
8. Allow the full specified cure
Protect the repair from water, dust, cleaning, touching, and loading for the full specified period. Maintain the environmental and ventilation conditions required by the product.
Some commercial acrylic-repair guidance mentions a cure period of at least or approximately 24 hours, but product cure times vary and that figure is not a universal waiting period (Giving Tree Home’s acrylic-tub repair guidance).
9. Finish in the specified sequence
Once the product reaches the required cure stage, finish-sand, feather, polish, or apply the supplied topcoat only as directed. Use the specified abrasives in the stated order and remain within the intended repair area.
Do not add unrelated paint, polish, or coating merely to improve the match unless the approved system permits it.
10. Keep the tub out of service until all requirements are met
Do not fill, stand in, clean, cover, or otherwise load the tub until every applicable cure and post-cure requirement has been satisfied. If the instructions specify different intervals for sanding, handling, polishing, and water exposure, follow each one.
Before returning the tub to use, photograph the completed repair under the same lighting and with the same scale used for the original documentation. This becomes the monitoring baseline.
Investigate support and possible moisture separately from the surface repair
A cracked tub can involve three separate workstreams:
- Surface repair: Sealing and finishing the visible acrylic.
- Support correction: Addressing inappropriate movement of the tub or base.
- Moisture investigation: Locating any water source and evaluating affected materials.
Completing the visible repair does not establish that support and moisture concerns have also been resolved.
Where access already exists, inspect beneath or behind the tub for dampness, stains, softened materials, odors, plumbing drips, and movement. Do not dismantle covered assemblies merely for a casual check, particularly while warranty coverage may apply. A dry opening cannot rule out water that appears only while the tub is occupied, filled, or draining.
If there is active water, damaged flooring, a ceiling stain below, or suspected drain, overflow, or supply leakage, contact an appropriate plumber. If building materials are wet or damaged, a water-damage professional may also be needed.
For movement, squeaking, poor bedding, or installation concerns, contact the tub manufacturer or a qualified installer familiar with the model. Ask:
- What support method does this model require?
- Can the support be corrected without removing the tub?
- Is access from below or behind permitted?
- Could the proposed work affect applicable warranty coverage?
- Must the tub be removed to inspect the base?
- Should support correction occur before the visible crack is repaired?
Do not treat injected foam, added mortar, or underside reinforcement as universal DIY solutions. The correct method depends on the tub’s construction, approved bedding system, existing installation, access, framing, and manufacturer requirements.
Arrange qualified assessment before cosmetic work when a crack is:
- In the basin floor.
- Next to a drain or fitting.
- Associated with a soft area.
- Recurrent.
- Moving under load.
- Accompanied by squeaking or popping.
- Near moisture, staining, or damaged flooring.
Resolving these questions first may increase the scope of work, but it avoids concealing a continuing failure mechanism beneath a neat-looking patch.
Let the repair cure, then monitor the tub
Follow the repair product’s full cure schedule rather than relying on appearance or a generic one-day estimate. If the instructions distinguish among sanding time, handling time, water-exposure time, and full cure, satisfy every applicable interval.
After curing, clean the tub only with non-abrasive products approved for acrylic and permitted by the tub manufacturer. The repair system may impose additional restrictions, especially during the early post-cure period. Commercial acrylic-tub guidance recommends non-abrasive cleaning, avoiding harsh chemicals and scrubbers, and preventing impacts from dropped objects (American Bath Industries’ acrylic crack-repair guide).
Reduce avoidable stress on the repair:
- Avoid dropping bottles, tools, or shower hardware into the tub.
- Do not place concentrated loads directly on the repaired area.
- Keep prohibited cleaners, adhesives, and bathmats away from it.
- Investigate new movement or noises promptly.
Monitor the repair using the original photographs and measurements. Check after initial use and periodically during normal cleaning. Watch for:
- A returning line.
- New branching.
- Color or gloss changes.
- Edge lifting or separation.
- Moisture or staining.
- Musty odors.
- Squeaking or popping.
- Softness or movement.
If the crack reopens, stop treating it as a simple finish defect. Reassess product compatibility, preparation, curing, shell movement, support, and the possibility that the damage extends more deeply than first thought.
Do not repeatedly layer filler over the same moving crack. Recurrence warrants manufacturer or professional review and a separate investigation of support and moisture.
Even a stable repair may remain somewhat visible. Color, gloss, texture, and feathered edges can differ from the original finish, and the available evidence does not support promising an invisible or permanent result.
Can I use an acrylic tub while it has a hairline crack?
Possibly, but the thin appearance alone cannot establish that continued use is safe. One unchanged line in a firm area, with no branching, softness, movement, moisture, staining, odor, or nearby floor damage, may be evaluated rather than treated as an automatic replacement.
Stop using the tub if the crack grows or branches, the shell flexes, the area feels soft, sharp edges form, more cracks appear, or possible leak warnings develop. Keep people off a flexing area instead of repeatedly loading it for testing.
Can a hairline crack in an acrylic tub be repaired without replacing the tub?
Yes. Some limited cracks can be repaired without replacing the tub. A conservative DIY candidate is small, stable, non-leaking, located in a firm and low-stress area, and free of branching, softness, recurrence, or evidence of inadequate support.
Cracks in the basin floor, near fittings, or in moving areas should be assessed before repair. Deep, spreading, multiple, recurrent, leaking, or flex-associated damage may make professional repair or replacement more appropriate.
What type of repair kit should I use on an acrylic tub?
Use a product explicitly labeled for acrylic bathtubs, the specific damage type, the repair location, and the relevant finish. A system may contain a two-part acrylic compound, resin, or compatible epoxy with hardener, but the product instructions must confirm suitability.
Do not assume a fiberglass-only kit is appropriate merely because the tub may contain fiberglass reinforcement. Silicone caulk, unspecified household fillers, and arbitrary adhesives should not be treated as structural acrylic-crack repairs.
Should I drill a stop-hole at the end of the crack?
Not by default. The supplied evidence does not establish stop-drilling as necessary or appropriate for every acrylic-tub crack.
Do it only when the exact tub manufacturer or selected acrylic-compatible repair system expressly requires it for that model and method. Otherwise, consult the manufacturer or a qualified specialist before drilling.
Why did the acrylic-tub crack reopen after I patched it?
Possible causes include continuing shell movement, inadequate or uneven support, unsuitable repair material, incomplete preparation, incorrect mixing, insufficient curing, deeper-than-expected damage, or a new impact.
Movement is especially important: filling the visible line does not remove the stress if the tub continues to bend during use. A recurring crack—particularly one accompanied by squeaking, softness, branching, or moisture—calls for manufacturer or professional assessment rather than another layer of filler.
Do not make the repair decision from the line’s thin appearance alone. Document the damage, check the warranty, consider its location, and look for movement or moisture before altering the tub. One stable minor crack in a firm, dry area may suit a manufacturer-permitted, acrylic-compatible repair system. Flexing, leakage, branching, recurrence, or softness requires assessment of the underlying cause before cosmetic patching.